
Historique de la page
...
| Sv translation | |||||||||||||||||||||||||||||||||||||||||||||||||||||||||||||||||||||||||||||||
|---|---|---|---|---|---|---|---|---|---|---|---|---|---|---|---|---|---|---|---|---|---|---|---|---|---|---|---|---|---|---|---|---|---|---|---|---|---|---|---|---|---|---|---|---|---|---|---|---|---|---|---|---|---|---|---|---|---|---|---|---|---|---|---|---|---|---|---|---|---|---|---|---|---|---|---|---|---|---|---|
| |||||||||||||||||||||||||||||||||||||||||||||||||||||||||||||||||||||||||||||||
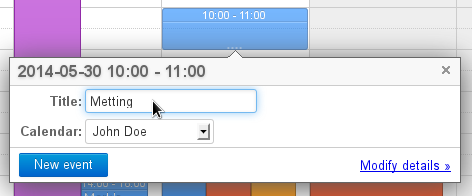
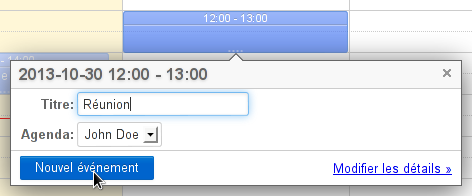
Creating eventsQuick-creating an event
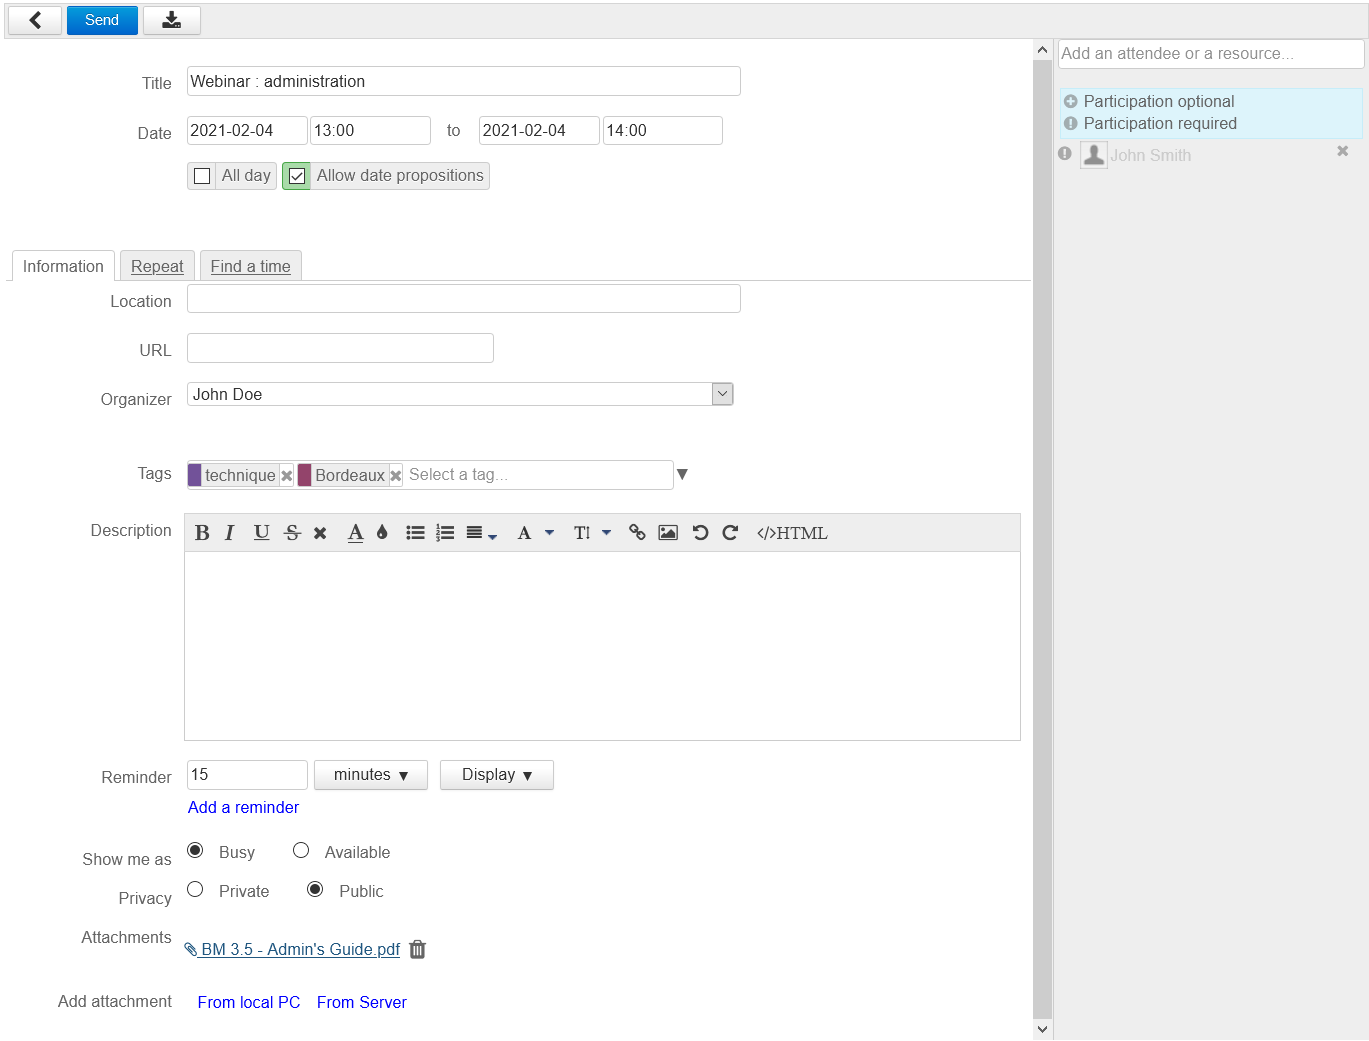
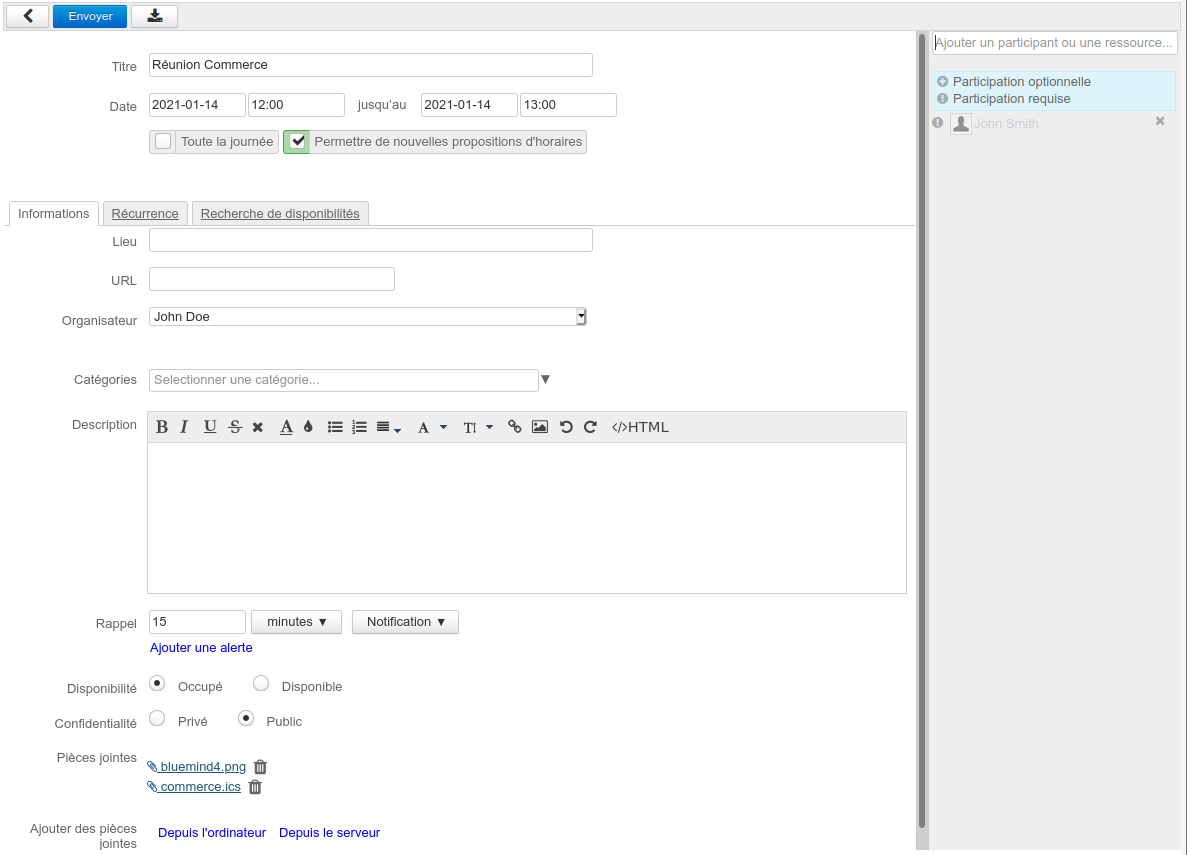
The "Modify details" link takes you to the detailed event creation window. Creating a detailed eventClick "New event" at the top of the sidebar to open the event creation window:
Key event details are shown at the top of the page:
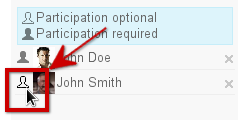
You can invite others in the right-hand side of the window. Click the icon before each guest's name to set their participation as optional or required:
Note:
Tabs give you access to additional features: recurring events and availability search. Event propertiesThe "Information" tab is used to set key event properties:
Recurring eventsGo to the "Repeat" tab to set how often an event is repeated: daily, weekly, monthly or yearly.
To delete one instance of an event:
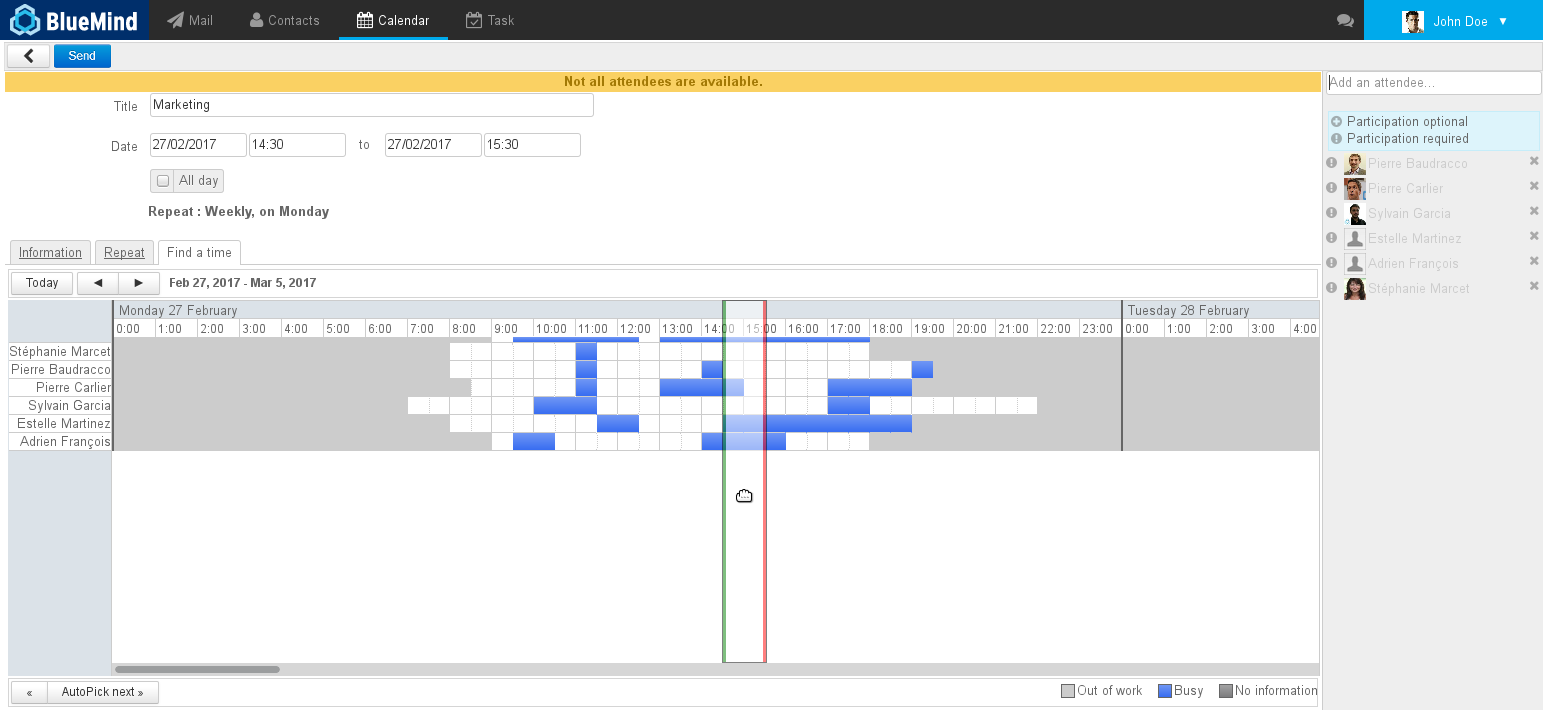
Availability searchThe "Find a time" tab is used to search for a common available time slot for event guests:
BlueMind automatically suggests the first available slot, shown between a green line and red line, based on the date entered in the form. You can drag and move the whole slot with your mouse, or widen or narrow it by dragging the green and red lines separately.
BlueMind Mail's linked attachments service allows you to attach files to calendar events – from version 3.5.13.
Once it is linked to an event, the file is available for download in the event details section at any time and it is sent in the invitation email to the event's participants if appropriate.
Adding/Deleting filesTo add a file:
If you have the appropriate role enabled – i.e. "Drive" – a second link is available:
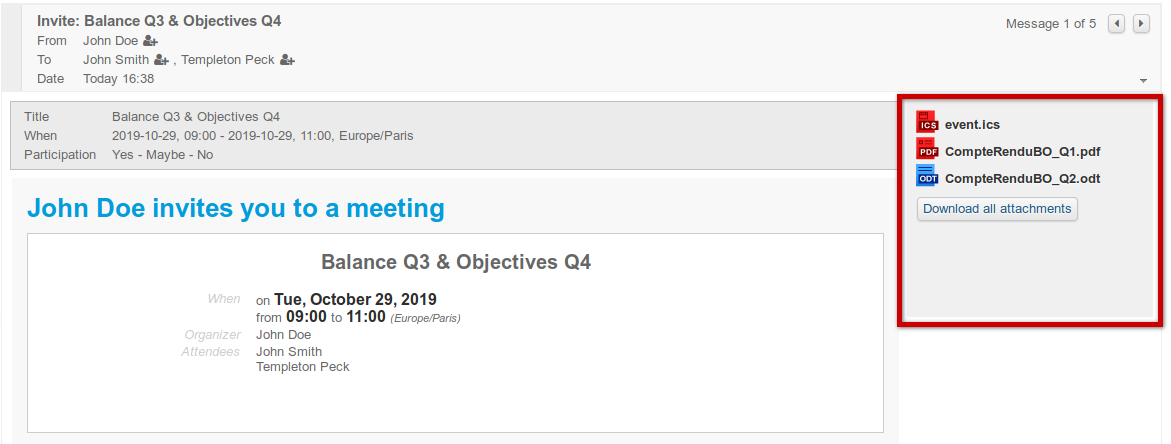
Click the trash Sending files to event attendeesFiles attached to an event are sent to attendees in the invitation email:
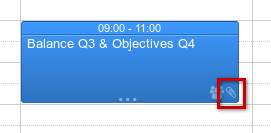
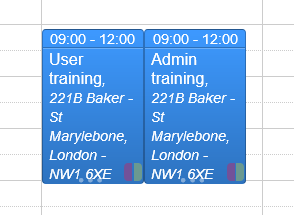
Downloading a fileWhen an event has an attachment, a paperclip is shown in calendar view:
Files attached to an event can be downloaded at any time by opening the event's editing form:
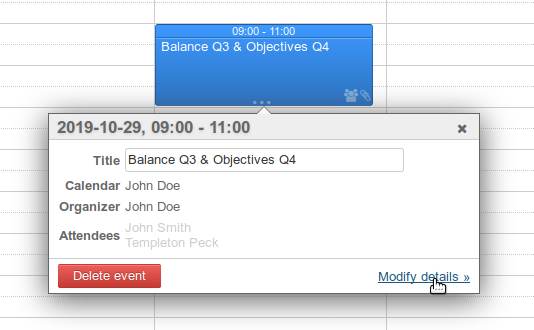
Modifying eventsTo modify an event:
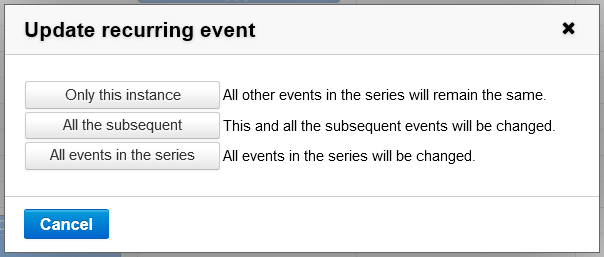
When you make changes to a recurring event – either by sliding the time slot in the calendar or using the event form – you are prompted to choose one of the following options:
Event duplication
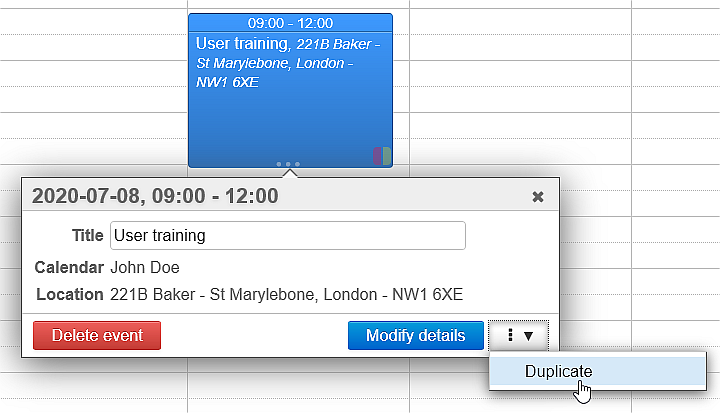
GeneralTo duplicate an event:
Recurring eventFor recurring events, the duplication drop-down menu offers two options:
Meetings (events with guests)When you duplicate a meeting, the new meeting is created with the same participants. The new meeting is considered as a new independent meeting:
Shared calendarIf the duplicated event is on another user's calendar, there are several scenarios:
Examples with two users
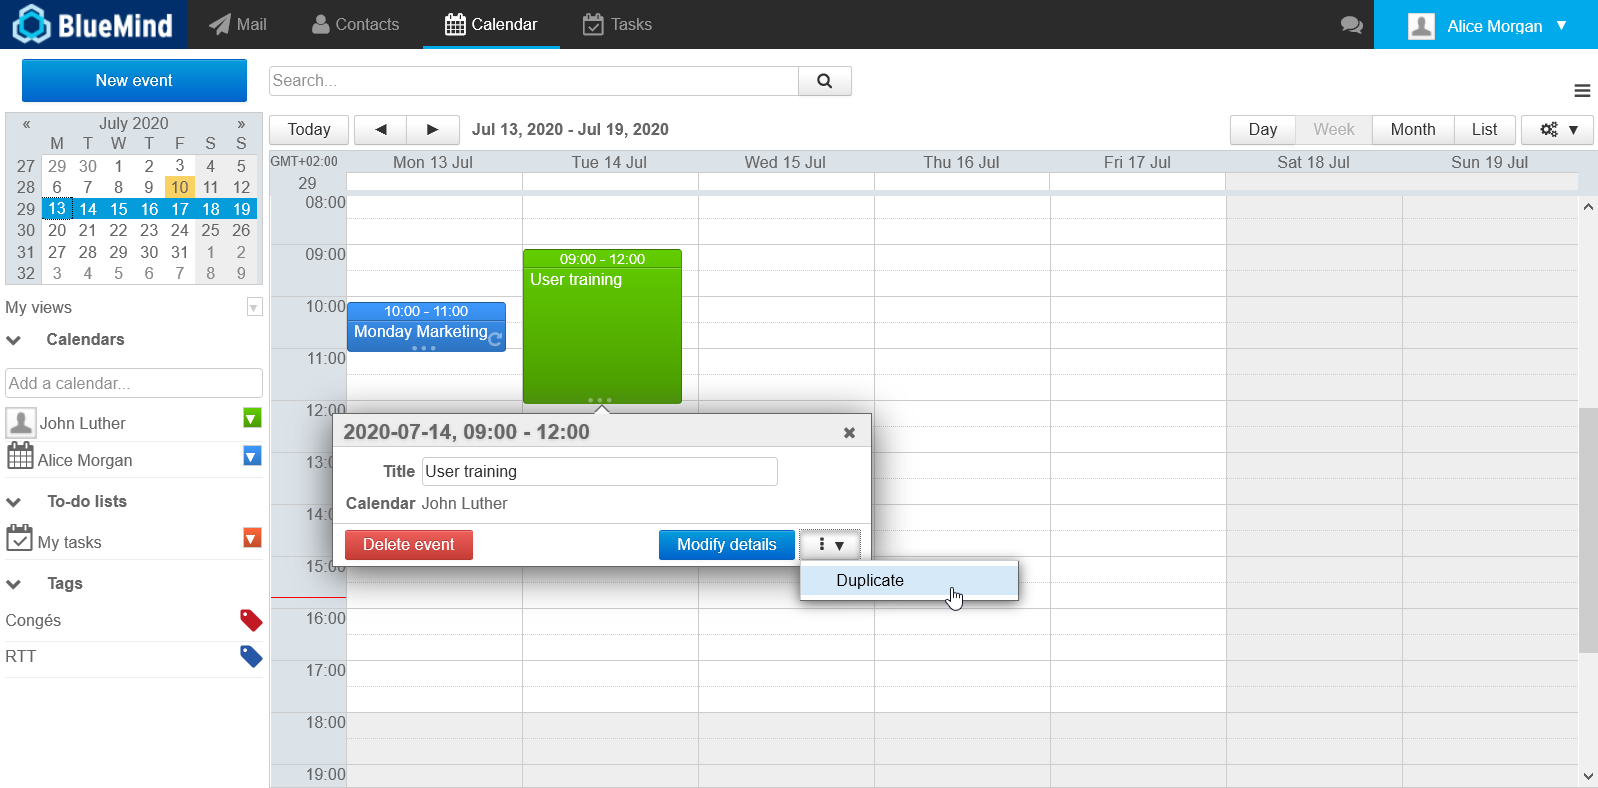
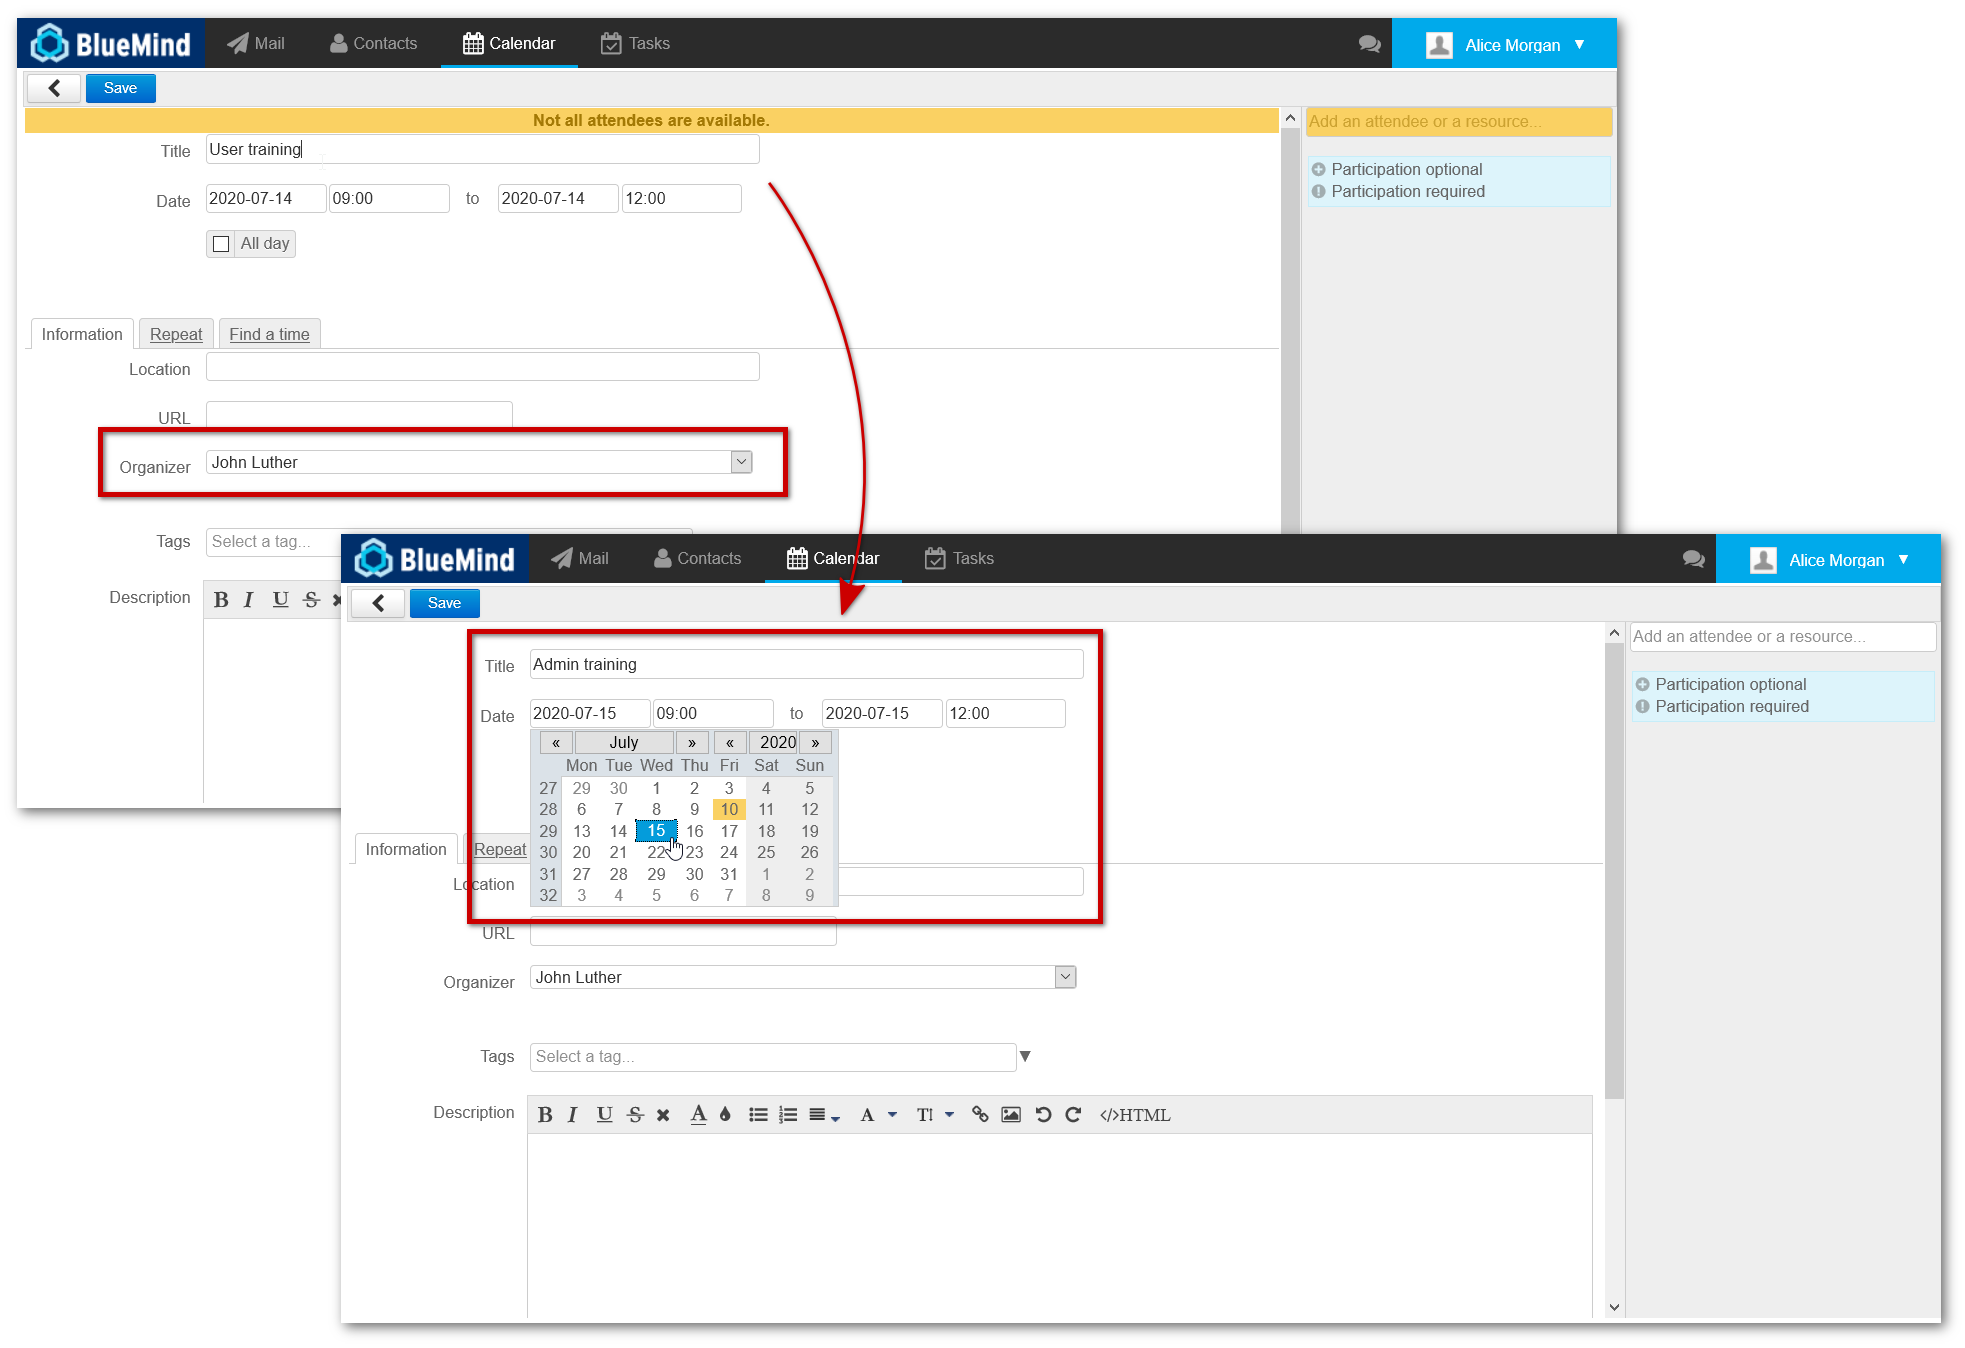
First example: Alice wants to create a new training session based on an existing one in John's calendar.Alice opens John's calendar and clicks his event "User training" then "Duplicate":
As Alice has read/write rights, the organizer stays the same, the target event will still be on John's calendar. Alice edits the event and changes the title to "Admin training" the next day:
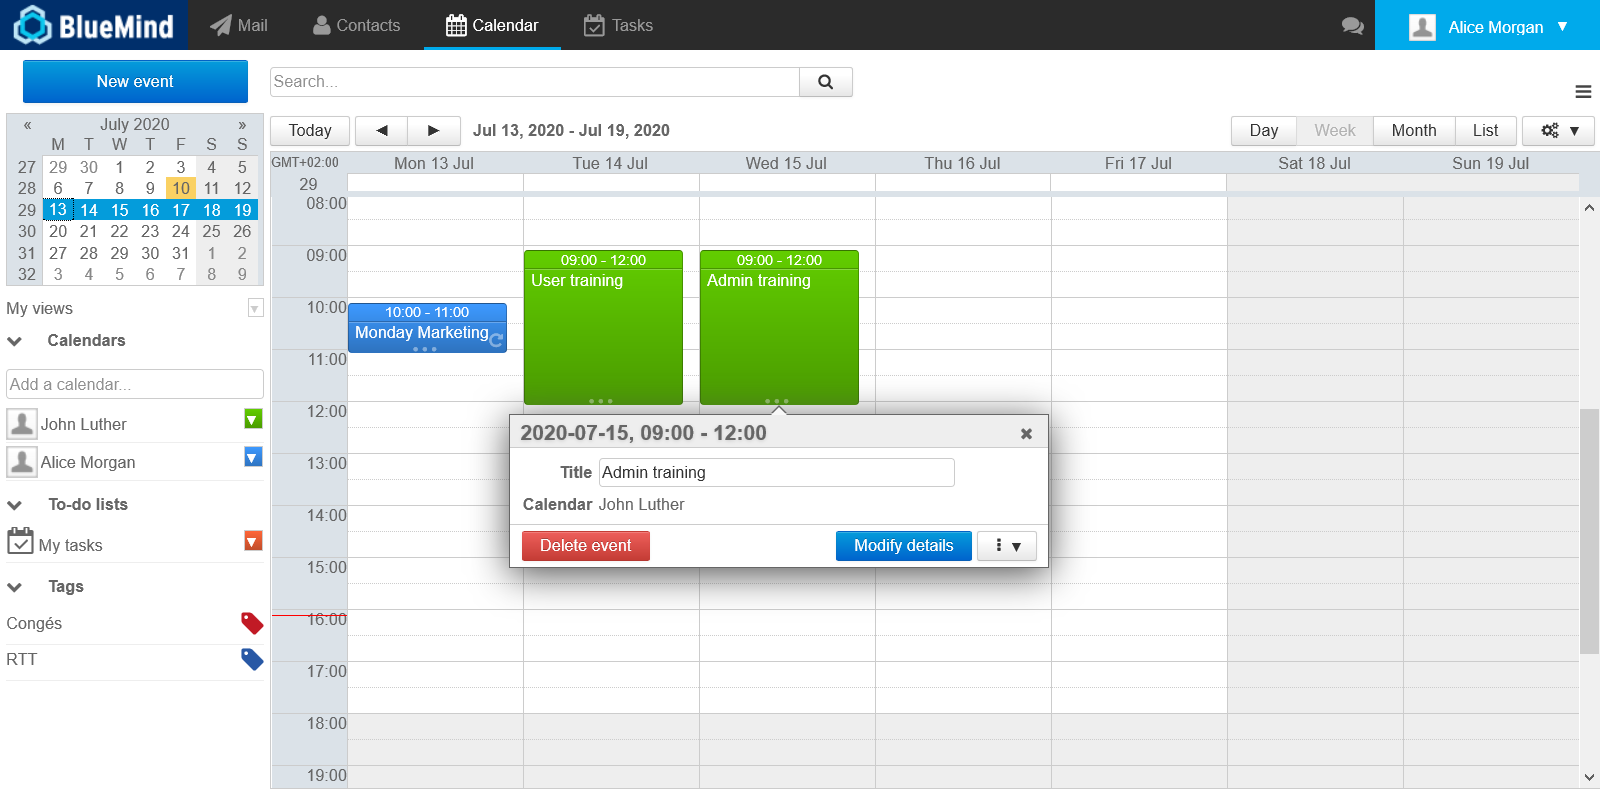
Once it is saved, the new event is shown on John's calendar:
Second example: John wants to copy a meeting organized by Alice to organize his own event the following week.Although he doesn't have read/rights on Alice's calendar, John can still duplicate her events:
The event is then copied on his own calendar (i.e. he becomes the organizer) and Alice is invited to the meeting:
John edits the date to organize the meeting himself the following week:
After it is saved, the meeting is shown in their calendar with the new settings:
The original meeting remains unchanged:
Deleting eventsTo delete an event:
Attending eventsDisplayIn Calendar, events are shown differently depending on your attendance status:
Responding to event invitationsTo accept or decline an invitation:
For more information, please see L'agenda
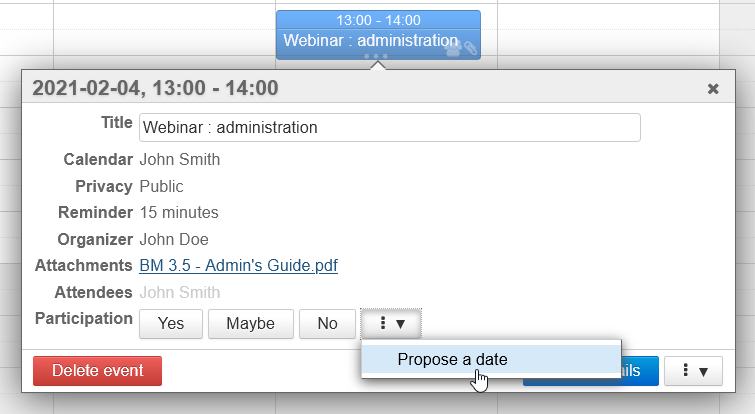
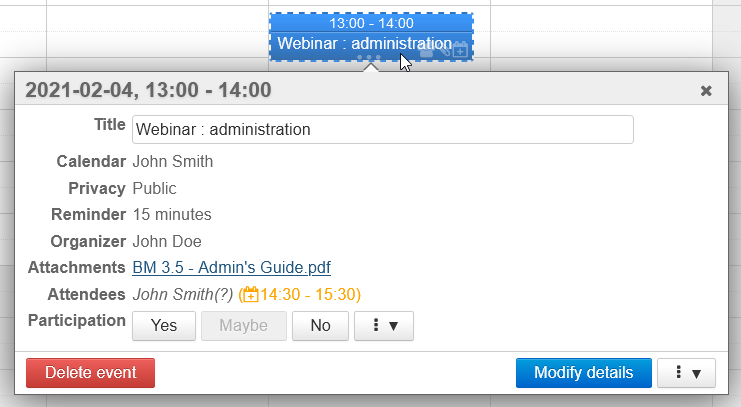
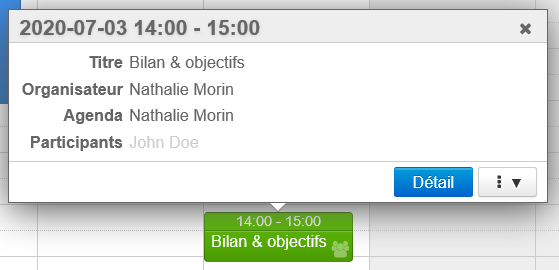
When the meeting's organizer has allowed participants to (see above §1.2 Creating a detailed event), a dedicated menu is then shown in the calendar's event popup window:
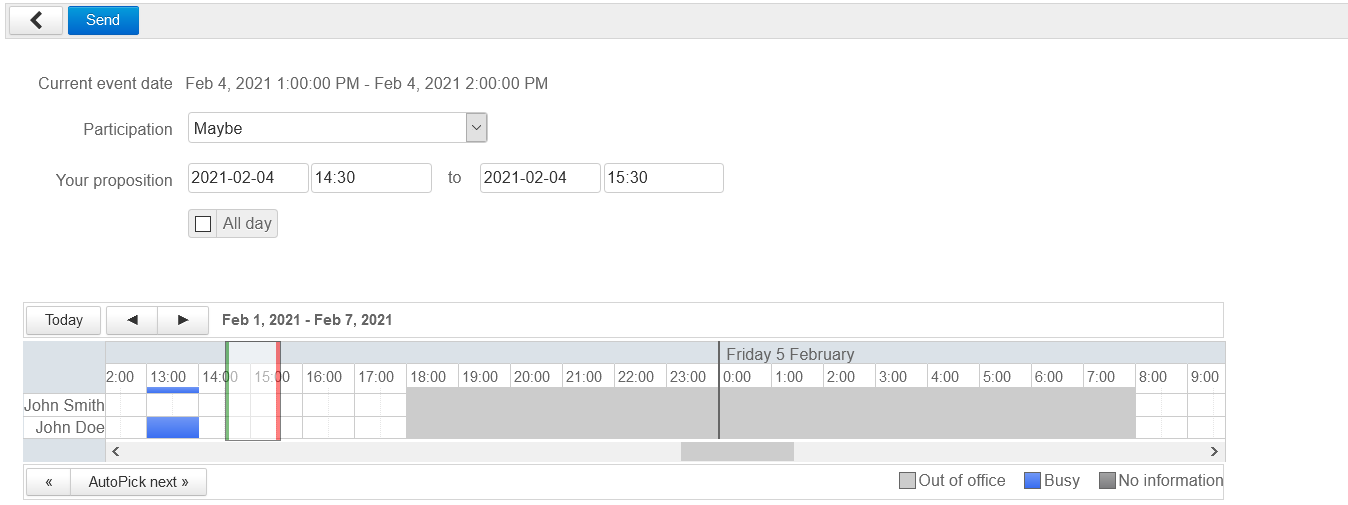
By clicking it, a search and proposal form opens:
You can then choose:
Once the form is filled in, click "Send" at the top of the page to send the proposal to the organizer.
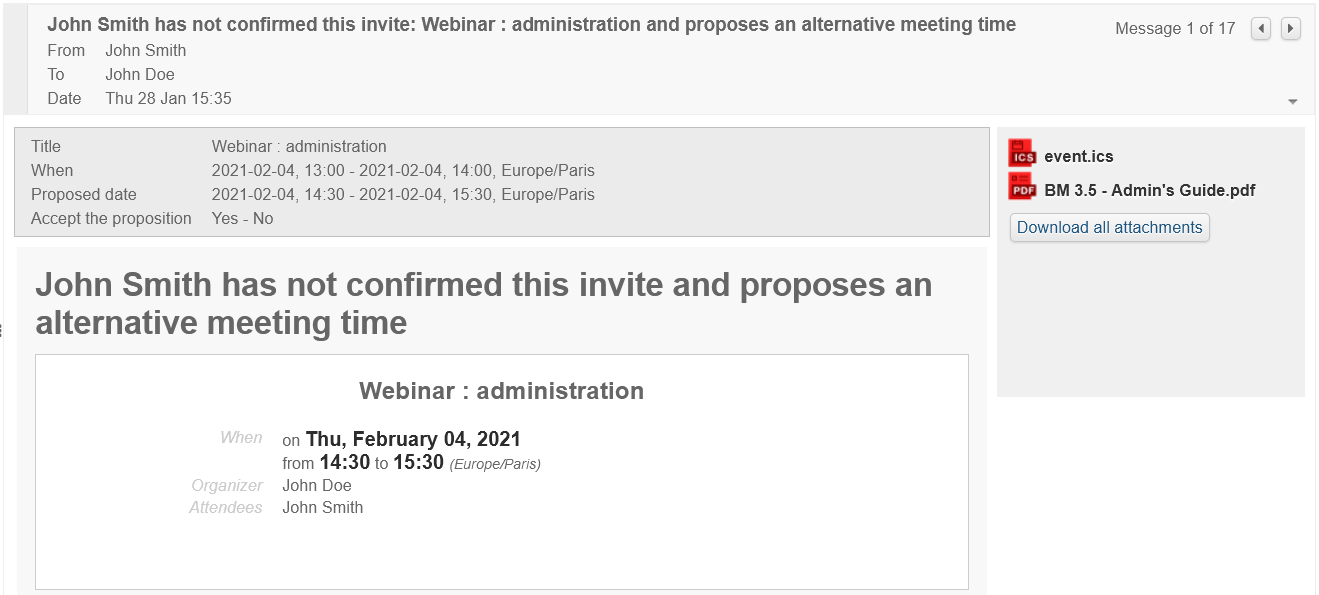
The organizer receives a message like this one:
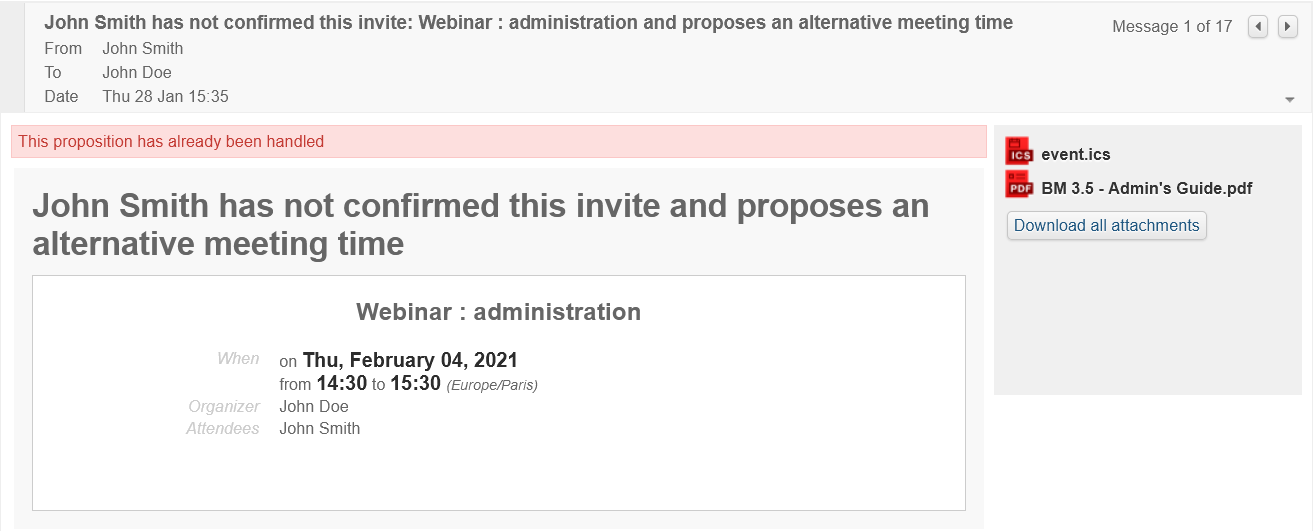
An infobox summarizes the information and proposes the appropriate links to accept or decline the new date/time.
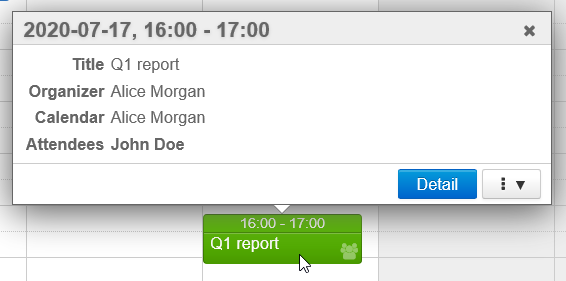
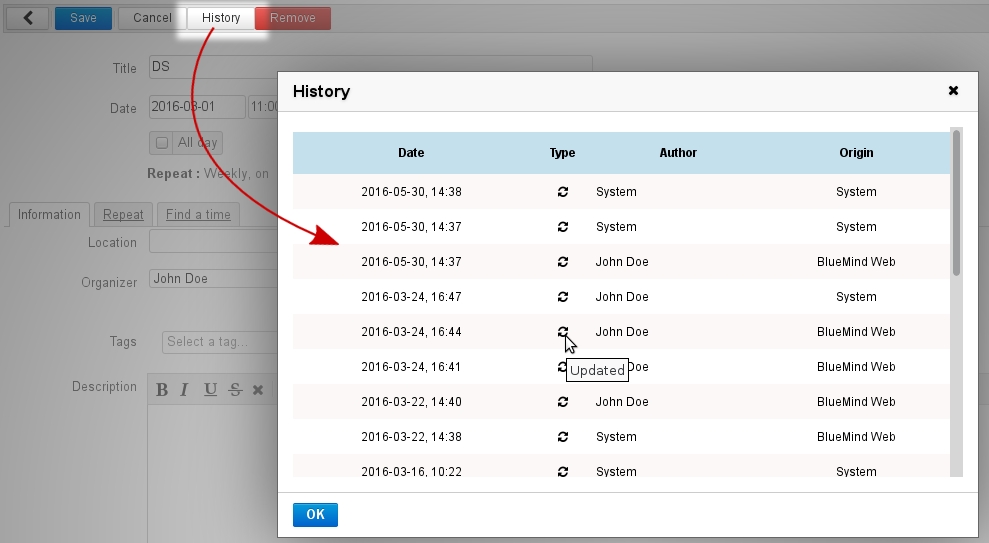
Event historyYou can view event creation and editing history. In an event's detailed view, click "History":
Event history shows:
| |||||||||||||||||||||||||||||||||||||||||||||||||||||||||||||||||||||||||||||||
| Sv translation | |||||||||||||||||||||||||||||||||||||||||||||||||||||||||||||||||||||||||||||||
|

| Volet | ||||
|---|---|---|---|---|
| ||||
Auf dieser Seite:
Verwandt: |
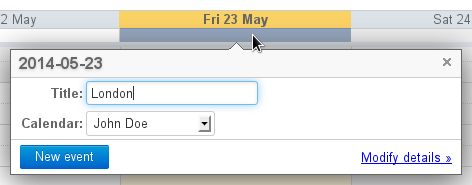
- Für einen Termin, der den ganzen Tag dauert, klicken Sie oberhalb der Zeitfenster auf den entsprechenden Tag:
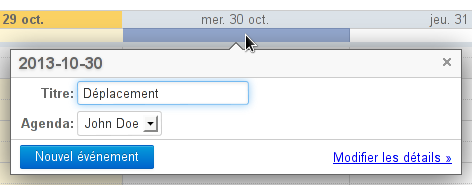
Wenn sich der Termin über mehrere Tage erstreckt, ziehen Sie die Maus über die entsprechenden Tage. - Machen Sie die erforderlichen Angaben:
- Titel
- Kalenderauswahl: Die persönlichen Kalender des Benutzers oder Kalender, die mit Schreibberechtigung für ihn freigegeben wurden, können ausgewählt werden.
Es werden nur die in der aktuellen Ansicht angezeigten Kalender aufgeführt.
Klicken Sie auf "Neues Ereignis".
Der Termin wird erstellt.
Info title Standardmäßige Verfügbarkeit Ein kurzes Ereignis mit Datum und Uhrzeit für Beginn und Ende wird standardmäßig mit "Beschäftigt" angezeigt.
Ein ganztägiges Ereignis wird standardmäßig mit "Verfügbar" angezeigt.
Wenn Sie auf die Schaltfläche "Details ändern" klicken, wechseln Sie zur umfassenden Erstellung des Termins.
Umfassende Erstellung:
Klicken Sie auf die Schaltfläche "Neues Ereignis" oben in der Seitenleiste, um das Fenster für die Erstellung eines Termins aufzurufen:
Im oberen Teil können Sie die wichtigsten Informationen des Termins eingeben.
Auf der rechten Seite des Fensters können Sie weitere Teilnehmer einladen. Wenn Sie auf das Symbol am Anfang der Zeile jedes Teilnehmers klicken, können Sie angeben, ob seine Teilnahme optional oder erforderlich ist:
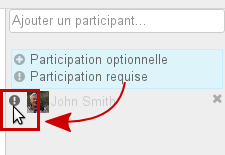
Zu beachten:
- Sie können alle Ihnen bekannten Personen aus der Domain einladen, die Ihnen diese Berechtigung erteilt haben (Freigabe "Kann mich einladen" siehe Abschnitt Freigabe des Kalenders).
- Sie können jede Person einladen, die in einem Ihrer Adressbücher aufgeführt ist, und jede externe Person, indem Sie ihre E-Mail-Adresse eingeben.
- Es ist auch möglich, den Ereignissen Ressourcen zuzuordnen, indem Sie sie auf die gleiche Weise hinzufügen wie Benutzer. Dann wird eine Reservierungsanfrage an ihren Verwalter gesendet.
- Beim Hinzufügen einer Gruppe werden die Mitglieder einzeln hinzugefügt.
Die Registerkarten "Wiederholen" und "Zeit finden" gestatten den Zugriff auf zusätzliche Funktionen.
Eigenschaften eines Termins
Die erste Registerkarte, "Informationen", gestattet die Definition der wichtigsten Eigenschaften eines Termins:
- Ort des Ereignisses
- Organisator (hier werden Benutzer angezeigt, die Schreibberechtigungen für ihre Termine erteilt haben UND deren Kalender in der Hauptansicht angezeigt wird)
- Kategorien (Tags)
- Beschreibung des Ereignisses
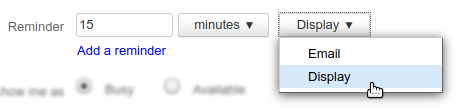
Erinnerung: Gestattet die Definition einer Erinnerung, damit das Ereignis nicht vergessen wird. In einer Dropdown-Liste können Sie die Art der Erinnerung auswählen:
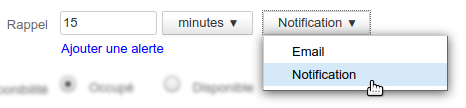
- Email: Eine Nachricht wird an den Benutzer gesendet (vorheriges Standardverhalten).
- Display: Ein Popup-Fenster mit einer Browser-Benachrichtigung wird angezeigt.
Astuce Es ist auch möglich, eine Standarderinnerung für Ereignisse einzurichten (eine vorkonfigurierte Erinnerung für jedes neue Ereignis). Für weitere Informationen siehe Einstellungen für den Kalender.
Mich anzeigen als: Gestattet Benutzern, die Ihren Kalender anzeigen, zu sehen, ob Sie während des Ereignisses erreichbar sind.
Standardmäßig werden Sie bei kurzen Veranstaltungen als "Beschäftigt" und bei ganztägigen Veranstaltungen als "Verfügbar" angezeigt.
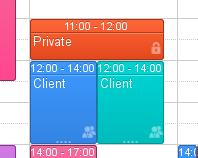
Wenn ein Benutzer sich als "Verfügbar" erklärt, wird das Ereignis in seinem Kalender mit einem hellen Rand auf der linken Seite angezeigt: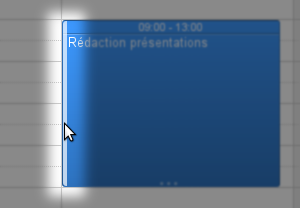
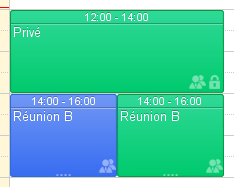
- Privatsphäre: Gestattet, den Inhalt des Ereignisses vor anderen Benutzern zu verbergen, sie sehen nur das reservierte Zeitfenster:
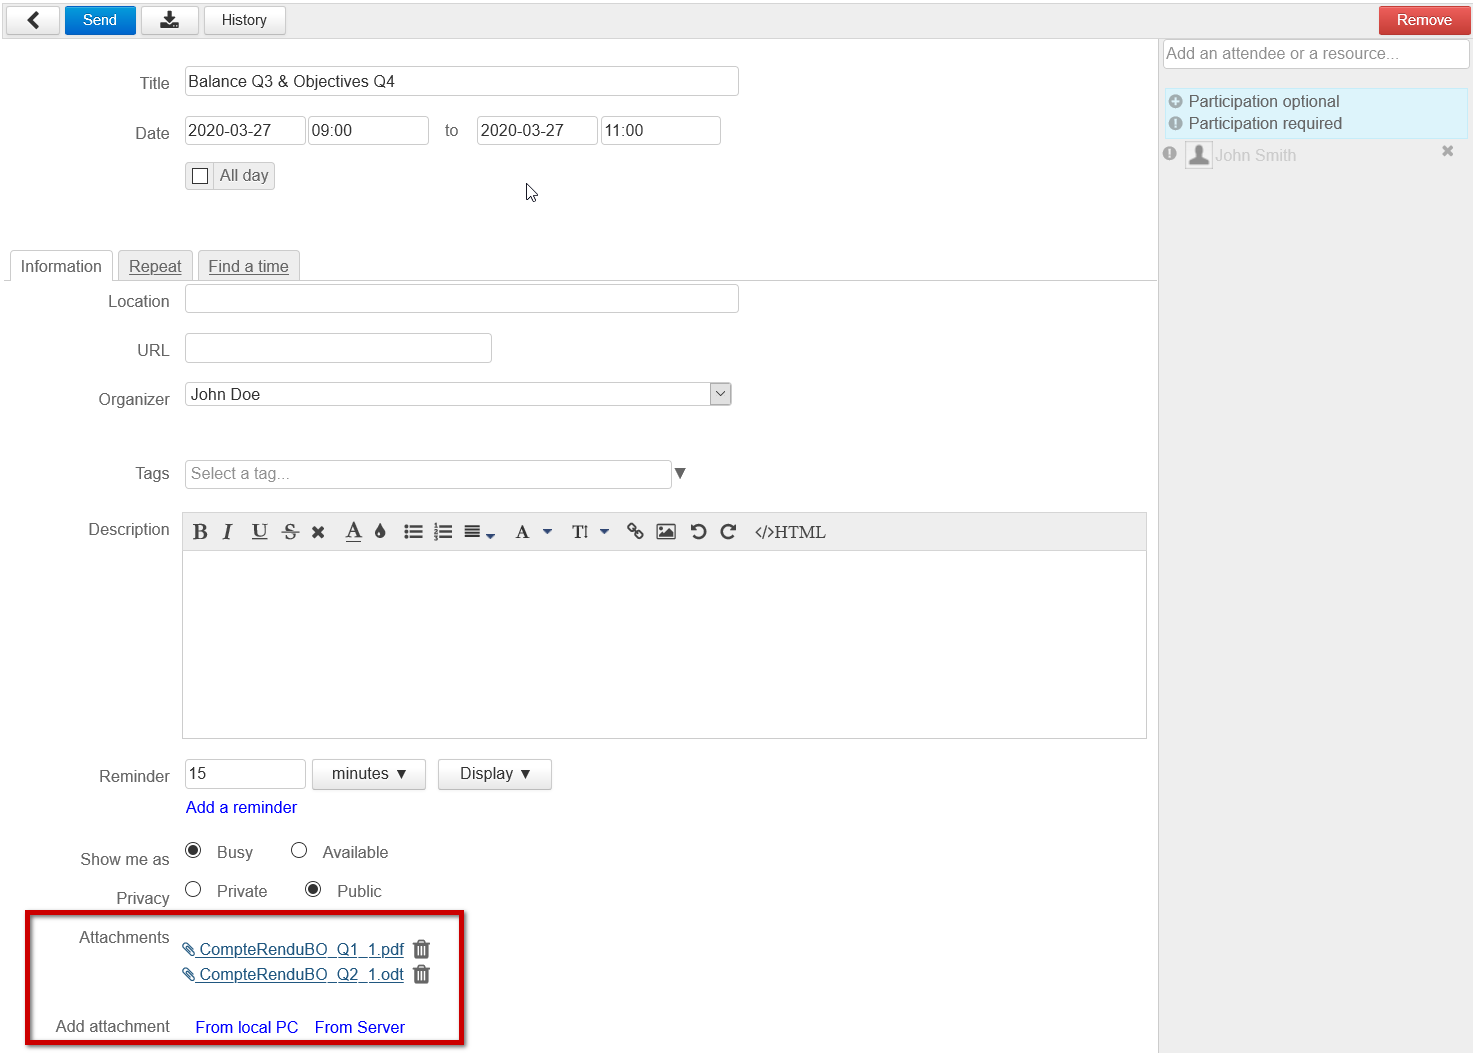
Anhänge: Dieser Teil des Fensters gestattet, den Ereignissen im Kalender Anhänge hinzuzufügen.
Astuce
Wiederholung
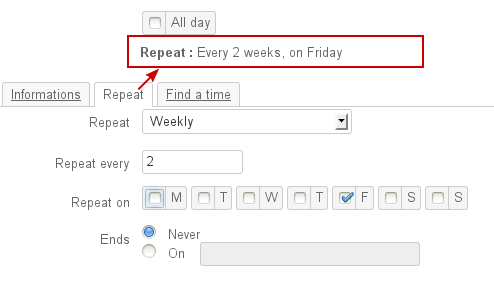
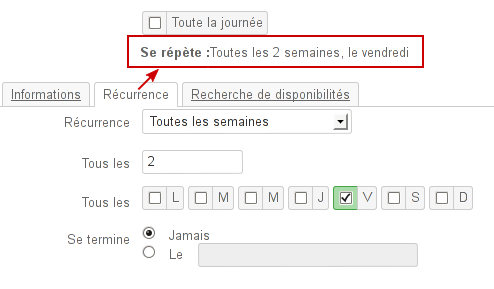
Die Registerkarte "Wiederholen" gestattet die Definition eines Wiederholungsintervalls für einen Termin: keine, täglich, wöchentlich, monatlich oder jährlich.
- Das Intervall der Wiederholung (z. B. alle 2 Wochen) wird im Feld "Wiederholen alle" unterhalb der Wiederholung angegeben.
- Geben Sie bei einer wöchentlichen Wiederholung den/die Wochentag(e) der Wiederholung an.
- Geben Sie bei einer monatlichen Wiederholung an, ob das Ereignis am jeweiligen Tag des Monats (z. B. am 3. eines jeden Monats) oder am entsprechenden Wochentag (z. B. am 2. Dienstag des Monats) wiederholt werden soll.
| Astuce |
|---|
Über der Registerkarte wird eine Zusammenfassung der Wiederholungsinformationen angezeigt und beim Ausfüllen des Formulars aktualisiert:
|
So löschen Sie ein Ereignis:
- Zeigen Sie das entsprechende Ereignis an.
- Klicken Sie darauf und klicken Sie im angezeigten Dialogfeld auf "Löschen".
- Wählen Sie "Nur dieses Ereignis", um alle anderen Wiederholungen des Ereignisses zu behalten.
Ermitteln der Verfügbarkeit
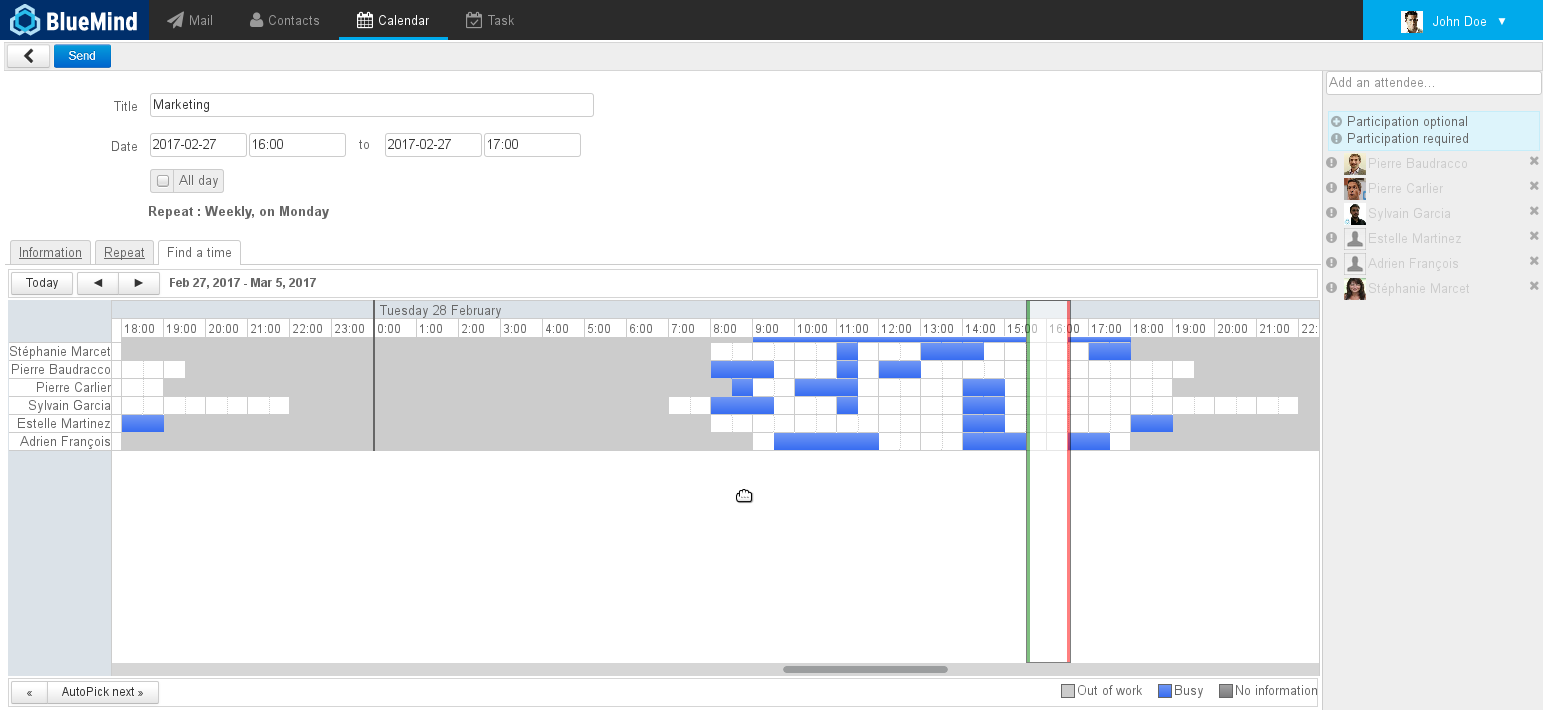
Die Registerkarte "Zeit finden" gestattet die Suche nach einem freien Zeitfenster für alle Teilnehmer:
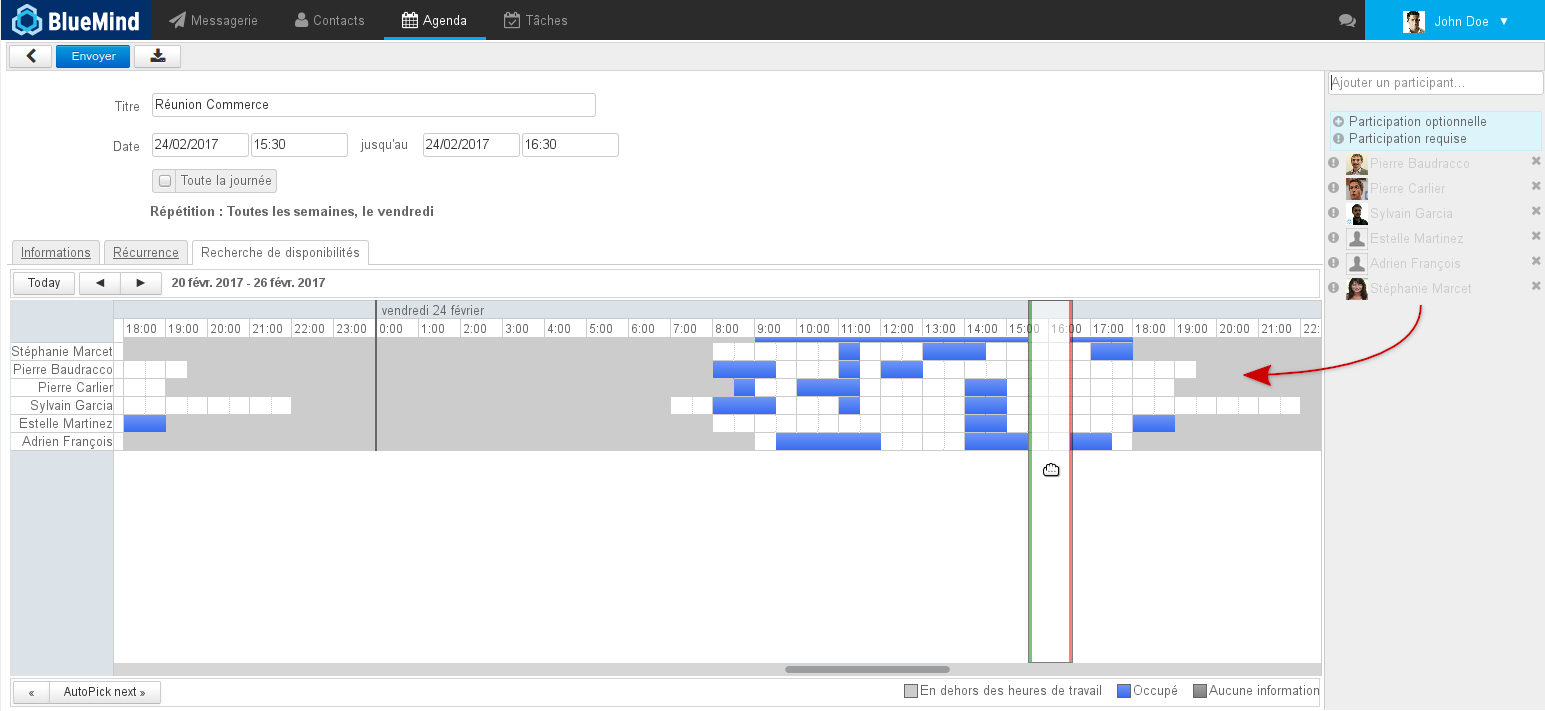
BlueMind schlägt automatisch, grün und rot umrahmt, das erste Zeitfenster vor, das für das im Formular eingegebene Datum verfügbar ist.
Das Zeitfenster kann durch Ziehen der Maus verschoben und durch Ziehen der grünen und der roten Linie verkleinert oder vergrößert werden.
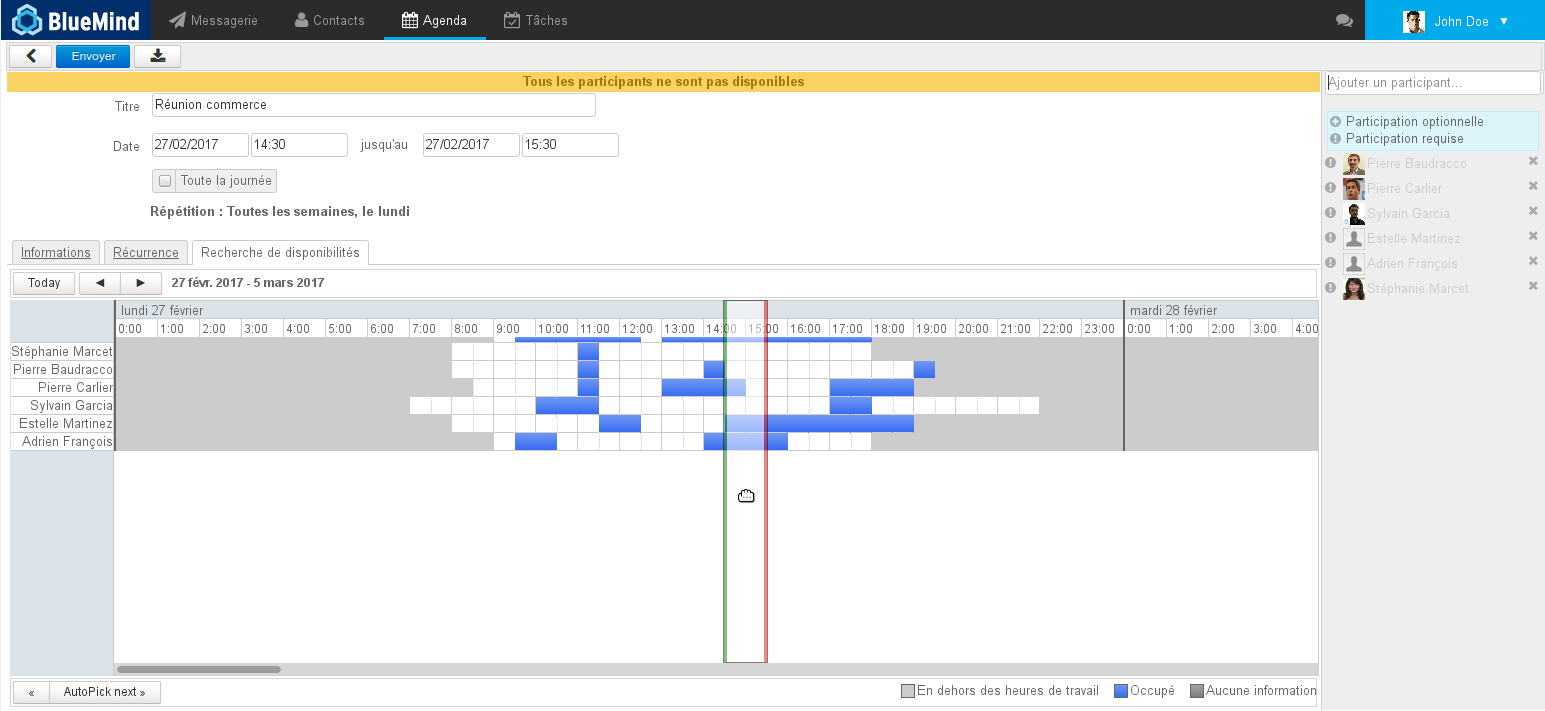
Wenn das Zeitfenster einen Termin von mindestens einem Benutzer enthält, erscheint oben auf der Seite eine Informationsmeldung:
Ab Version 4.1 können Sie mit der FunktionAbtrennen von Anlagen des E-Mail-Systems auch Dateien an Kalenderereignisse anfügen.
| Remarque | ||
|---|---|---|
| ||
Um diese Funktion verwenden zu können, müssen die Benutzer über folgende Rollen verfügen:
Wenn Sie den unten angezeigten Bereich oder einen der Links nicht sehen, wenden Sie sich an Ihren Administrator. |
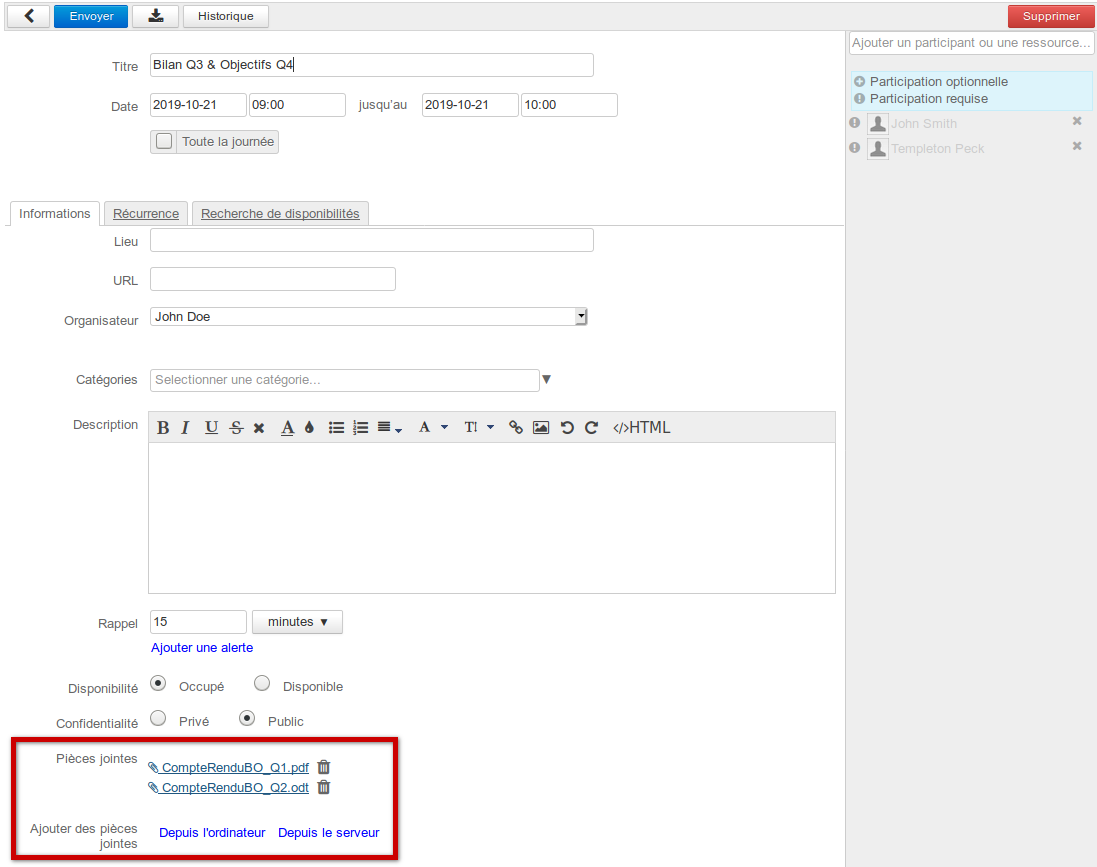
Sobald eine Datei mit einem Ereignis verknüpft ist, steht sie jederzeit in den Ereignisdetails zum Download bereit und wird ggf. in der elektronischen Einladung an die Teilnehmer versendet.
Dateien hinzufügen/entfernen
So fügen Sie eine Datei hinzu:
- Klicken Sie für "Anhang hinzufügen" auf "Computer", um eine neue Datei hochzuladen.
Wenn der Benutzer über die dedizierte Rolle ("Drive") verfügt, wird ein zweiter Link angezeigt:
- Klicken Sie auf "Server", um die BlueMind-Dateiauswahl zu öffnen und eine bereits im Speicherplatz des Benutzers vorhandene Datei hinzuzufügen
. Die Dateien können anschließend über die Dateiauswahl gefunden werden, um sie anderen Kalenderereignissen oder Nachrichten hinzuzufügen.
Klicken Sie auf das Papierkorbsymbol ![]() vor dem Dateinamen, um diese Datei zu löschen.
vor dem Dateinamen, um diese Datei zu löschen.
Übertragung von Dateien an Teilnehmer
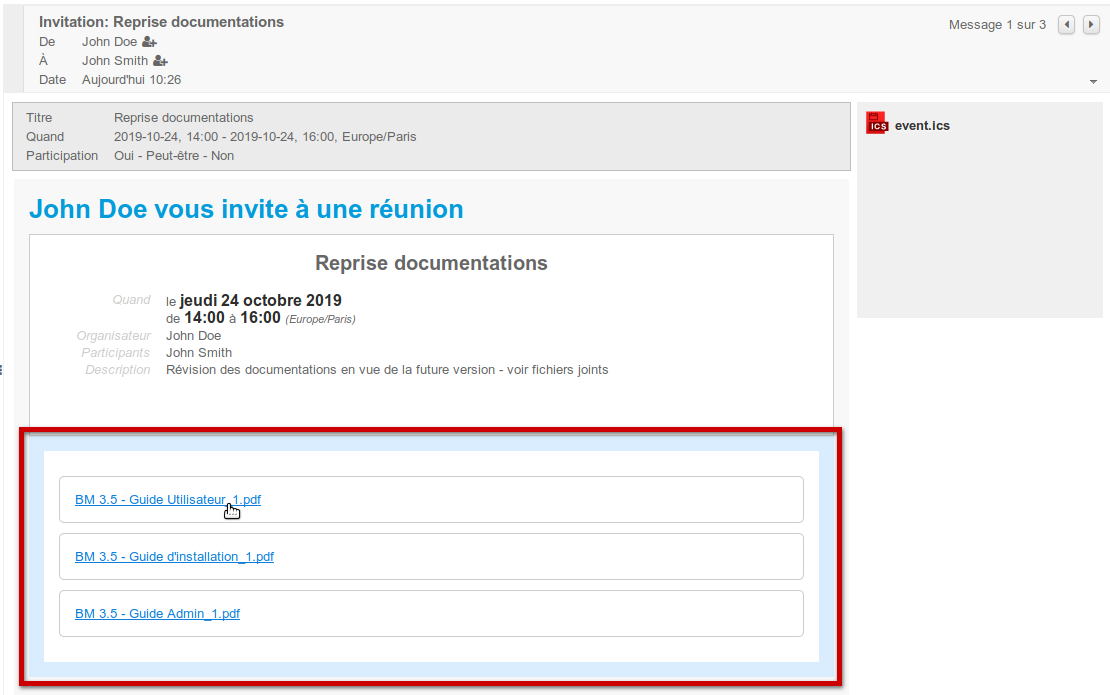
Einer Besprechung hinzugefügte Dateien werden in der elektronischen Einladung an die Teilnehmer übermittelt:
- als Anlagen, wenn die Gesamtgröße der Nachricht die vom Server zugelassene Größe nicht überschreitet:
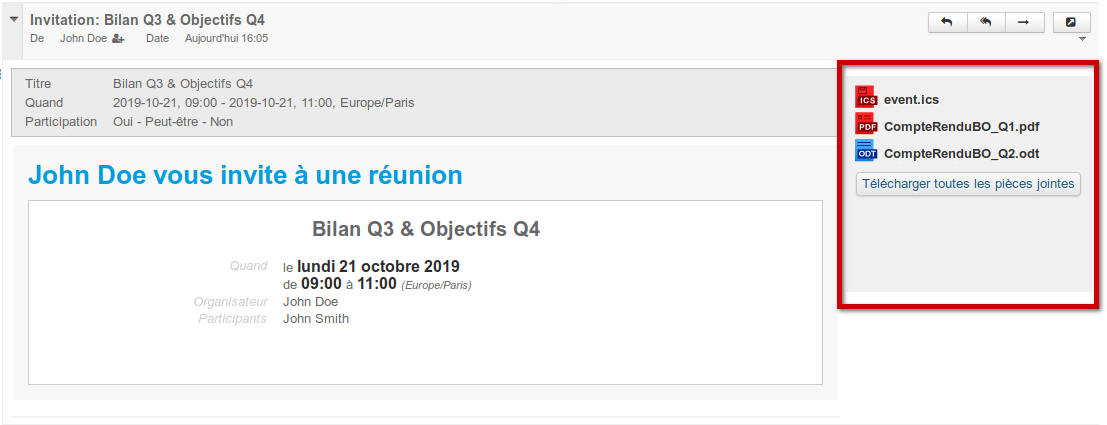
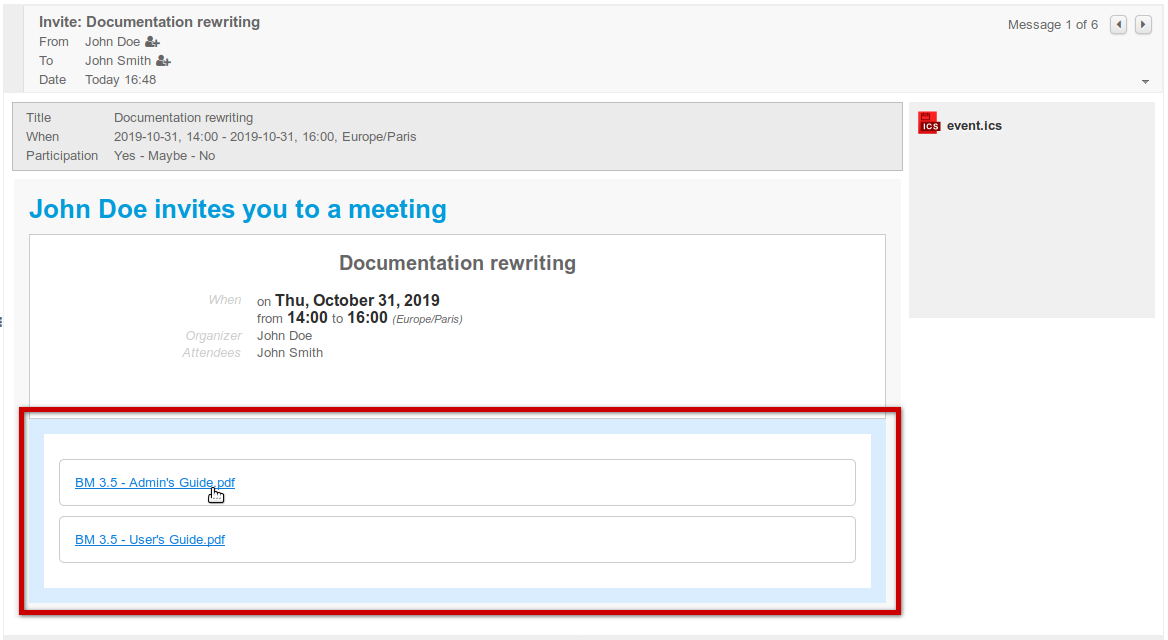
- als Download-Links, wenn die Gesamtgröße der Nachricht die vom Server zugelassene Größe überschreitet:
| Info |
|---|
Die Funktion des Anfügens/Abtrennens erfolgt automatisch und kann nicht gesteuert werden. Sie wird je nach Gesamtgröße aller als Anlage beigefügten Dateien angewendet, unabhängig davon ob einzelne Dateien dieser Anlage klein sind. |
Download einer Datei
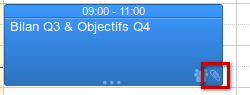
Wenn ein Termin einen Anhang hat, wird der Anhang durch ein Piktogramm in der Kalenderansicht angezeigt:
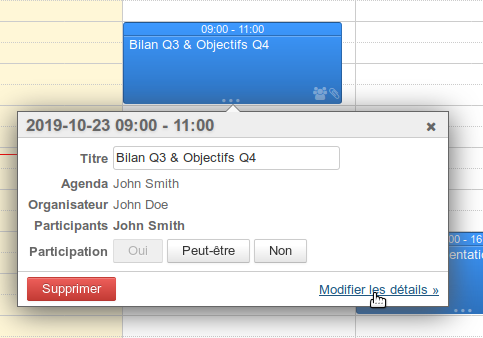
Die Dateien in der Anlage zu einem Ereignis können jederzeit über das Abfrage-/Bearbeitungsformular heruntergeladen werden:
| Astuce | ||
|---|---|---|
| ||
Die Funktionsweise für die eingeladenen Teilnehmer einer Besprechung ist identisch: Sie finden die Dateien mit den Download-Links in ihrem Kalender. Sie können selbst Dateien hinzufügen, aber wie alle anderen Änderungen, die sie vornehmen, werden diese nicht an den Organisator oder an andere Teilnehmer weitergegeben. |
Änderung eines Ereignisses
So ändern Sie ein Ereignis:
- Klicken Sie in der Kalenderansicht auf den Termin.
- Ändern Sie den Titel und klicken Sie auf Speichern
- oder klicken Sie auf den Link "Details ändern": Angezeigt wird das vollständig ausgefüllte Formular, das für die Erstellung verwendet wurde (siehe oben).
- Wenn die erforderlichen Änderungen vorgenommen wurden, klicken Sie auf die Schaltfläche "Speichern" (oder "Senden", wenn es weitere Teilnehmer gibt) oben links auf der Seite, damit die Änderungen berücksichtigt werden.
| Astuce | ||
|---|---|---|
| ||
| Das Hinzufügen/Löschen/Ändern von Tags und Erinnerungen wird als private Änderung betrachtet, die nicht an die Teilnehmer gesendet wird. Bei anderen Änderungen werden aktualisierte Informationen an die anderen Teilnehmer (falls vorhanden) verschickt. |
Im Fall einer Änderung eines wiederkehrenden Ereignisses durch Verschieben in der Kalenderansicht oder durch Aufrufen des ausgefüllten Formulars werden verschiedene Arten der Änderung zur Auswahl angeboten:
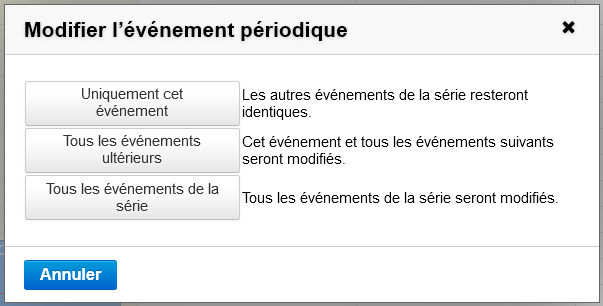
- Nur dieses Ereignis: Die Änderung bezieht sich nur auf das Ereignis, das der Benutzer angeklickt hat, alle anderen Ereignisse dieser Serie bleiben unverändert.
- Alle folgenden: Die Änderung bezieht sich auf das Ereignis, das der Benutzer angeklickt hat und alle darauf folgenden Ereignisse dieser Serie. Alle davor liegenden Ereignisse der Serie bleiben unverändert.
- Alle Ereignisse in dieser Serie: Die gesamte Serie wird geändert
Duplizieren eines Ereignisses
Ab BlueMind 4.3 ist es möglich, ein Ereignis oder eine Besprechung zu duplizieren, um eine Kopie zu erstellen, die unabhängig vom ursprünglichen Ereignis geändert oder an einen anderen Organisator delegiert werden kann.
Im Allgemeinen
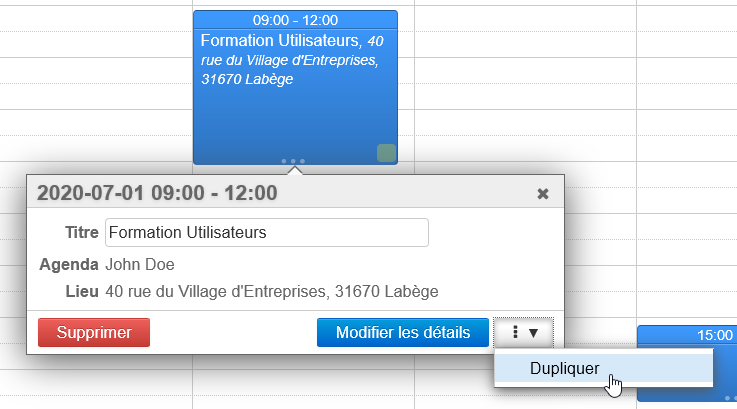
So duplizieren Sie ein Ereignis:
- Klicken Sie auf das Ereignis in der Kalenderansicht.
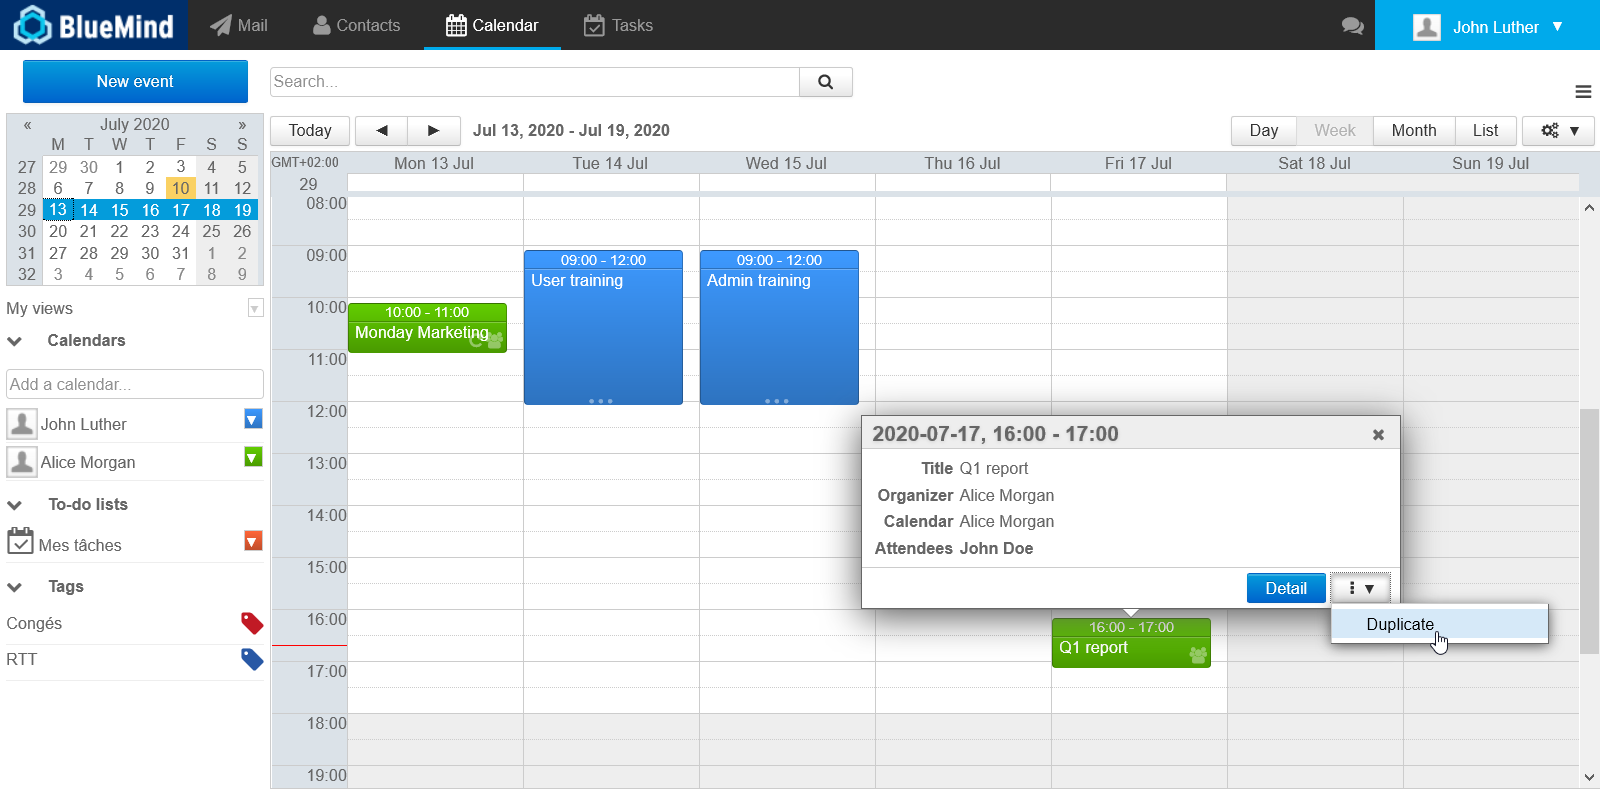
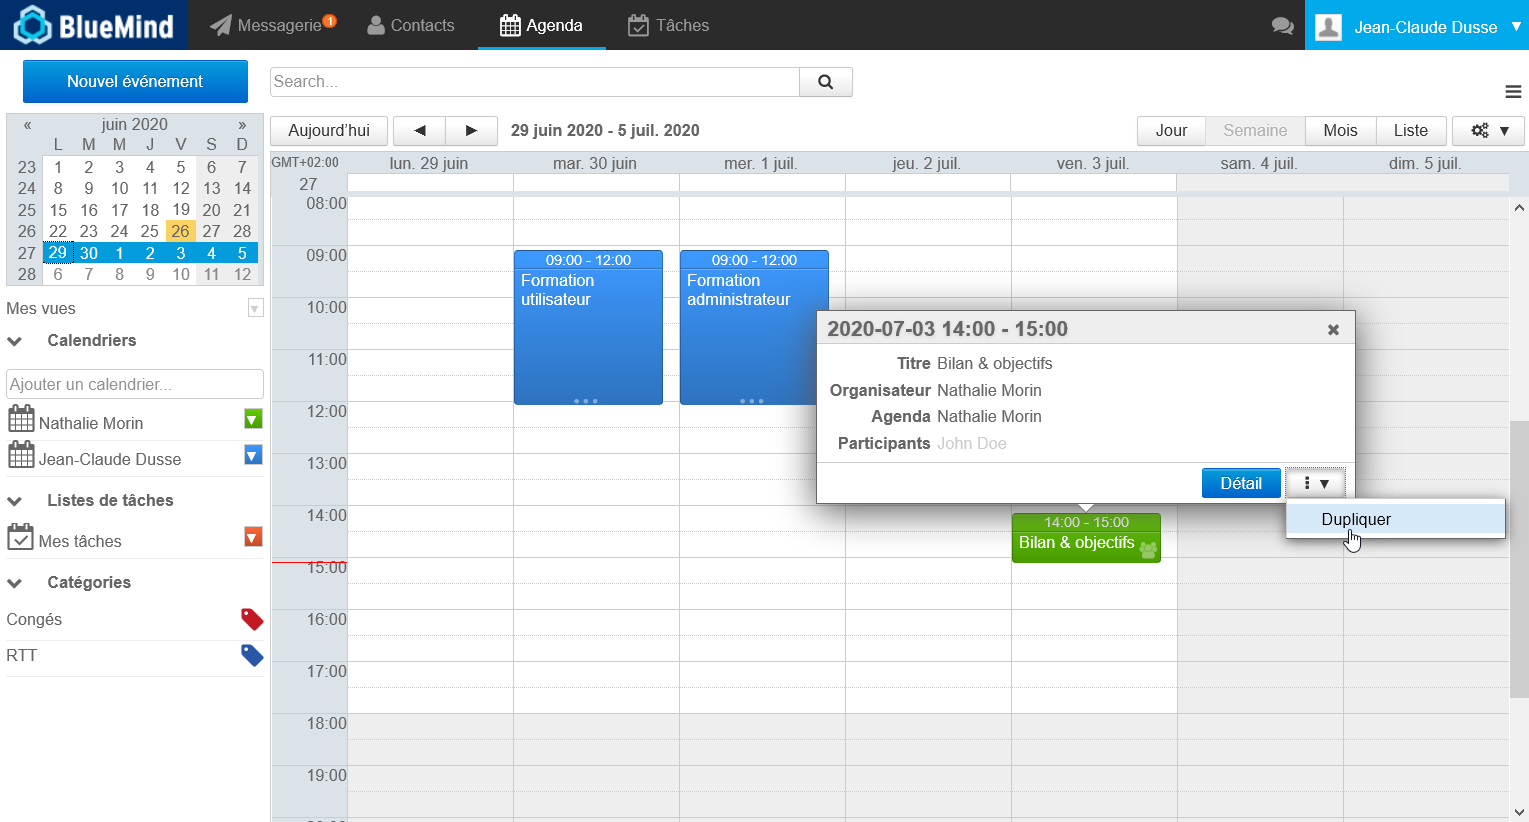
- Rollen Sie das Menü unten rechts ab und wählen Sie die Option "Duplicate":
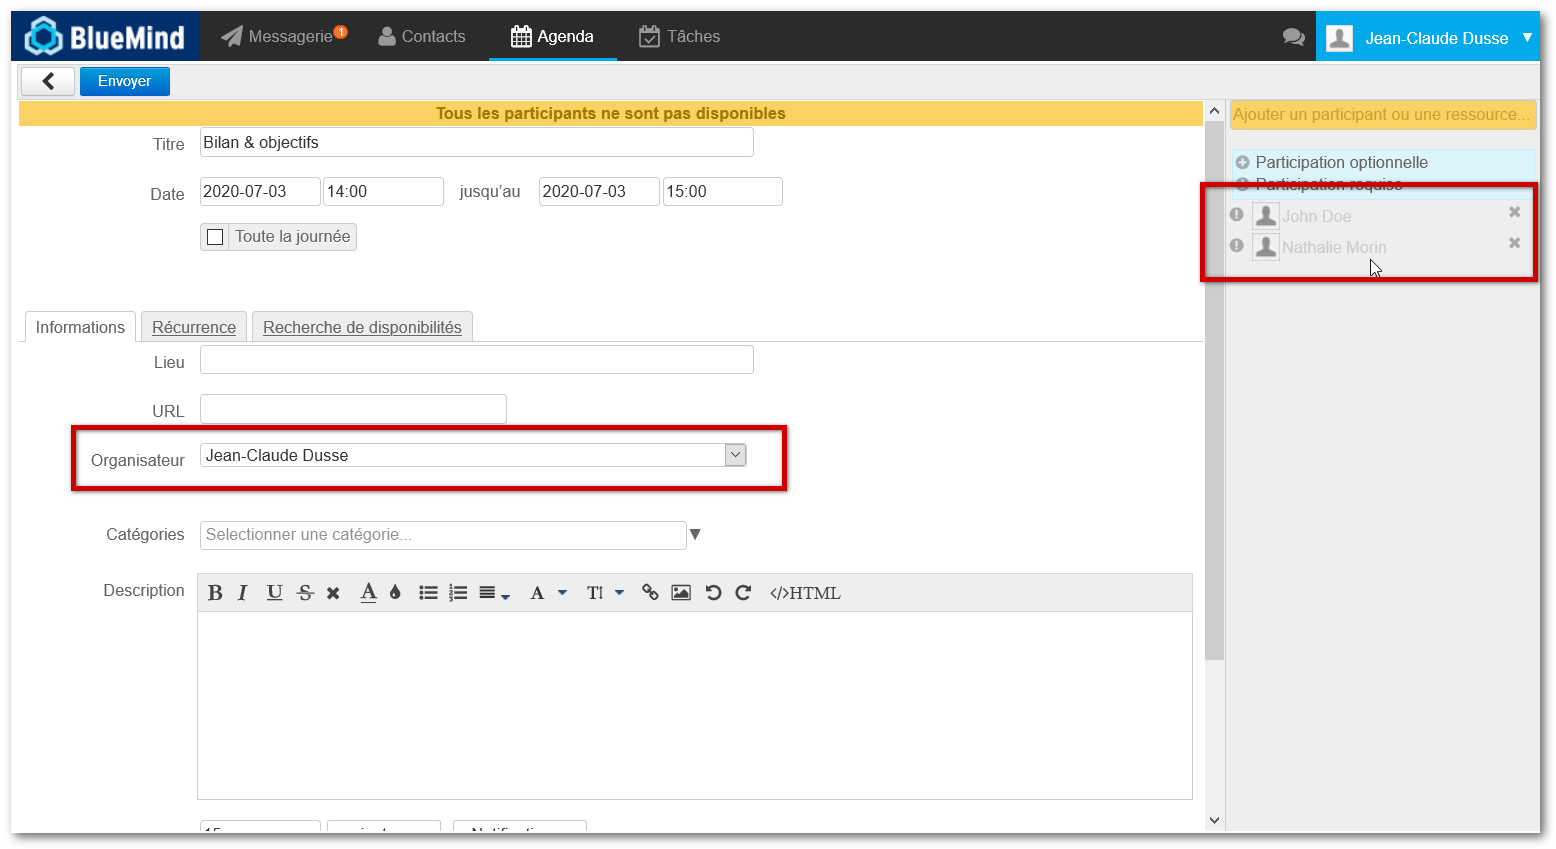
- Das Formular zur Erstellung eines Ereignisses wird mit den Informationen des ursprünglichen Ereignisses (Tag, Uhrzeit, Beschreibung, Organisator, Teilnehmer usw.) angezeigt.
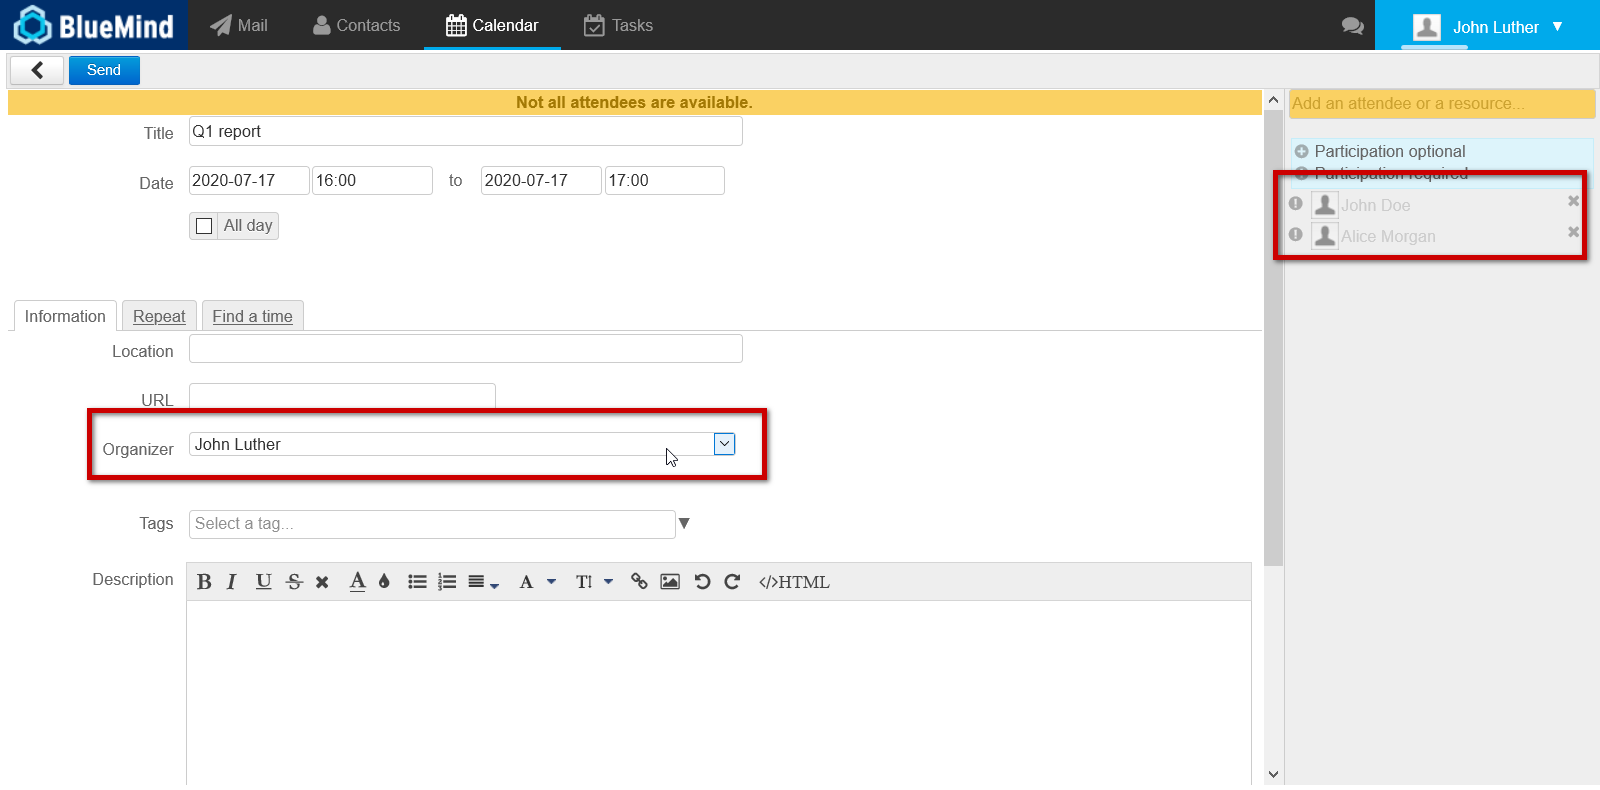
Nehmen Sie die gewünschten Änderungen vor:
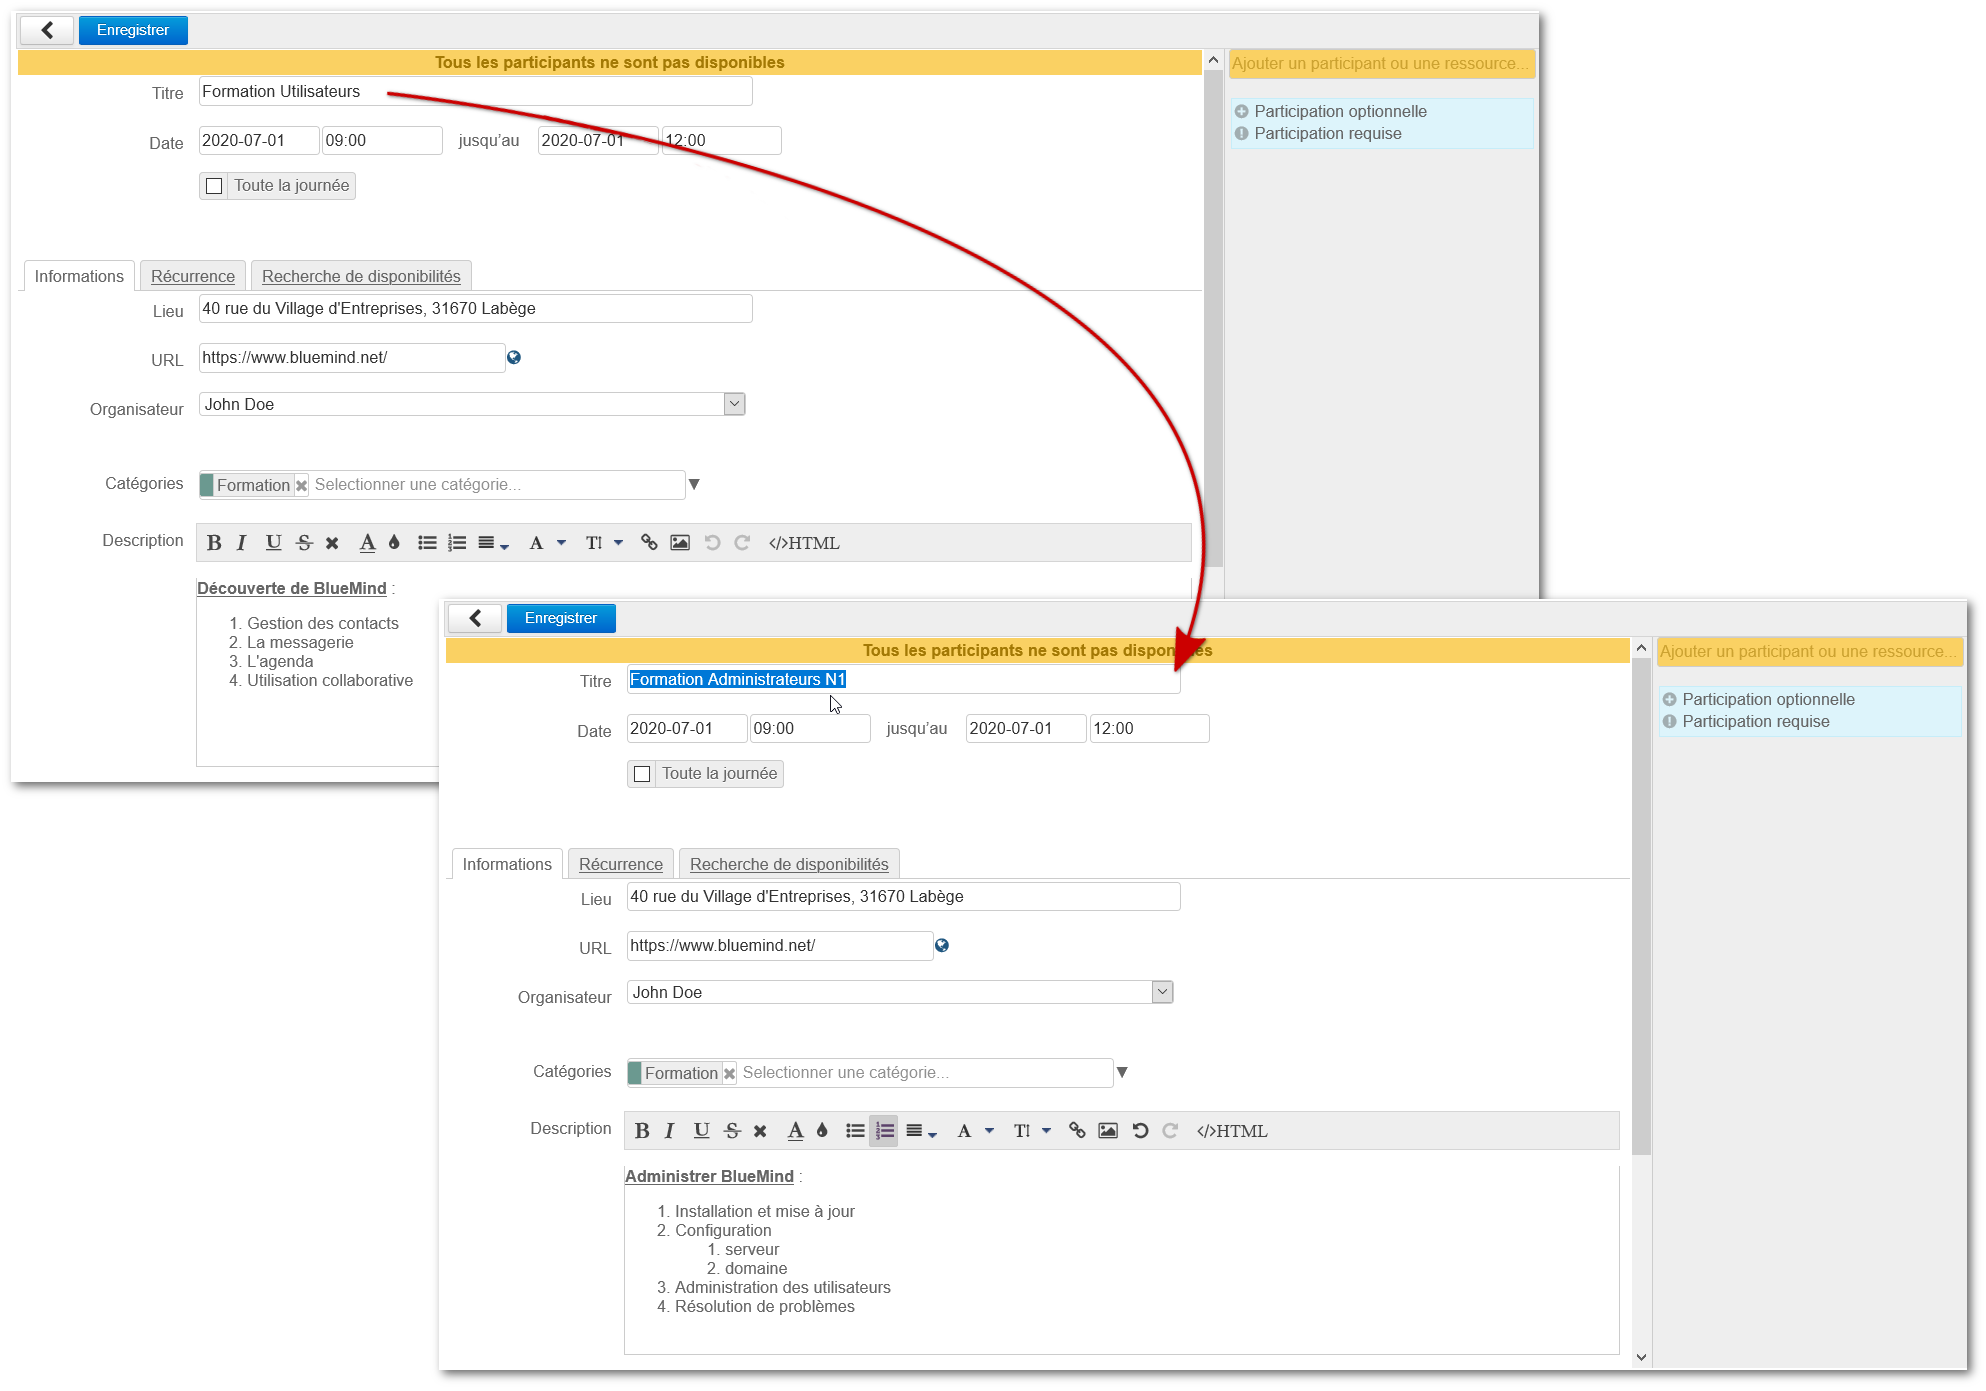
Info Vorgenommene Änderungen werden wie Änderungen an einem bereits bestehenden Ereignis behandelt (siehe vorheriger Abschnitt).
Bei freigegebenen Kalendern erscheinen daher nur die Benutzer in der Dropdown-Liste der Organisatoren, die eine Schreibberechtigung für ihren Kalender erteilt haben und deren Kalender gerade in der Hauptansicht angezeigt wird.
Weitere Informationen zu diesem Thema finden Sie weiter unten im Abschnitt Freigegebene Kalender.- Klicken Sie auf "Speichern", um die Erstellung des neuen Ereignisses zu bestätigen:
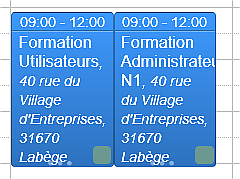
 In unserem Beispiel wurde das Ereignis "Benutzerschulung" dupliziert und in "Administratorschulung" umbenannt, die Beschreibung wurde ebenfalls angepasst: So wurde ein neues Ereignis mit den gleichen Zeit- und Ortsangaben und einer angepasster Beschreibung erstellt, das jetzt zur passenden Uhrzeit verschoben werden kann.
Wiederkehrendes Ereignis
Bei einem wiederkehrenden Ereignis bietet das Dropdown-Menü für die Duplizierung zwei Optionen:
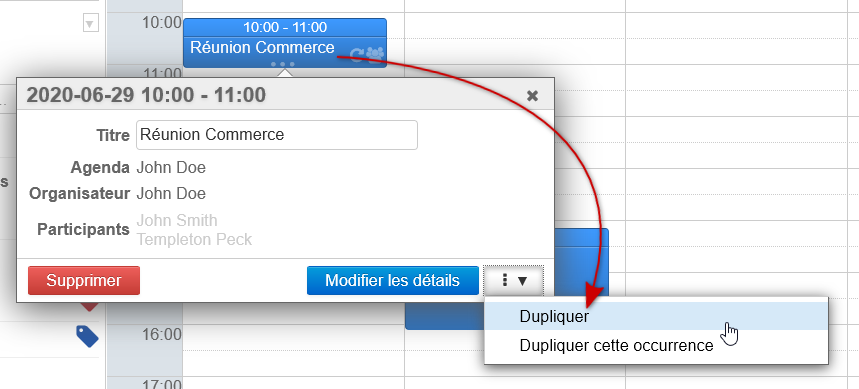
Duplicate: Die gesamte Serie wird mit ihrer Wiederholung dupliziert.
Remarque Die neue Serie wird mit der Uhrzeit des ersten Ereignisses und seiner Wiederholung erstellt. Es handelt sich daher um eine regelmäßige Serie, ohne die Ausnahmen, die in der ursprünglichen Serie enthalten sein könnten.
- Duplicate occurrence: Ein einmaliges (d. h. nicht wiederkehrendes) Ereignis mit der Uhrzeit des duplizierten Ereignisses wird erstellt.
Besprechungen (Ereignisse mit Teilnehmern)
Beim Duplizieren einer Besprechung wird eine identische Besprechung mit ihren Teilnehmern neu angelegt.
Die neue Besprechung wird als neue unabhängige Besprechung betrachtet:
- Die Teilnehmer erhalten bei der Speicherung des Formulars eine neue Einladung.
- Der Teilnahmestatus der ursprünglichen Besprechung wird nicht beibehalten: Alle Teilnehmer erhalten den Status "en attente de réponse" (Antwort steht aus).
- Änderungen an einer der beiden Besprechungen (Original oder Kopie) wirken sich nicht auf die andere aus.
| Remarque |
|---|
Änderungen des Organisators oder der Teilnehmer können entsprechend den freigegebenen Berechtigungen für den Kalender, in dem das Ereignis dupliziert wird, sichtbar sein (Einzelheiten siehe nächster Abschnitt). |
Freigegebener Kalender
Wenn sich das zu duplizierende Ereignis im Kalender eines anderen Benutzers befindet, sind mehrere Szenarien denkbar:
- Der Benutzer hat die Schreibberechtigung für seinen Kalender erteilt: Er wird dann als Organisator des duplizierten Ereignisses angegeben, unabhängig davon ob er bereits Organisator oder nur Teilnehmer ist.
Der Benutzer hat die Schreibberechtigung für seinen Kalender nicht erteilt: Die Duplizierung erfolgt auf dem Kalender der duplizierenden Person, die automatisch als Organisator angegeben wird.
Astuce Wenn der Benutzer ursprünglich Organisator war, wird er in diesem Fall Teilnehmer der Besprechung und erhält eine Einladung.
Beispiele
Zwei Benutzer führen folgende Schritte durch:
- Nathalie: Sie ist Abteilungsleiterin und gibt ihren Kalender im schreibgeschützten Modus frei (Berechtigung "Kann einladen und meine Termine einsehen").
- Jean-Claude: Er ist Trainer und hat Nathalie berechtigt, seinen Kalender zu ändern (Berechtigung "Kann meine Ereignisse aktualisieren").
Fall 1: Nathalie möchte eine neue Schulung für Jean-Claude erstellen, die auf einer bestehenden Schulung basiert.
Nathalie zeigt den Kalender von Jean-Claude an und klickt auf das Ereignis "Benutzerschulung" und dann auf "Duplicate":
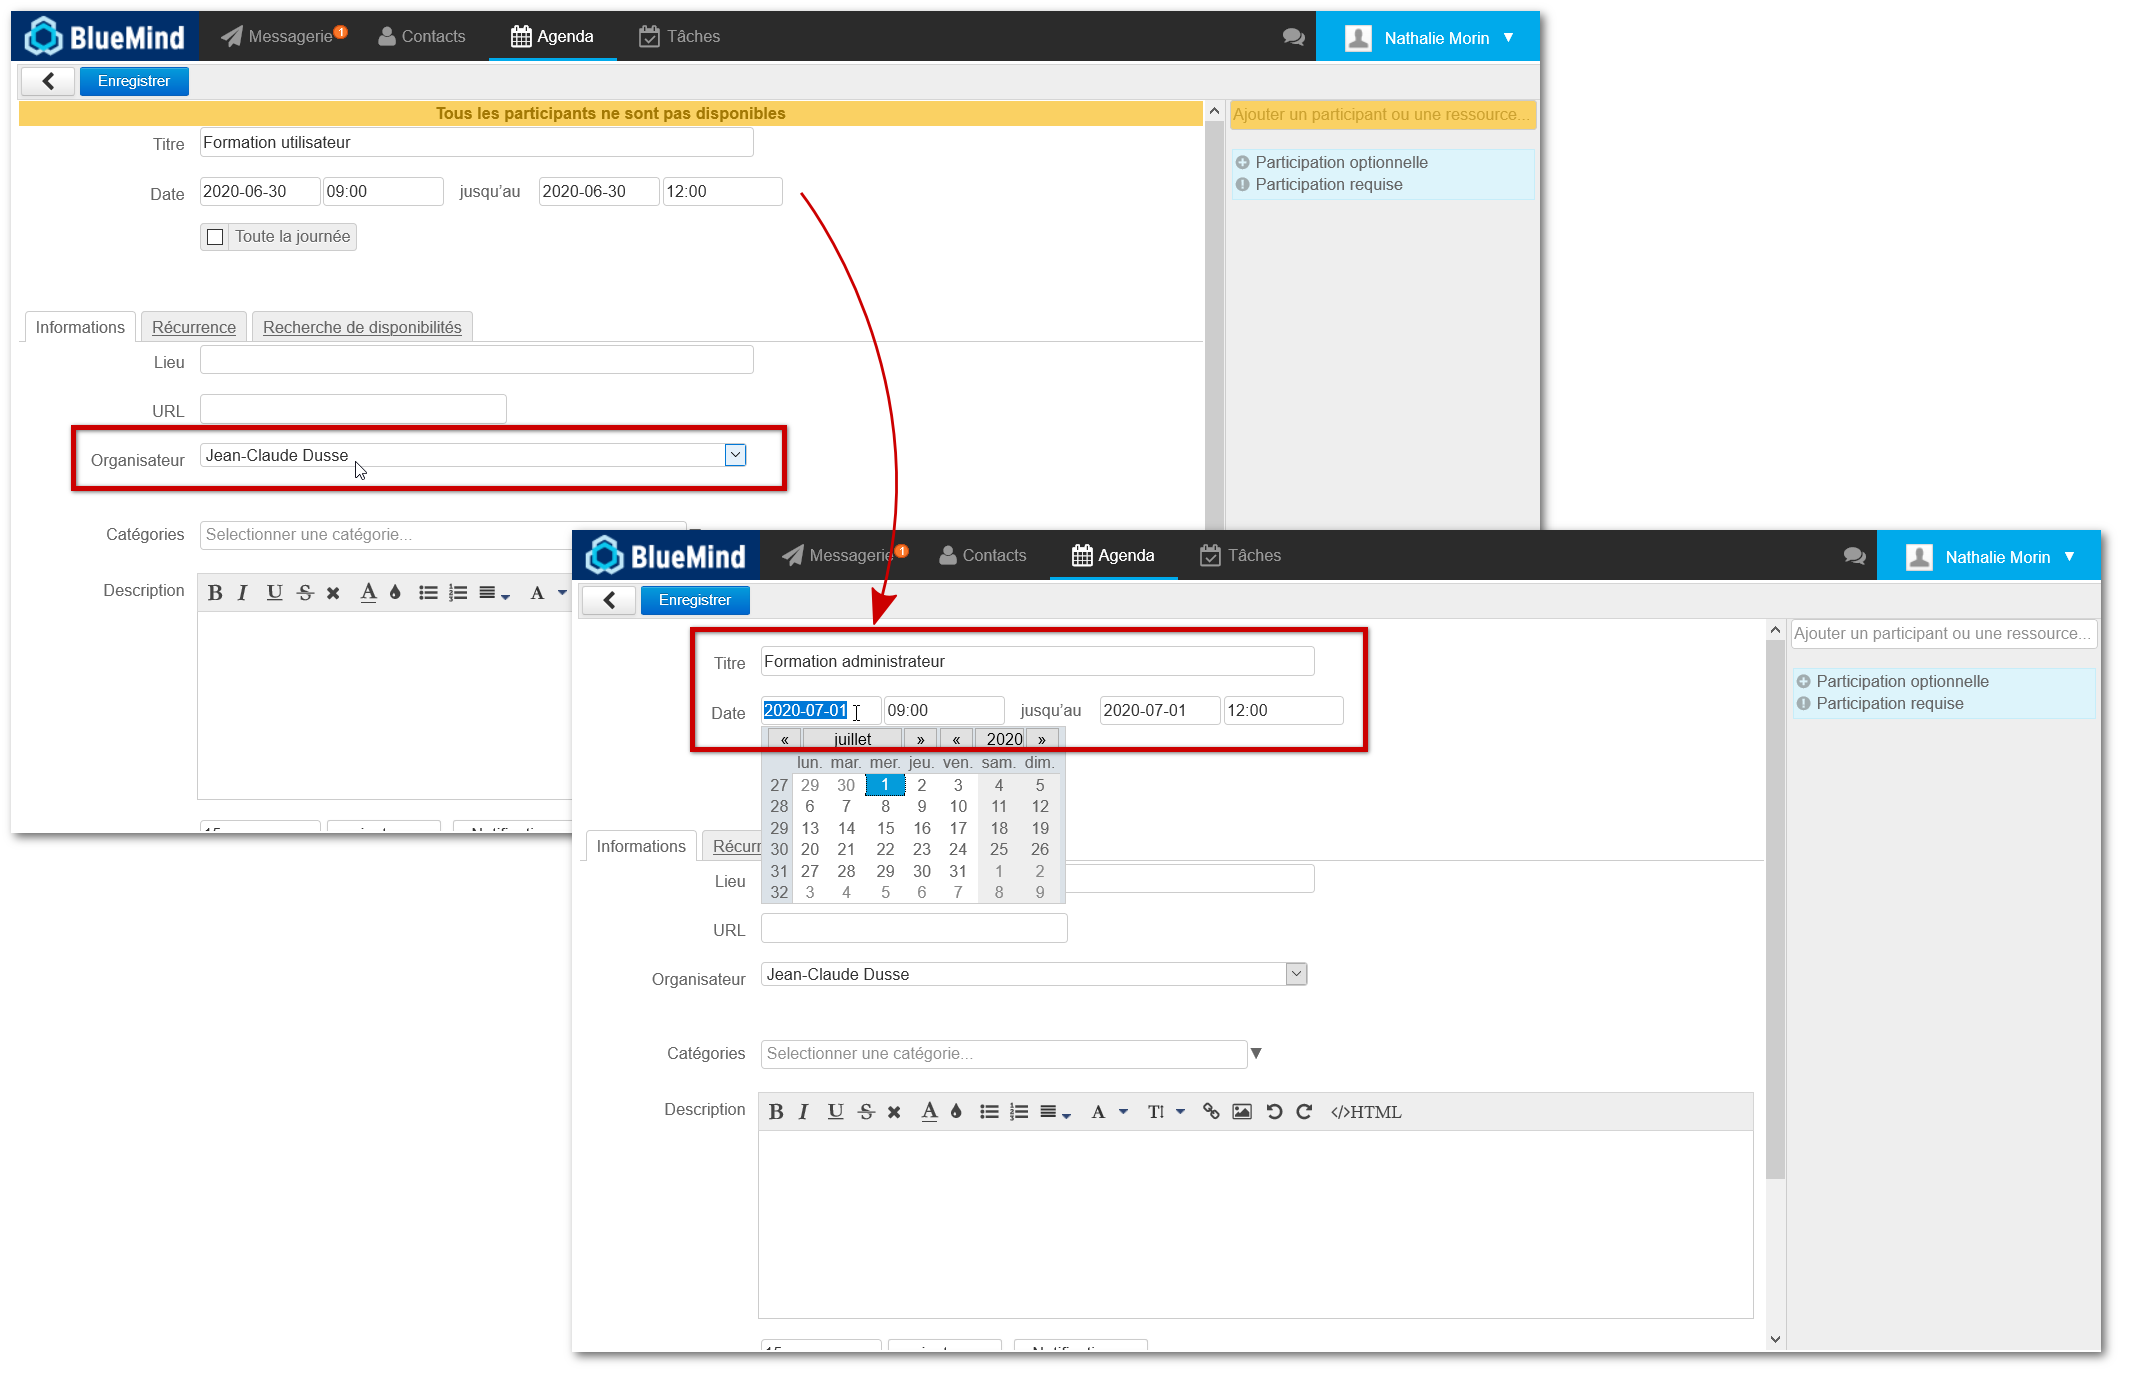
Da Nathalie über die Schreibberechtigung verfügt, wird der Organisator beibehalten, das duplizierte Ereignis verbleibt auf dem Kalender von Jean-Claude. Nathalie ändert das Ereignis in eine "Administratorschulung", die am nächsten Tag stattfindet:
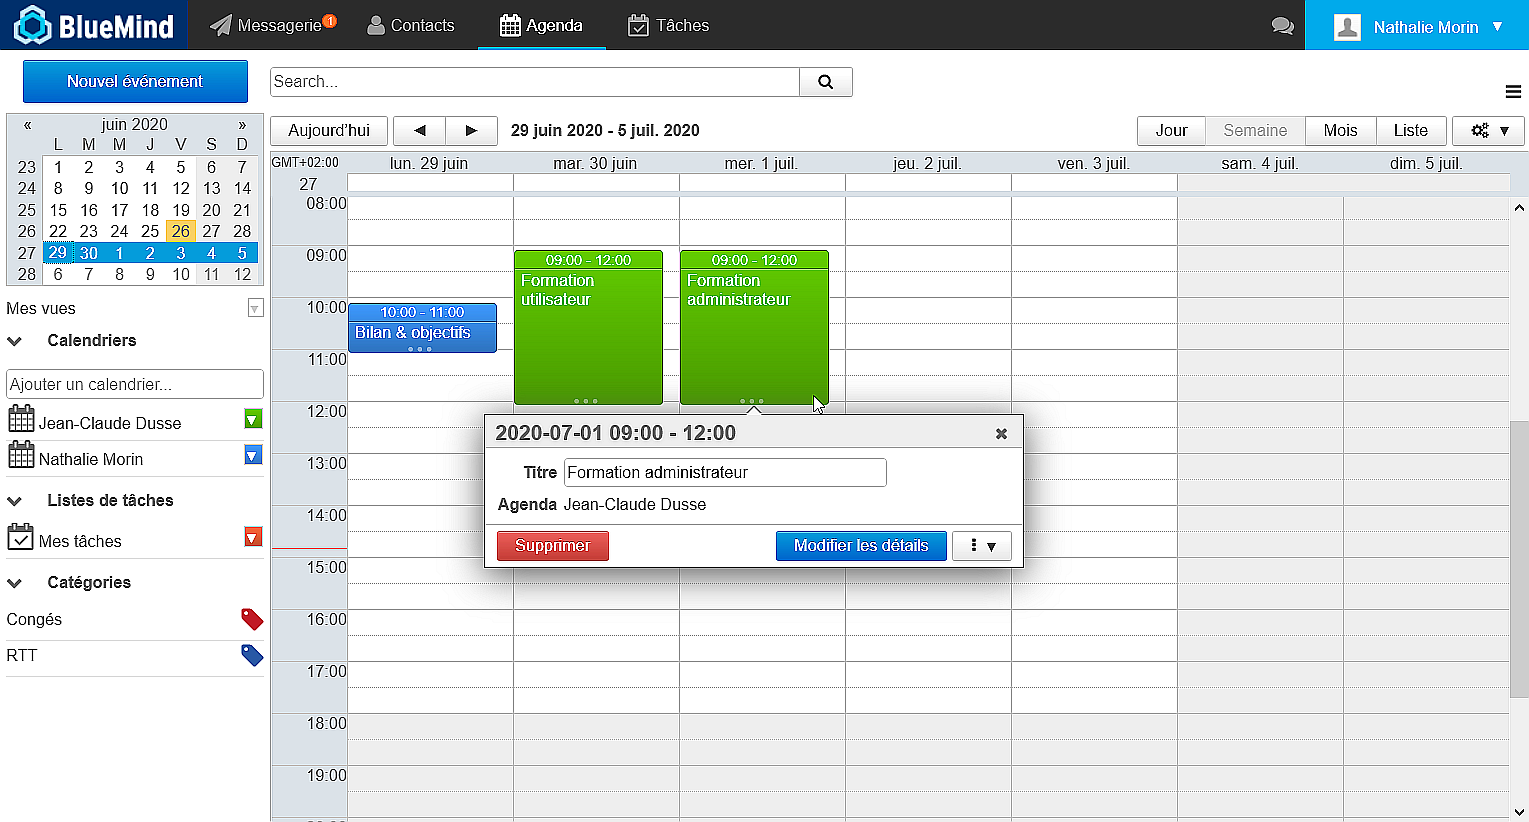
Nach der Speicherung erscheint das neue Ereignis im Kalender von Jean-Claude:
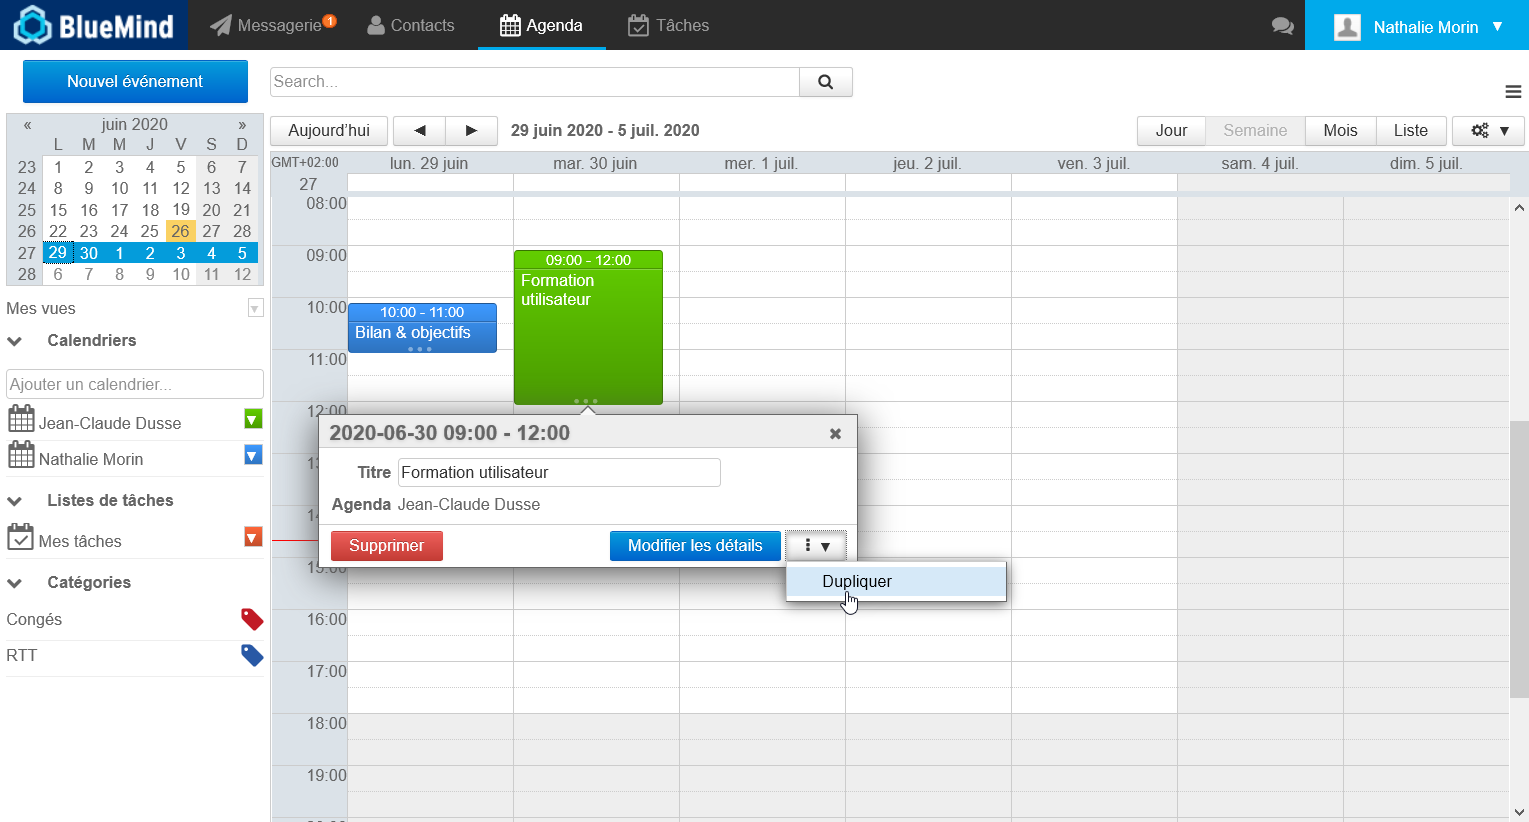
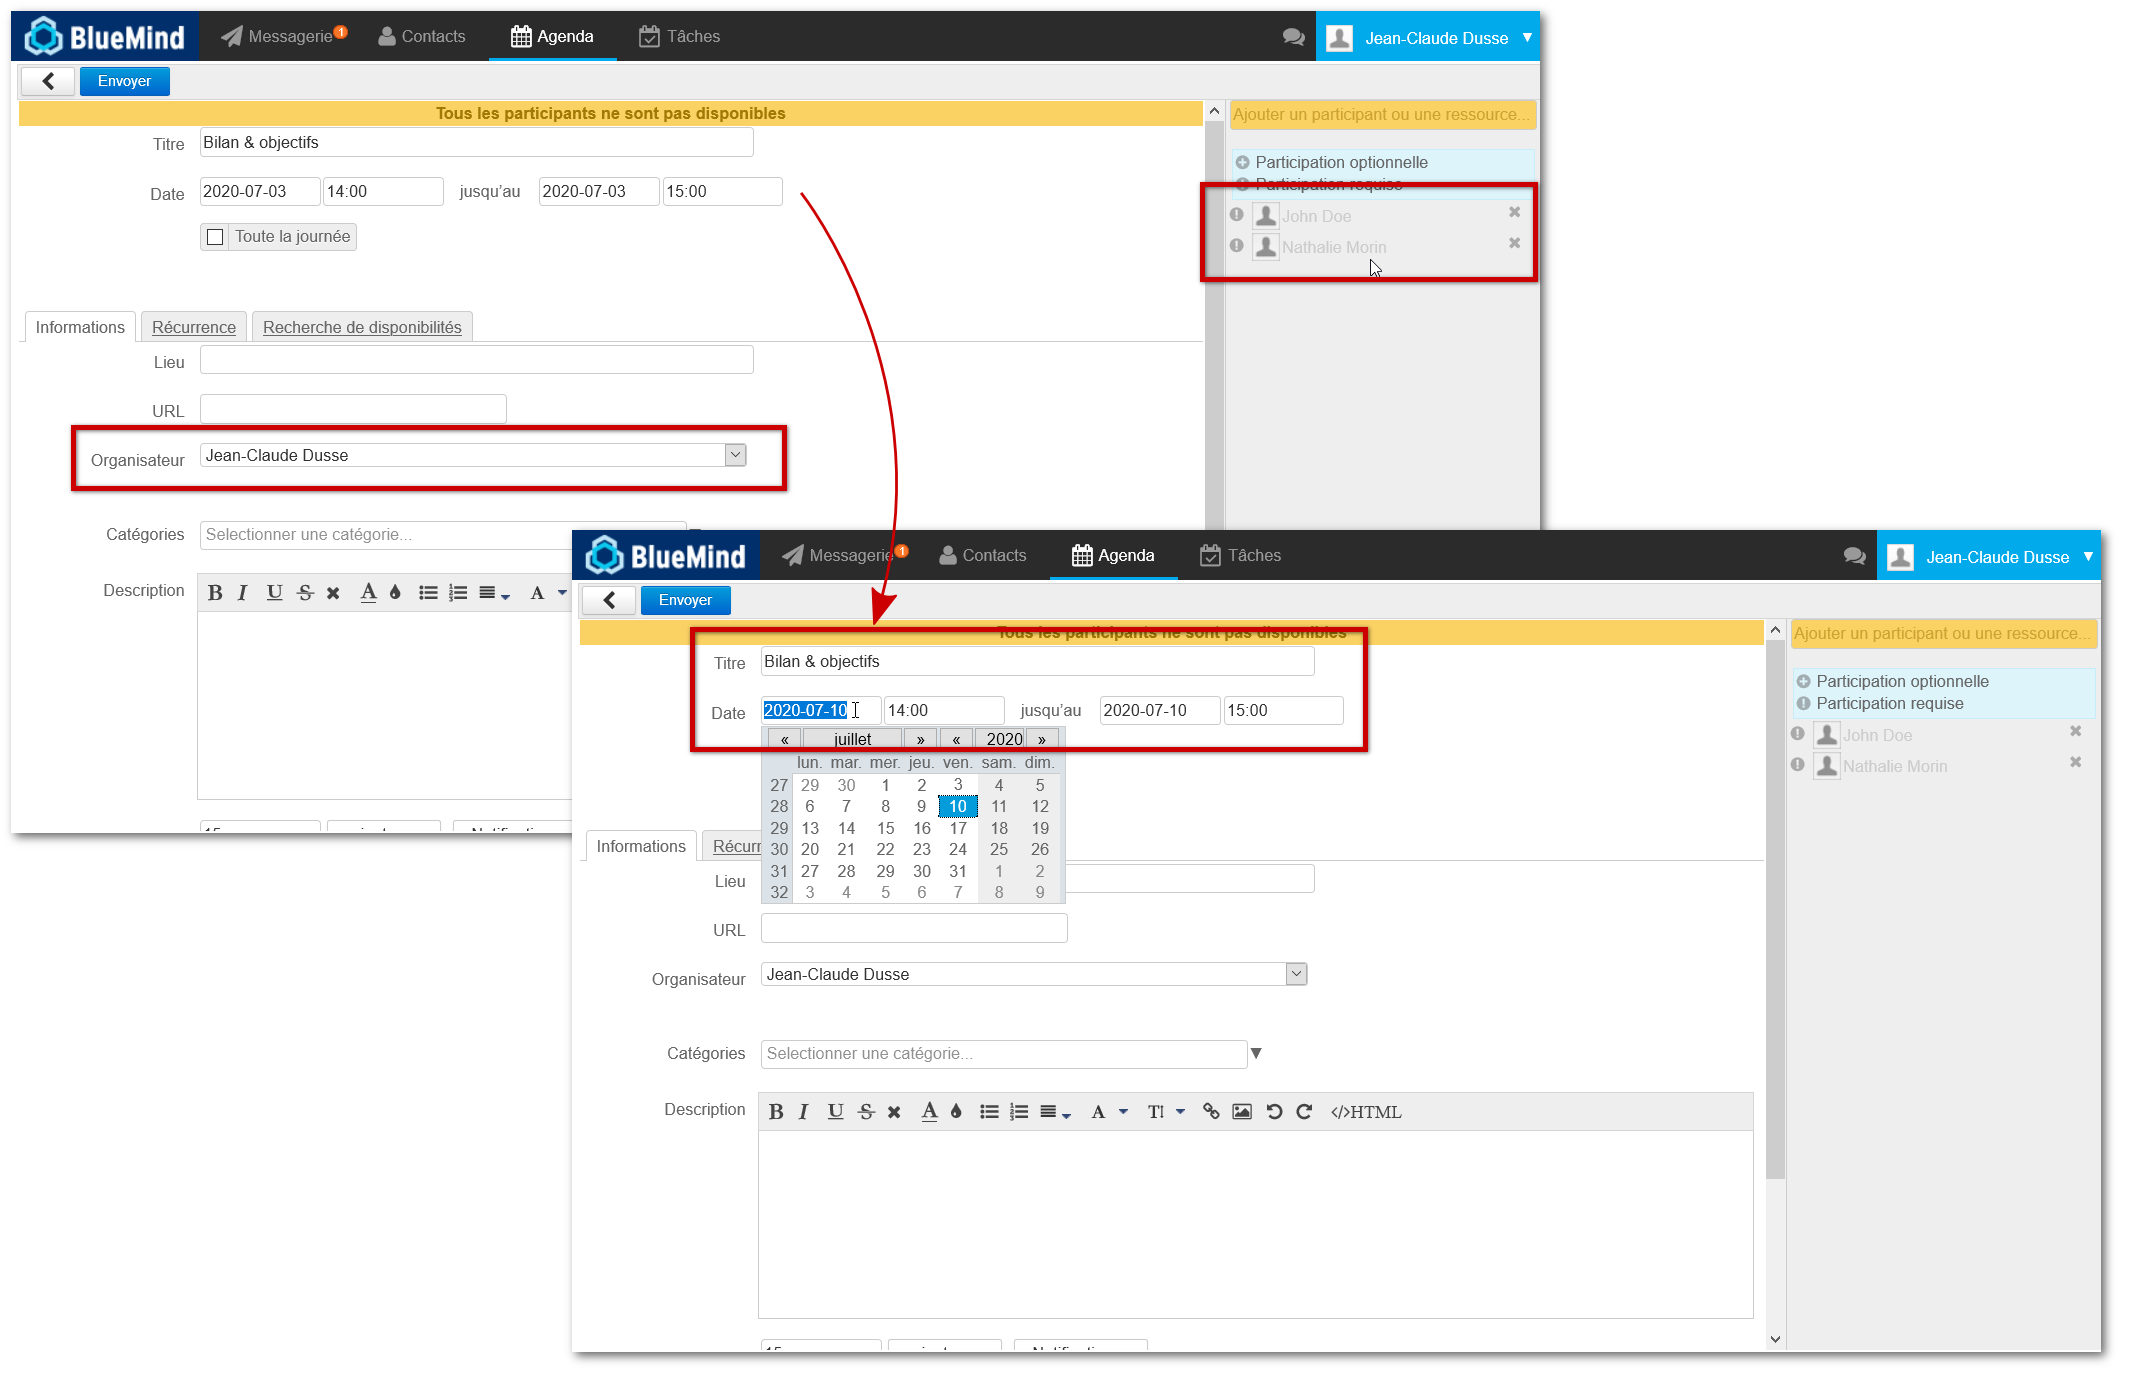
Fall 2: Jean-Claude möchte eine von Nathalie organisierte Besprechung kopieren, um sie in der folgenden Woche selbst zu organisieren.
Auch wenn Jean-Claude den Kalender von Nathalie nicht verändern darf, hat er doch die Möglichkeit, ihre Ereignisse zu duplizieren:
Das Ereignis wird dann in seinen Kalender kopiert (= er wird zum Organisator bestimmt) und Nathalie wird zur Besprechung eingeladen:
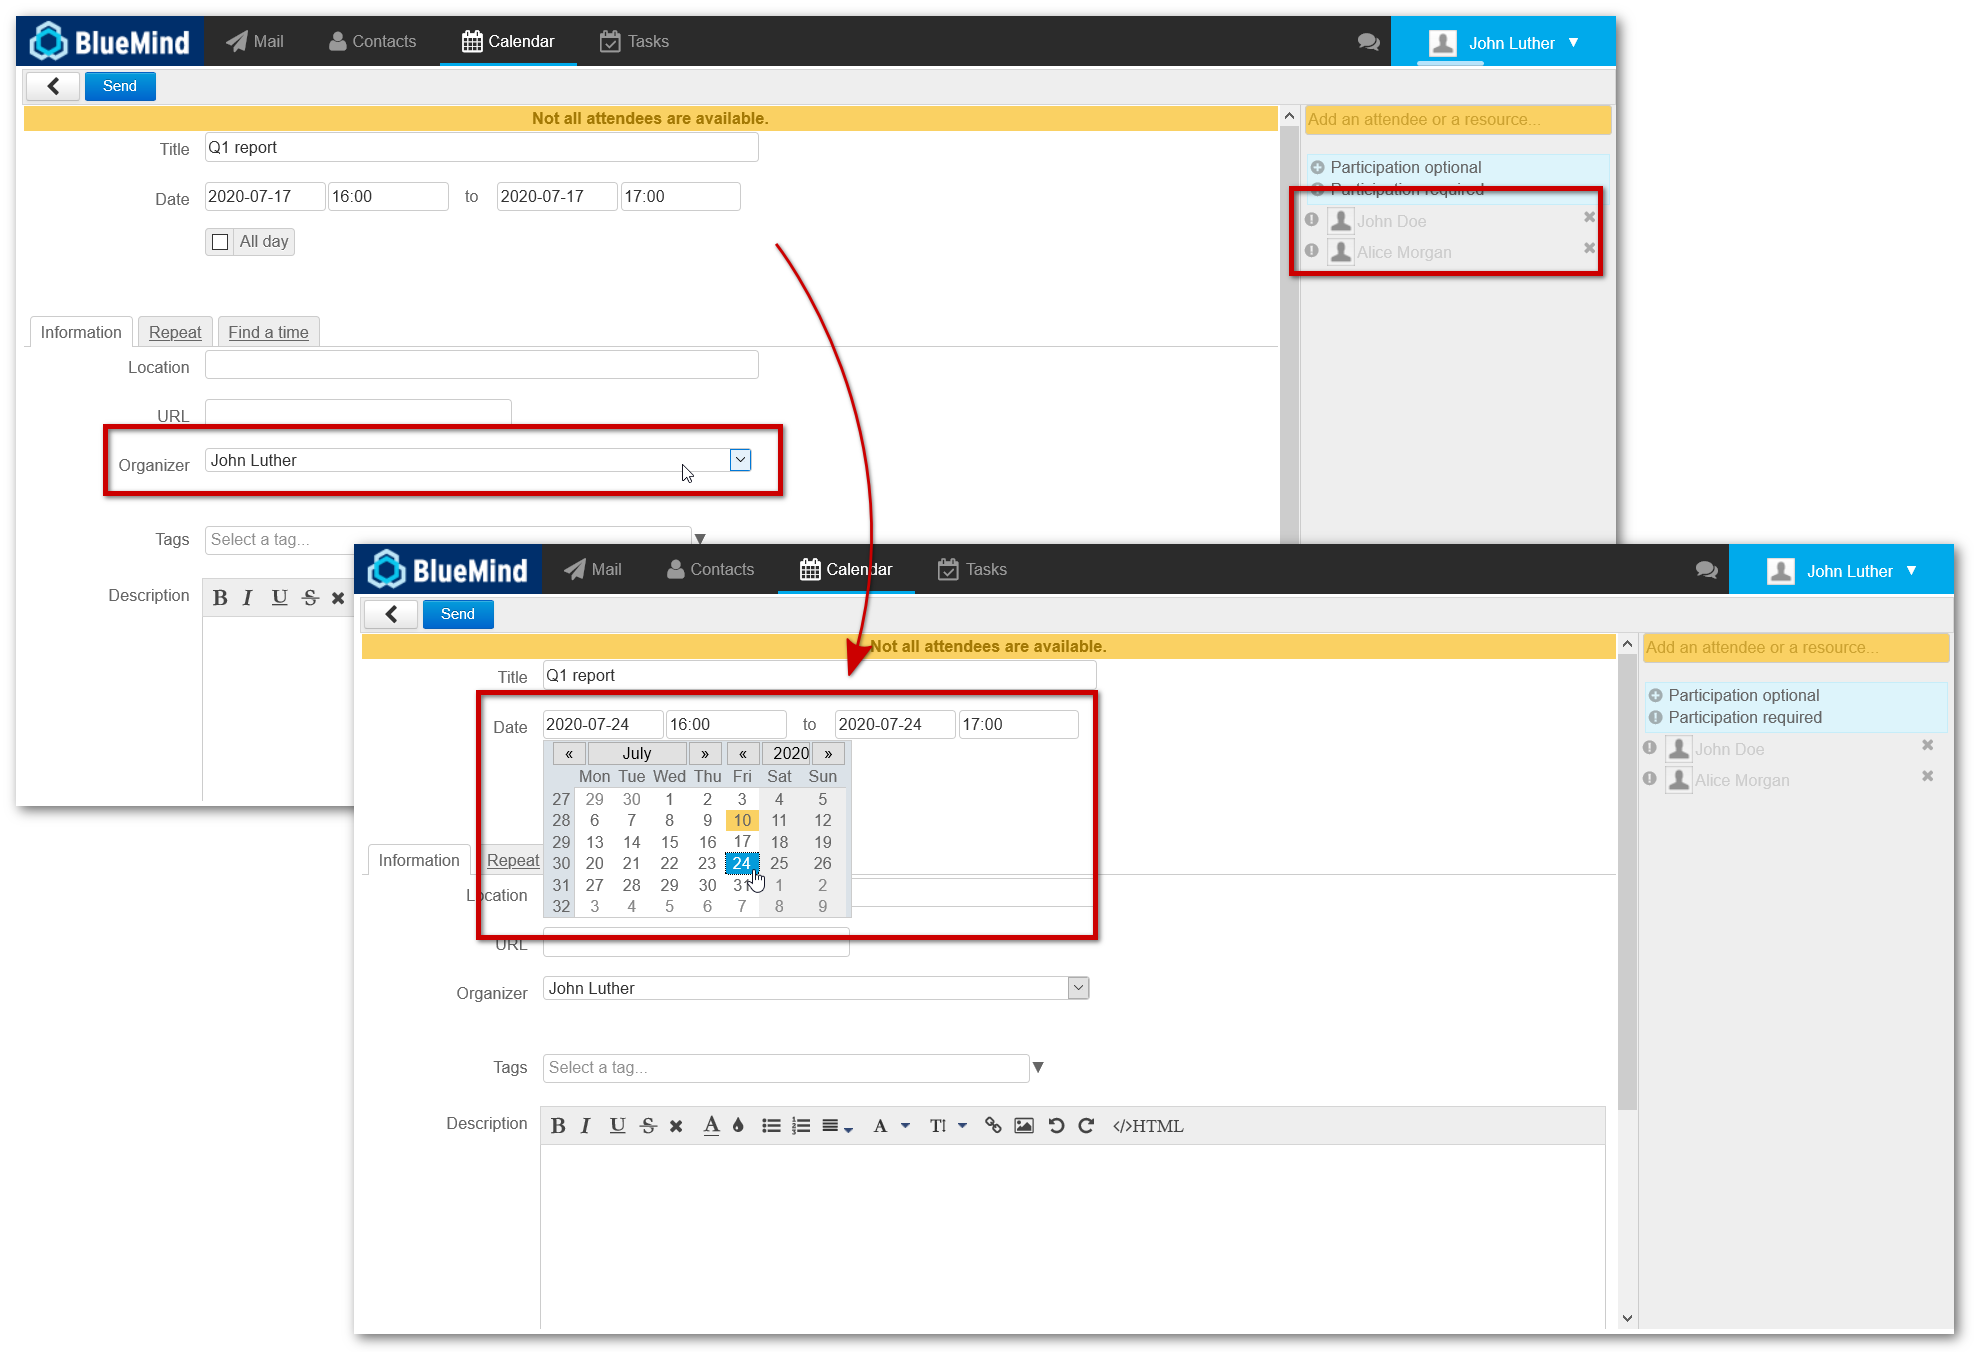
Jean-Claude ändert das Datum, um in der darauffolgenden Woche die Organisation dieser Besprechung zu übernehmen:
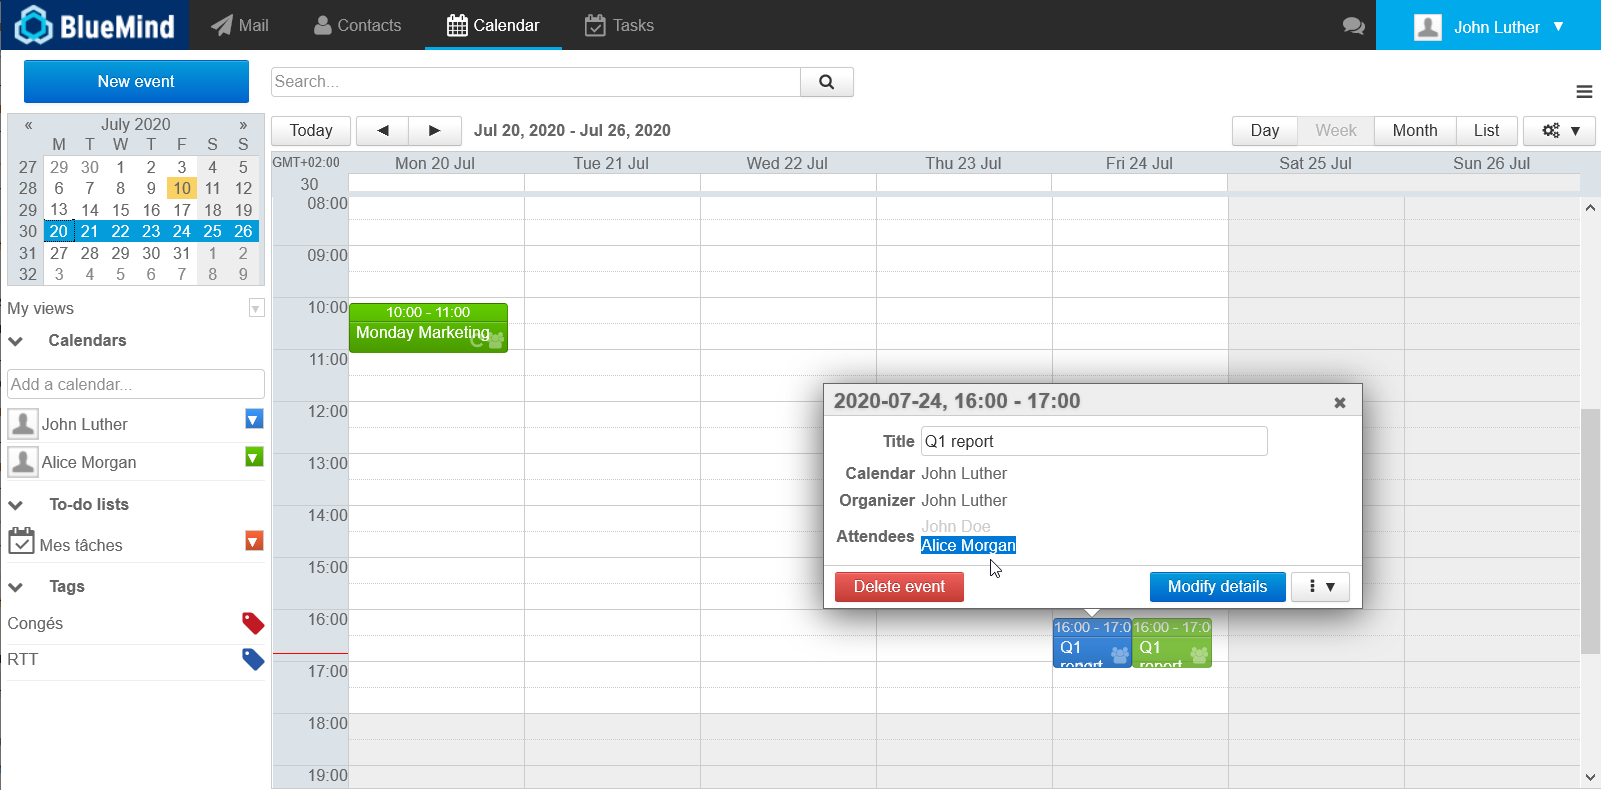
Nach dem Speichern erscheint die Besprechung wie konfiguriert in ihren Kalendern:
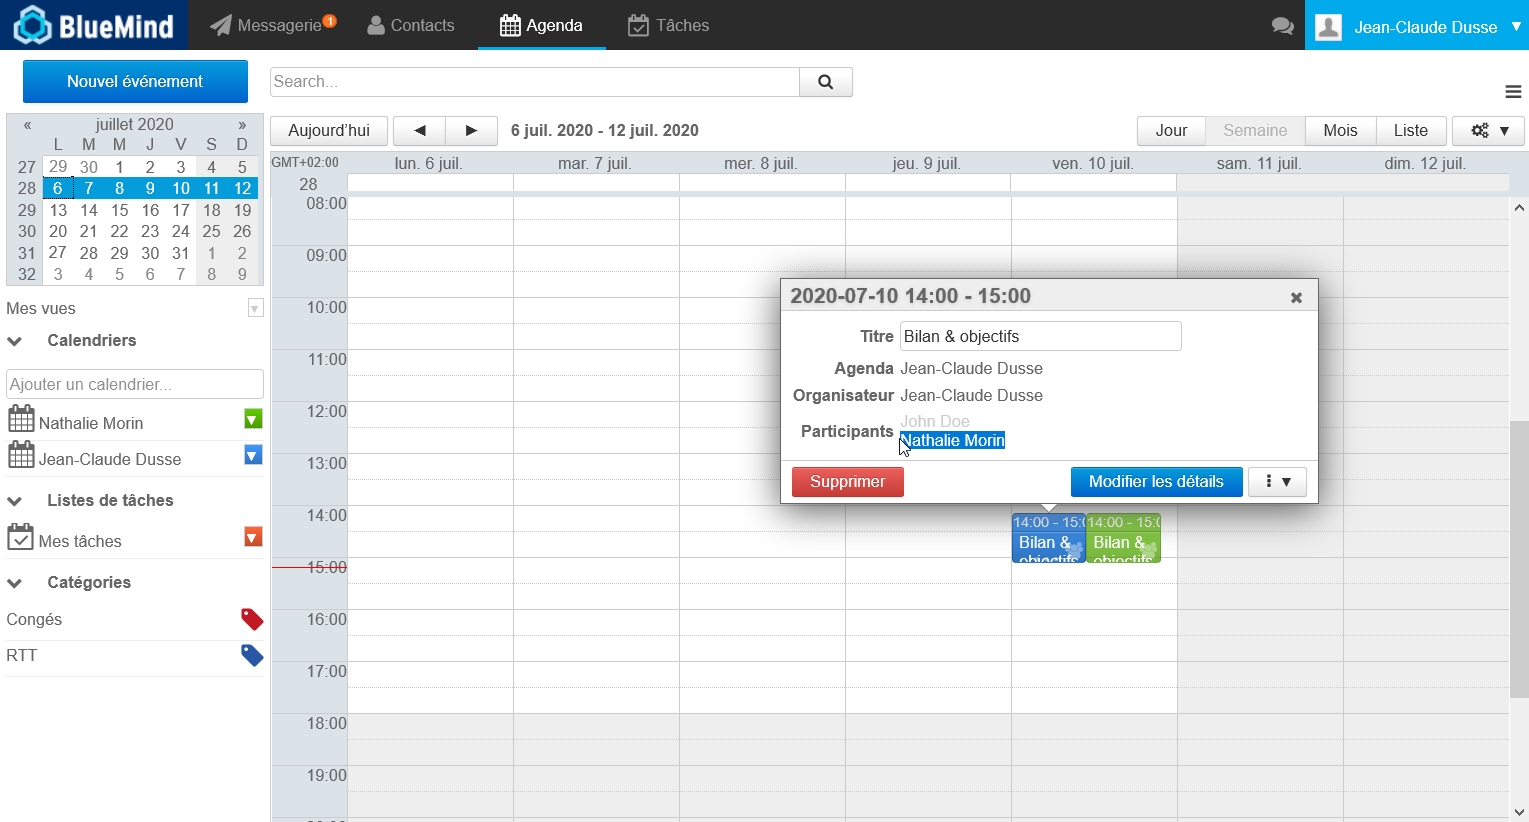
Die ursprüngliche Besprechung hat sich nicht geändert:
Löschen eines Ereignisses
So löschen Sie ein Ereignis:
- Klicken Sie im Hauptfenster auf das Ereignis.
- Klicken Sie im angezeigten Popup-Fenster auf die Schaltfläche "Löschen".
- Wenn Sie der Organisator sind und mehrere Teilnehmer eingeladen haben, wird das Ereignis bei allen Teilnehmern gelöscht und sie erhalten eine Mail zur Information.
- Wenn Sie einfacher Teilnehmer des Ereignisses sind, wird nur Ihre Teilnahme abgesagt, bei den anderen Teilnehmern bleibt das Ereignis weiterhin vorhanden.
Der Organisator erhält keine Mail zur Information, aber in der Teilnehmerliste des Ereignisses werden Sie als nicht teilnehmend markiert.
- Wählen Sie beim Löschen eines wiederkehrenden Termins die gewünschte Option:
- Nur dieses Ereignis
- Alle Ereignisse in dieser Serie
- Alle folgenden Ereignisse
| Remarque | ||
|---|---|---|
| ||
| Wenn ein Teilnehmer ein Ereignis löscht, erscheint es nicht mehr im Kalender, so dass es diesem Teilnehmer nicht mehr möglich ist, seine Teilnahme nachträglich zu ändern. |
Teilnahme an einem Ereignis
Anzeige
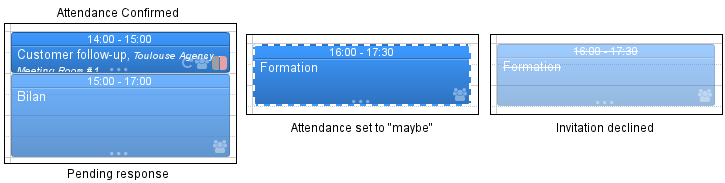
Wie ein Termin im Kalender angezeigt wird, ist abhängig von der Teilnahme des Benutzers:
- Termin akzeptiert: Vollfarbe
- Antwort steht noch aus: Transparenz
- Teilnahme wurde mit "vielleicht" gekennzeichnet: Volltonfarbe und Umrandung mit einer gepunkteten Linie
Termin abgelehnt: Transparenz, durchgestrichener Inhalt
Astuce Der Benutzer kann wählen, ob abgelehnte Ereignisse angezeigt werden sollen oder nicht. Diese Option ist in der Verwaltung der Benutzereinstellungen > Kalender > Registerkarte "Allgemein" zu finden: "Abgelehnte Ereignisse anzeigen".
Diese Einstellung ist nicht standardmäßig aktiviert, kann aber nützlich sein, um den Teilnahmestatus für ein Ereignis zu ändern, das zuvor abgelehnt wurde.
| Bm_legend | ||
|---|---|---|
| ||
|

Teilnahme angeben
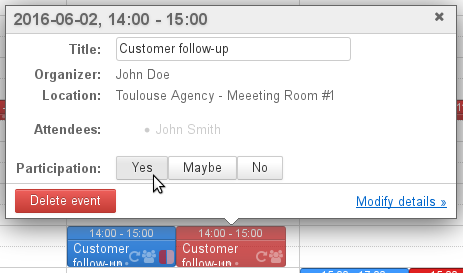
Um die Teilnahme an einem Ereignis zu bestätigen oder abzulehnen, gehen Sie wie folgt vor:
- Klicken Sie im Hauptfenster auf das Ereignis.
Klicken Sie im angezeigten Popup-Fenster auf die Schaltfläche Ihrer Wahl:

Remarque title Änderung ab BlueMind 4.2 In den Versionen vor 3.5.15 ist es möglich, die eigene Teilnahme zu ändern, ohne den Organisator zu informieren: Dieses Vorgehen wird nicht empfohlen, da der Organisator in diesem Fall den Status dieses Teilnehmers nicht in seinem Kalender sieht.
Weitere Informationen zur Darstellung der Teilnahme an einer Besprechung finden Sie auf der Seite Kalender - Abschnitt 3 Verwaltung von Besprechungen
Chronologischer Verlauf eines Ereignisses
Es ist jetzt möglich, den Erstellungs- und Änderungsverlauf eines Ereignisses anzuzeigen.
Klicken Sie in der Detailansicht eines Ereignisses auf die Schaltfläche "Historie":
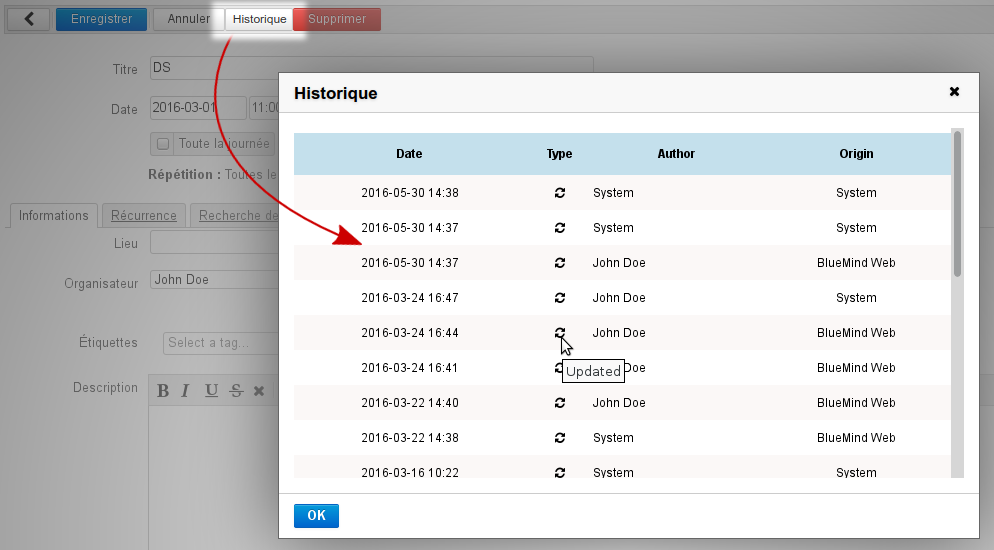 Im Verlauf sind folgende Informationen enthalten:
- Datum der Aktion
- Art der Aktion: Erstellung ("Created") oder Änderung ("Updated")
- Benutzer, der die Aktion durchgeführt hat ("Author")
- Herkunft: BlueMind-Client, Drittanbieter-Client (Fat Client oder mobiles Gerät) usw.
Vue d'ensemble
Gestion des contenus
Apps