Introduction
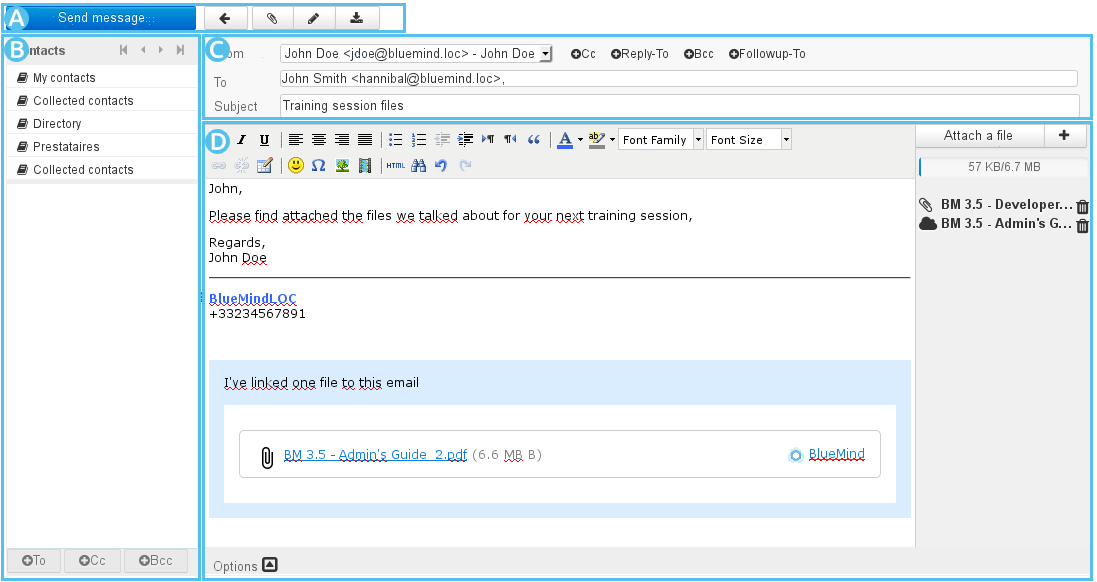
 : this area offers you a series of message action buttons: send, cancel, attach, add signature and save.
- : this area allows you to access your contacts and add them as message recipients (primary recipient, copy, or blind copy)
- : this area shows the address and subject boxes.
- In this area, you can select the identity you want to use to send the message.
- Recipient boxes – click Cc or Bcc to display the appropriate box – can be filled in from the contacts in or directly by typing into them. Autocomplete suggests matching contacts.
- : message composition area.
- A tool bar allows you to format the message.
- On the right hand side is where you can work with attachments: click "Attach a file" or drag-drop an attachment into the message.
- The options button at the bottom of the compose box gives you access to more message settings.
Message recipients
The "To" box, allows you to enter the primary message recipient(s).
Two 2 links allow you to add more recipients:  and
and 
- 2 autres liens permettent d'ajouter des champs particuliers other links allow you to add special fields:
- Reply-To: permet de préciser une ou plusieurs adresses qui seront utilisées lorsque le destinataire utilisera la fonction "Répondre"enter one or several addresses that will be automatically added when the message's recipient uses the "Reply" button.
- Follow-up To: permet de préciser une ou plusieurs adresses qui seront ajoutées lorsque le destinataire utilisera la fonction "Répondre à tous"enter one or several addresses that will be automatically added when the message's recipient uses the "Reply all" button
| Info |
|---|
|
Based on As you type the first characters you type, the recipient fields suggest results by searching your address books and the directory. |
Attachments
To add attachments:
To delete an attachment:
- Click the
 icon corresponding to the attachment you want to delete.
Options
The  button at the bottom of the page allows you to open opens an advanced settings dialog box which allows you to:
Choose the edition mode: by default, messages are edited in HTML and formatted. To use an unformatted edition mode, select "plain text".
Modify message priority status.
Request a read receipt (when the recipient opens the message and if they accept the read receipt request).
Request a delivery status receipt (the recipient's server has received the message).
Choose a different folder from the "Sent messages" folder to keep a copy of the message sent.
Saving messages
Messages that are being written are automatically saved at regular intervals.
To force-save a message you are writing, click  "Save this draft".
The message is then saved into the "Drafts" folder.
The  "Insert signature" button allows you to add the signature related to the identity you are using to the message.
The "From" field – for the recipient – is pre-filled with your default identity.
You can select another identity if you like.
Sending messages
Click  in the top left corner of the composition window.
Signature d'entreprise
Présentation
Lors de l'insertion des destinataires, si des signatures d'entreprises sont paramétrées et correspondent aux critères d'expéditeurs et destinataires pour l'email, alors un encadré informe de l'ajout d'une signature et présente celle-ci :
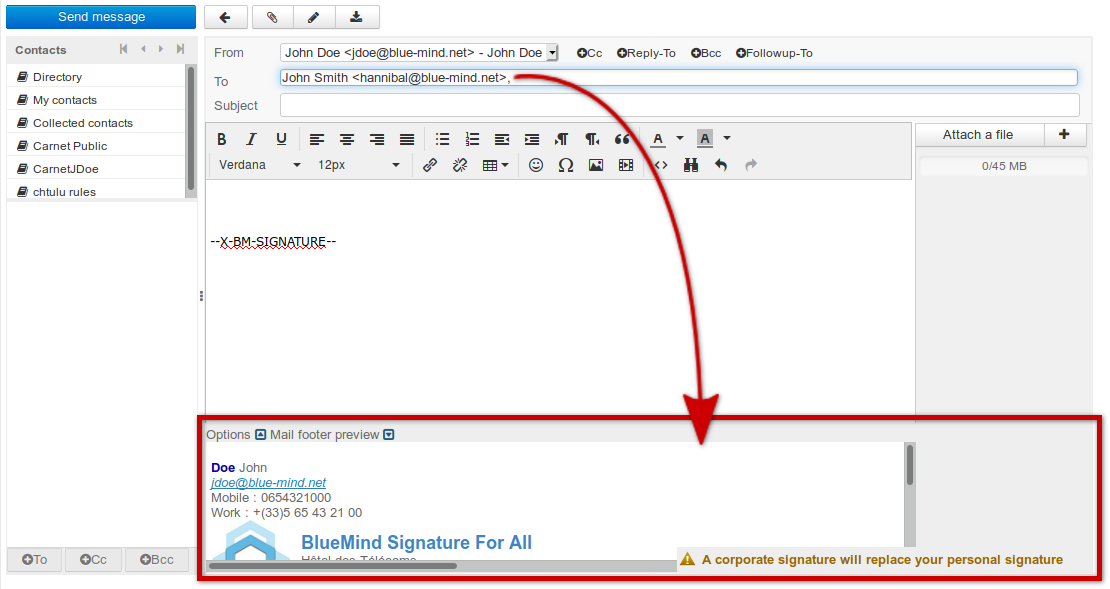 Image Removed
Cela permet à l'utilisateur de contrôler quelle est la signature utilisée, dans le cas où plusieurs signatures sont paramétrées et pourraient lui correspondre (s'il est membre de plusieurs groupes par exemple ou si une signature événementielle temporaire est mise en place).
Placement de la signature
La signature est placée par défaut à la toute fin du message. Néanmoins, certains paramétrages permettent d'optimiser ce placement.
Corporate signatures
Introduction
When you add recipients in the "To" box, if corporate signatures have been configured and match the message's senders and recipients criteria, a warning message will pop up telling you about the signature that will be added:
Image Added
This allows you to control which signature is used in the event that several matching signatures have been configured (if you belong to several groups, for instance, or if a temporary event signature is active).
Signature placement
By default, the signature is added at the very end of the message. Some settings allow you to modify this as appropriate.
If the signature's manager has enabled the option allowing users to place the signature, the string Si le gestionnaire de la signature a activé l'option permettant à l'utilisateur de placer la signature, la chaîne "--X-BM-SIGNATURE–" apparaît là où la signature apparaîtra. Cette information est intéressante en particulier lors d'une réponse à un fil de discussion :
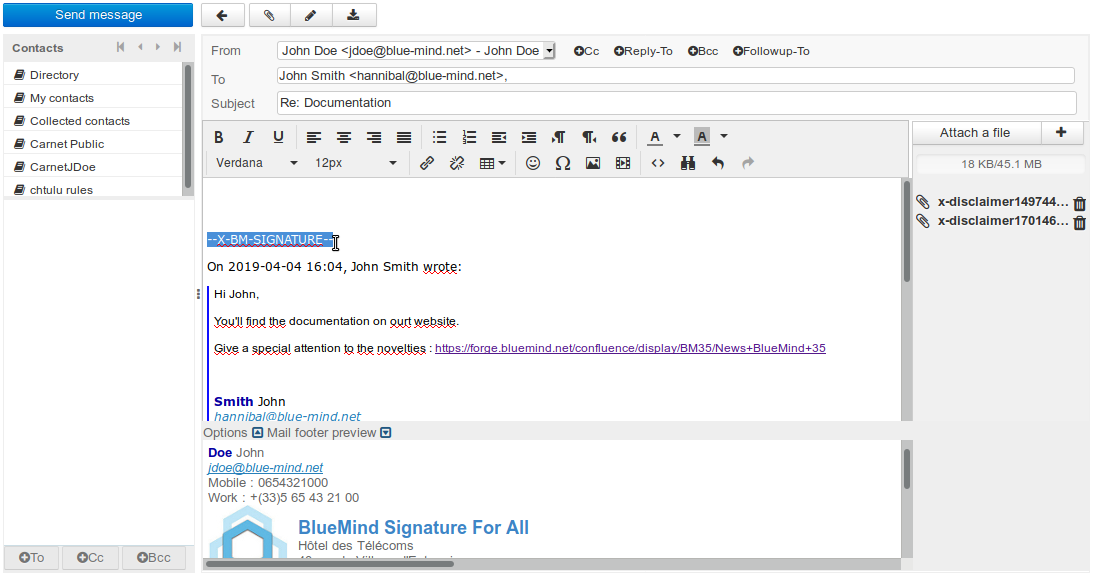 Image Removed
Ainsi, l'utilisateur peut déplacer la signature en déplaçant simplement cette chaine de façon simple :
- sélectionner/déplacer
- ou couper/coller
- ou supprimer/réécrire.
is shown where the signature will appear. This is particularly useful when you're replying to a thread of messages:
Image Added
You can therefore move the signature simply by moving this string with:
- select/move
- or cut/paste
- or delete/write again.
| Info |
|---|
In order to streamline conversations with multiple replies, previous instances of the signature in the message thread will be deleted automatically by the system. Note that this option is not the default behaviour, it must therefore be enabled by the administrator |
| Info |
|---|
Afin d'épurer les discussions lors de multiples échanges de réponses, les versions précédentes de la signature de l'utilisateur dans le fil des messages pourront être supprimées automatiquement par le système. Il s'agit là d'une option qui doit être activée par l'administrateur et non d'un comportement par défaut systématique. |