Gestion des ressources
Créer une ressource
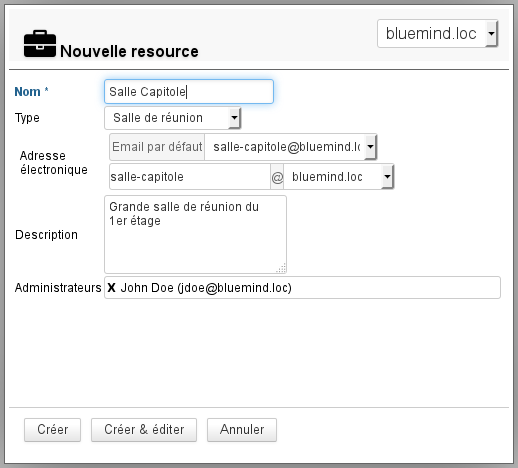
Depuis la page des entrées d'annuaires, cliquer sur le bouton «Nouveau» > «Ressource» et renseigner les informations concernant la ressource à créer :
- Seuls le nom et l'adresse sont obligatoires
NB : l'adresse est automatiquement complétée lors de la saisie du nom, veuillez vous assurer avant de valider qu'elle ne contient pas de caractères spéciaux (majuscules, accents...) - les administrateurs désignés ici se voient attribuer un droit de partage "Peut modifier mes rendez-vous et gérer mes partages".
Celui-ci pourra être modifié par la suite et d'autres administrateurs pourront être désignés. Voir chapitre ci-après « Partage d'une ressource »
Cliquer enfin sur «Créer» pour procéder à une création rapide ou sur «Créer et éditer» pour créer la ressource et accéder à sa fiche (voir chapitre ci-dessous « Éditer une ressource »).
Éditer et administrer une ressource
Pour éditer une ressource, cliquer sur la ligne correspondante dans la liste de ressources disponibles.
Général
Propriétés
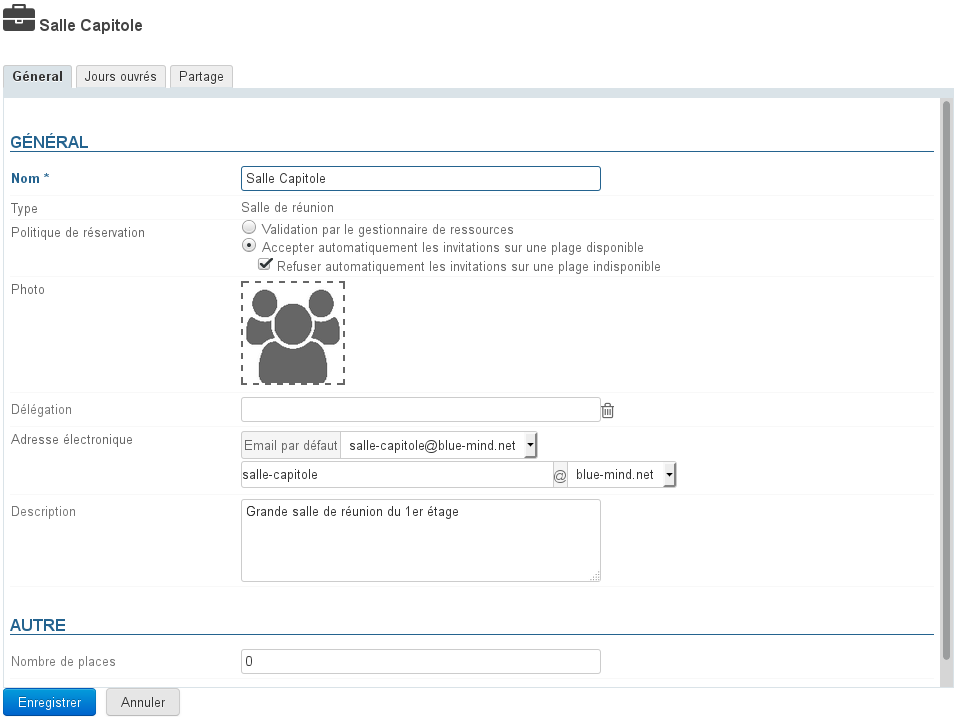
La page d'édition permet de modifier les informations générales de la ressources (nom, photo, délégation, adresse de messagerie, description) :
Pour ajouter ou modifier la photo (avatar) de la ressource, cliquer dans le carré blanc ou sur la photo déjà en place.
Politique de réservation
À partir de BlueMind 3.5.5, les administrateurs peuvent choisir de permettre ou d'empêcher les réservations multiples (surbooking) pour une ressource :
- Validation par le gestionnaire de ressources : le statut de participation de la ressource reste en attente jusqu'à ce que le gestionnaire accepte ou refuse l'invitation.
C'est l'ancien fonctionnement, qui reste actif pour les anciennes ressources et pour les ressources migrées depuis BlueMind 3.0 lors du changement de version. - Accepter automatiquement : le gestionnaire de la ressource reçoit une demande mais la participation est automatiquement validée si la ressource est disponible sur le créneau demandé (plage horaire ouvrée et aucune autre réservation acceptée)
C'est désormais le fonctionnement par défaut lors de la création d'une nouvelle ressource.- Refuser automatiquement : le gestionnaire de la ressource reçoit une demande mais la participation est automatiquement refusée si la ressource n'est pas disponible sur le créneau demandé.
Le refus est indissociable de l'acceptation.
Cela permet d'accepter automatiquement les réservations sur un créneau disponible en laissant l'arbitrage au gestionnaire lorsque la ressource n'est pas disponible (organiser une réunion tardive, faire passer en priorité une 2ème demande plus importante, etc.)
La politique de réservation automatique ne peut s'appliquer qu'aux événements ponctuels : les événements récurrents restent soumis à la validation par un gestionnaire.
- Refuser automatiquement : le gestionnaire de la ressource reçoit une demande mais la participation est automatiquement refusée si la ressource n'est pas disponible sur le créneau demandé.
À noter que seuls les administrateurs ont accès à ce paramétrage, les gestionnaires de ressources restent des utilisateurs à qui l'on a donné le droit de modifier le calendrier de la ressource (accepter/refuser/modifier des rendez-vous).
Horaires de disponibilités
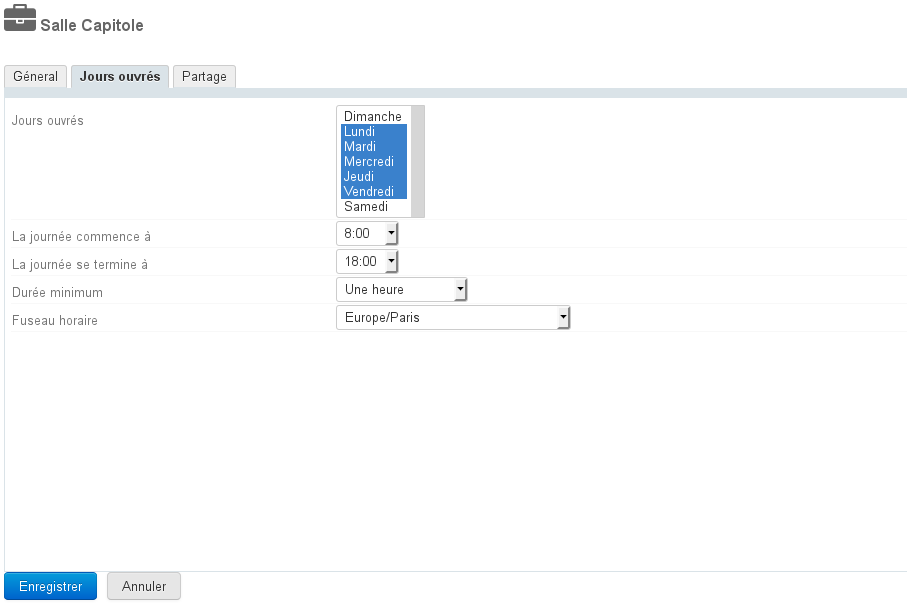
Le nouvel onglet "Jours ouvrés" permet de définir des jours et horaires de disponibilités de la ressource, ainsi que la durée minimum pour laquelle elle peut être réservée (1h, 2h, demie-journée, journée) et son fuseau horaire :
De même que pour inviter un utilisateur, ces informations permettront d'informer la personne souhaitant réserver la ressource mais n'empêcheront pas sa réservation en dehors des heures de disponibilités ou pour une durée plus courte.
Partage d'une ressource
Par défaut, une ressource a pour partage public "Peut m'inviter à une réunion" : tous les utilisateurs du domaine peuvent ainsi effectuer une demande de réservation.
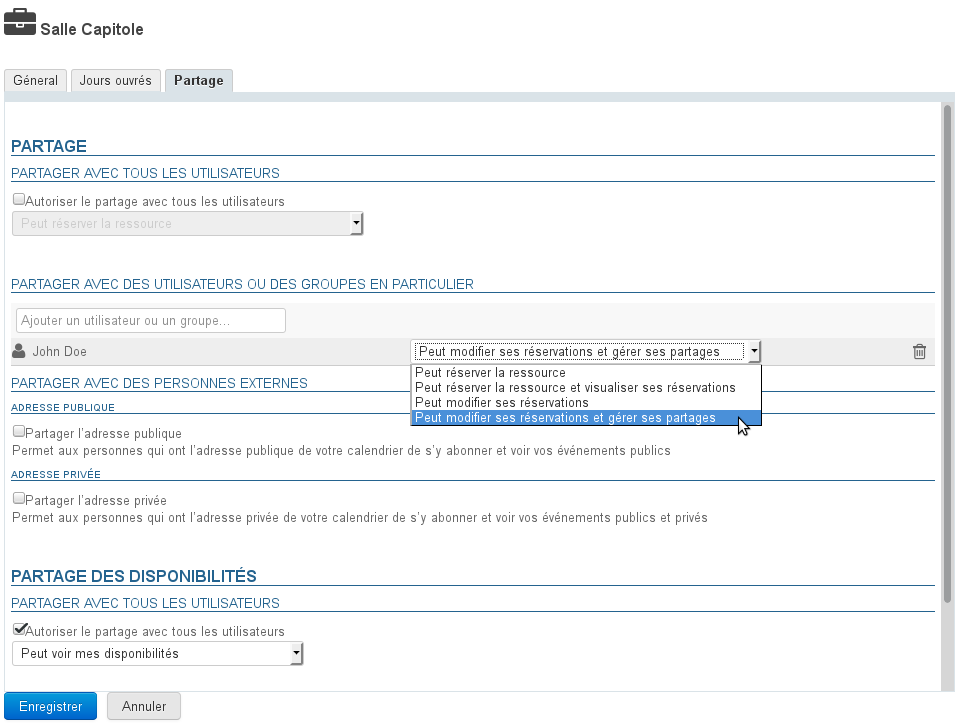
L'onglet « Partage » permet de modifier ce partage public et/ou donner des droits supplémentaires à des utilisateurs ou groupes (retirer ou désigner un nouvel administrateur par exemple, donner le droit de visualisation du calendrier à certains utilisateurs, etc.) :
Les droits possibles sont :
- Peut réserver la ressource : l'utilisateur peut faire une demande de réservation en invitant la ressource
- Peut réserver la ressource et visualiser ses réservations : en plus du droit précédent, l'utilisateur peut voir le calendrier de la ressource et ainsi ses disponibilités
- Peut modifier ses réservations : l'utilisateur devient gestionnaire de la ressource, il reçoit les messages de demande de réservation, il peut accepter, refuser ou modifier les événements auxquels la ressource est invitée. Il peut aussi directement écrire dans le calendrier de la ressource afin d'y créer des rendez-vous.
- Peut modifier ses réservations et gérer ses partages : en plus du droit précédent, l'utilisateur accède à la gestion des partages de la ressource afin de modifier les droits
De même que pour les utilisateurs, cet onglet permet aussi de partager le calendrier avec l'extérieur et de gérer le partage des disponibilités.
Pour plus d'informations sur les partages voir la page dédiée : Gestion des partages
Utilisation d'une ressource
Pour associer une ressource à un événement, il suffit lors de la création de l'événement de l'inviter en l'ajoutant à la liste des participants comme les autres utilisateurs.
Pour en savoir plus sur l'utilisation des ressources, consulter la page dédiée du guide de l'utilisateur : Les ressources.
Gestion des types de ressource
Dans la console d'administration, la page Annuaires > Gestion des entités > Types de ressources vous permet de visualiser et gérer les types de ressources disponibles.
À partir de BlueMind 3.5.13 il est possible de définir des patrons de description d'événements. Lors de l'invitation d'une ressource de ce type à un événement, le patron sera automatiquement inséré dans la description de l'événement. Ces patrons peuvent contenir des variables et être définis dans plusieurs langues afin de s'adapter à la langue de l'organisateur de la réunion.
Créer un nouveau type
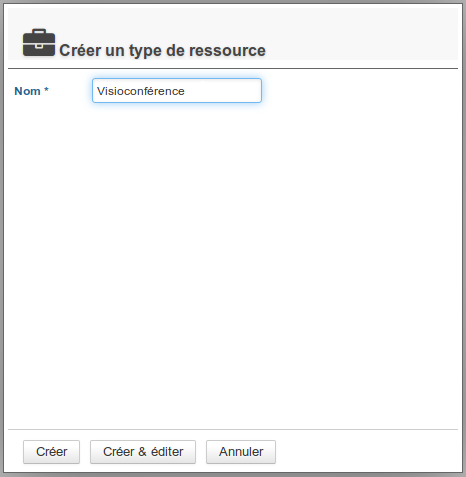
Pour ajouter un type de ressource, cliquer sur le bouton «Nouveau» et remplir les informations :
Cliquer ensuite sur «Créer» pour procéder à une création rapide ou sur «Créer et éditer» pour créer le type et accéder à plus d'options de personnalisation (voir rubrique "Éditer un type de ressource").
Éditer un type de ressource
Pour éditer un type de ressource, cliquer sur la ligne correspondante dans la liste des types disponibles.
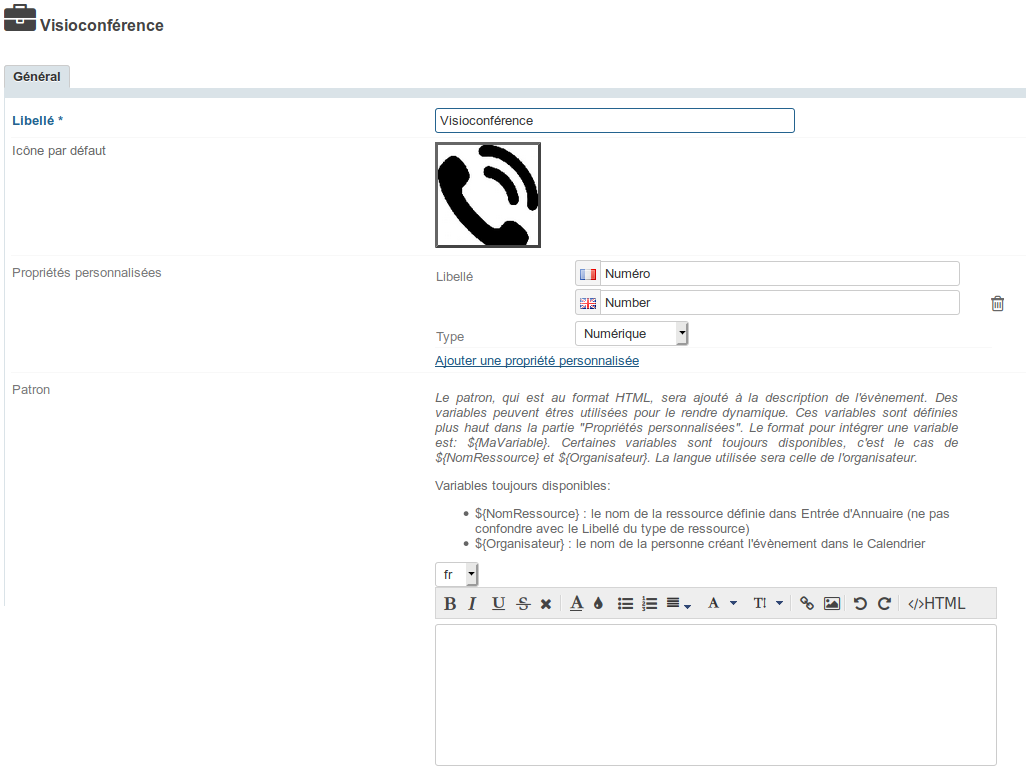
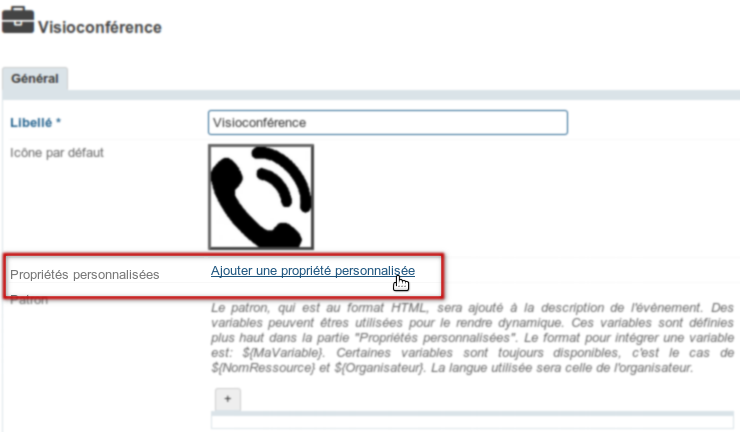
La page d'édition permet de modifier le libellé, ajouter une icône par défaut et modifier ou ajouter des propriétés personnalisées :
Créer un patron de contenu
À partir de BlueMind 3.5.13 il est possible de définir un patron : ce texte sera automatiquement ajouté à la description d'une réunion lorsqu'une ressource de ce type y sera invitée.
Créer un patron
- sélectionner la langue souhaitée
- remplir le contenu :
- Cliquer sur pour enregistrer les changements.
Patron multilingue
Ajout d'une langue
Pour créer d'autres langues :
- sélectionner la langue souhaitée dans la liste déroulante
remplir le contenu de même qu'avec la première langue :
Le contenu de la ou les précédentes langues est gardé en mémoire, vous pouvez basculer de l'une à l'autre et créer autant de patrons qu'il y a de langues disponibles dans l'interface.
Cliquer sur pour enregistrer les changements.
Lors de la création d'un événement, le contenu sera ajouté en fonction de la langue de l'organisateur.
Suppression d'une langue
Pour supprimer le patron d'une langue :
- sélectionner la langue souhaitée dans la liste déroulante
- vider le champ de contenu (sélectionner le texte et le supprimer)
- Cliquer sur pour enregistrer les changements.
Utilisation de variables
Le patron peut contenir des variables, qui seront à renseigner dans la ressource de ce type puis remplacées automatiquement dans le patron par le système lors de la création de l'événement.
Comme indiqué dans l'aide en ligne au dessus du formulaire, 2 variables existent pour tous les types et toutes les ressources :
- ${NomRessource} : le nom de la ressource
- ${Organisateur} : le nom de la personne créant l'évènement dans le Calendrier
D'autres variables peuvent être créées au moyen des Propriétés personnalisées .
Pour cela :
- cliquer sur le lien "Ajouter une propriété personnalisée" :
- Remplir le libellé (en Français et en Anglais) et choisir le type de propriété.
3 types sont possibles :- Numérique : contiendra obligatoirement un nombre
- Texte : contiendra une chaîne de caractère
- Case à cocher : dans ce contexte de patron de description d'événement, ce type n'a pas d'intérêt, nous déconseillons son utilisation
- Dans le patron de contenu, utiliser ensuite le libellé avec la syntaxe
${libellé}.
Par exemple :Vous êtes invité(e) à appeler ${Organisateur} au numéro ${numero}
les variables seront plus tard renseignées avec les valeurs indiquées dans les fiches de gestion des ressources, voir l'exemple ci-après.
NB : la syntaxe s'utilise de la même façon lorsque le libellé comprend plusieurs mots, comme par exemple${Mot de passe}.
Exemple d'application
L'organisation utilise un service de visioconférences comprenant plusieurs "ponts" : un pont est défini par son numéro de téléphone et son code d'accès. Il faut pouvoir réserver les ponts et transmettre les informations aux invités des réunions afin qu'ils sachent facilement sur lequel ils doivent se connecter.
Nous allons donc utiliser pour cela les ressources :
- une ressource représentera un pont de visioconférence
- un type de ressource "Visioconférence" permettra de définir les propriétés et le patron de contenu pour toutes les ressources de ce type
Création du type
Le type de ressource "Visioconférence" est créé.
On lui attribue 2 propriétés personnalisées :
- Numéro : de type numérique, il attendra le numéro de téléphone
- Code confidentiel : de type numérique, il attendra le code d'accès
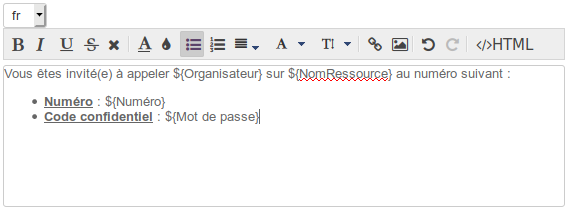
On crée le patron suivant avec les variables correspondantes :
-FR-
Vous êtes invité(e) à appeler ${Organisateur} sur ${NomRessource} au numéro suivant :
- Numéro : ${Numéro}
- Code confidentiel : ${Code confidentiel}
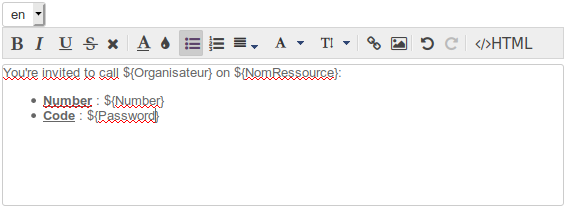
-EN-
You're invited to call ${Organizer} on ${ResourceName}:
- Number : ${Number}
- Code : ${Password}
Création de la ressource
On crée une ressource Téléconf442 pour le pont de numéro 01 22 333 442 dont le code d'accès est 137 :
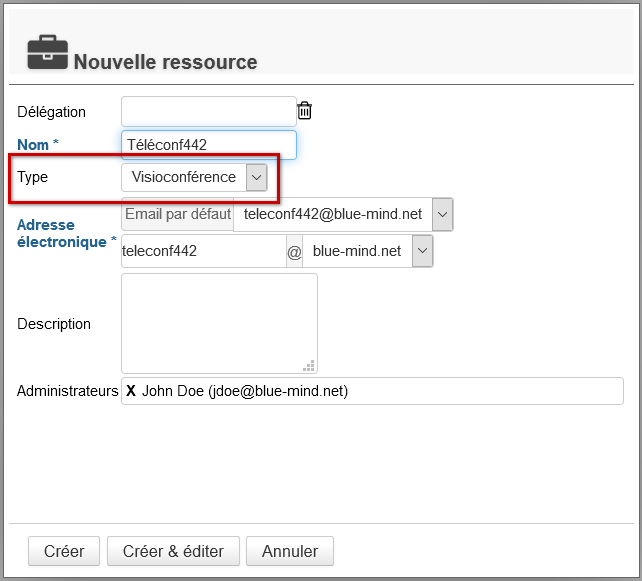
Dès la création on sélectionne le type Visioconférence
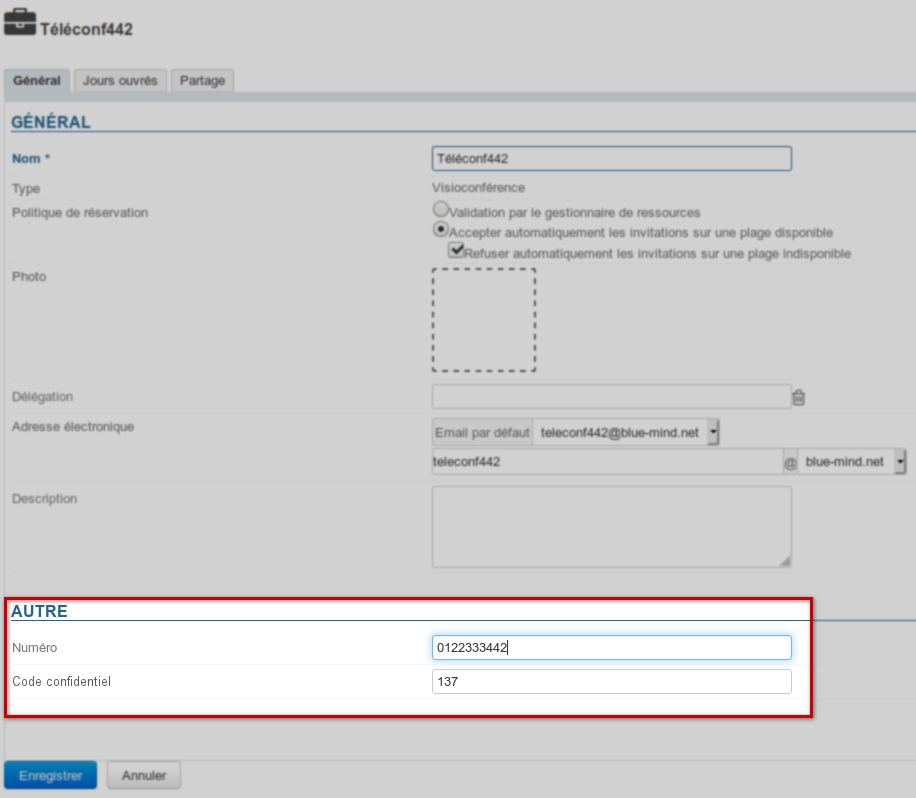
Dans la fiche d'administration de la ressource, nous allons retrouver les propriétés créées pour ce type dans la section "Autre" :
On renseigne le numéro et téléphone et le code puis on clique sur "Enregistrer"
Utilisation de la ressource
Lors de la création d'un événement, on ajoute la ressource à une réunion de la façon habituelle.
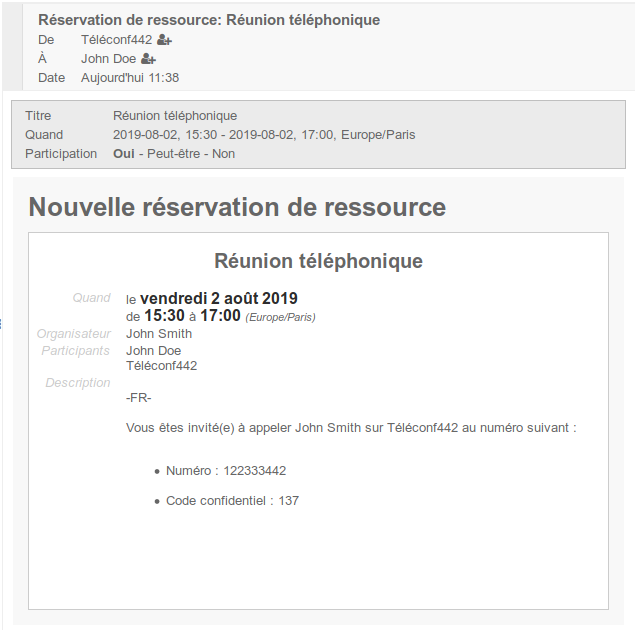
Le champs description de la réunion est alors aussitôt complété automatiquement avec le patron défini pour le type et les variables sont renseignées avec les valeurs des propriétés de la ressource :
- dans l'événement d'agenda :
- après envoi, la description apparait aussi dans l'email d'invitation reçu par les participants :
Patron multilingue
Dans le cas des patrons multilingues, c'est le patron de la langue de l'organisateur qui est ajouté à la description de l'événement.

