Comparaison des versions

Légende

  • Ces lignes ont été ajoutées. Ce mot a été ajouté.
  • Ces lignes ont été supprimées. Ce mot a été supprimé.
  • La mise en forme a été modifiée.
Commentaire: Published by Scroll Versions from space DA and version BM-4.0
Sv translation
languagefr

Présentation

La synchronisation d'Outlook avec BlueMind 4.0 ne nécessite plus l'installation d'un connecteur donnant accès aux fonctions de BlueMind depuis Outlook. Désormais, vous pouvez utiliser pleinement toutes les fonctionnalités de votre Outlook connecté à votre messagerie BlueMind.

L'installation consiste en 3 parties, dont les 2 premières doivent être réalisées par un administrateur :

  1. Installation côté serveur
  2. Configuration du poste Windows afin d'établir la connexion avec le serveur
  3. Création d'un compte dans Outlook
Info

Comme dans les versions précédentes de BlueMind, l'utilisation d'Outlook est rendue possible par une souscription. Veuillez vous rapprocher de notre équipe commerciale pour obtenir une souscription de test.

Volet
borderWidth3

Sur cette page :

Sommaire
maxLevel2

En rapport :
Mise oeuvre de MAPI pour Outlook

Remarque

L'utilisation d'Outlook en MAPI sans connecteur implique que celui-ci ne peut bénéficier du détachement des pièces jointes volumineuses, ceci étant une fonctionnalité purement BlueMind qui est pour le moment apportée par le connecteur.

Compatibilité

Avertissement
titleOutlook pour MacOS

Les protocoles de communication étant différents, nous ne pouvons garantir la compatibilité qu'avec Outlook pour Windows.

BlueMind 4 n'est ainsi pas compatible avec les versions d'Outlook pour MacOS.

Prérequis

  1. Versions :
    • BlueMind 4.0 avec souscription
    • Poste client :
      • Windows 10 à jour
      • Outlook 2013 (ou supérieur) à jour
  2. Les urls externe et d'autodiscover doivent être accessibles depuis le poste en HTTPS : entrées dans un navigateur elles doivent afficher la page de login de BlueMind

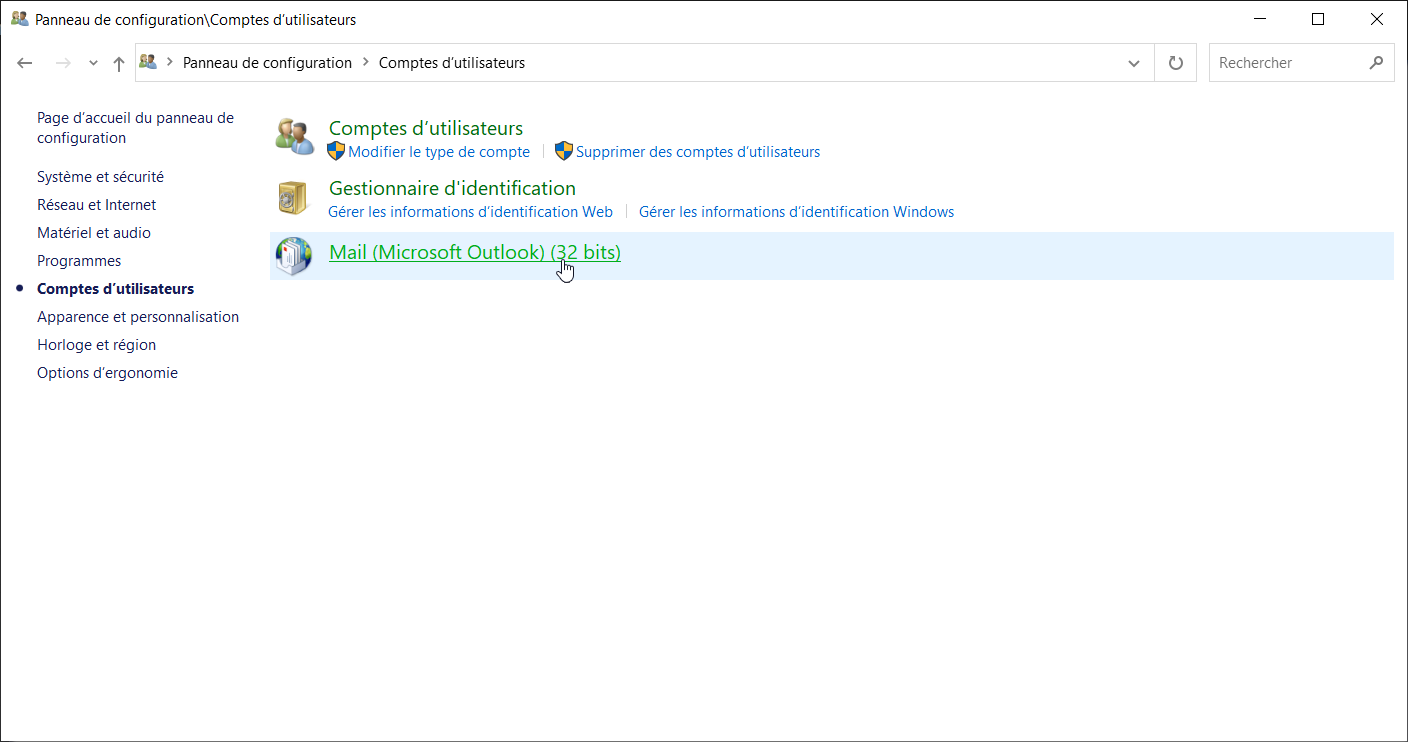
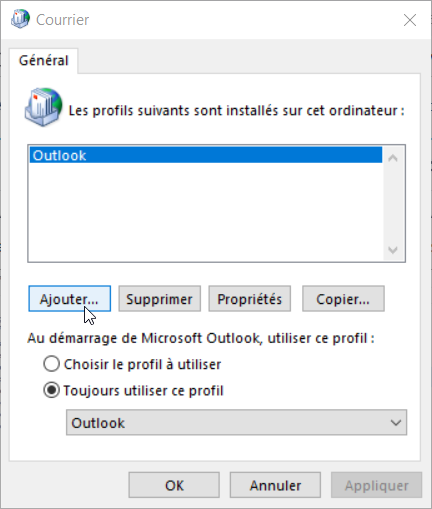
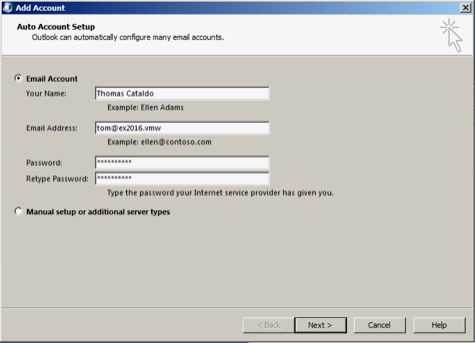
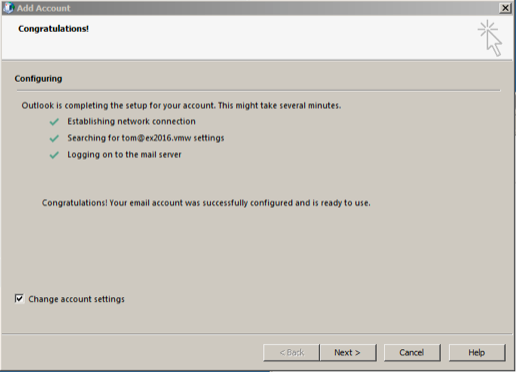
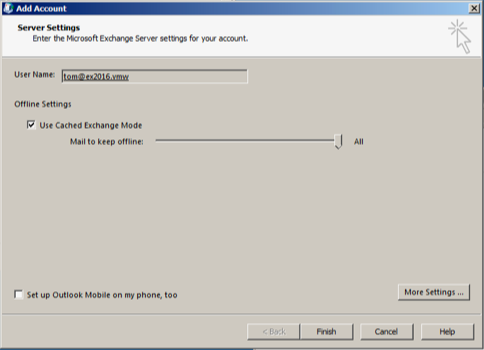
Configuration d'Outlook

  1. Ouvrir le logiciel
  2. Créer un nouveau profil Outlook : le compte ne doit pas être ajouté dans un profil déjà existant, y compris le profil par défaut lors du lancement du logiciel.

Au stade actuel de l'implémentation du protocole MAPI dans BlueMind, le profil Outlook ainsi créé ne peut être utilisé pour se connecter à un autre compte Exchange

Pour cela :

    • se rendre dans le Panneau de configuration > Comptes Utilisateurs > Mail Microsoft Outlook (selon la configuration de l'affichage, ce menu peut se trouver à la racine du panneau de configuration) :
    • Dans la fenêtre Courrier qui s'ouvre, cliquer sur "Ajouter" afin de créer un nouveau profil vierge :
    • Donner un nom à ce profil :
    • l'interface vous amène dès lors à l'étape suivante de création du compte de messagerie
  1. Ajouter un nouveau compte Email

    Avertissement

    Ne pas choisir la configuration manuelle

  2. Renseigner l'adresse email et le mot de passe de l'utilisateur :


    Remarque

    Il est important d'utiliser l'adresse par défaut de l'utilisateur : les alias ne sont pas correctement pris en compte.

  3. Après quelques instants, Outlook signale que le compte a été ajouté avec succès :
  4. Cocher "Modifier les paramètres du compte" et cliquer sur "Suivant"
  5. Cocher "Utiliser le cache Exchange" et amener le curseur le plus à droite possible, jusqu'à "Tout" :
  6. Cliquer sur "Terminer"

Vous y voilà ! Votre Outlook communique désormais en mode natif avec BlueMind !

Les boîtes aux lettres partagées

La version 4.3 de BlueMind permet, grâce à une nouvelle fonctionnalité d'abonnements identique à celle des calendriers et carnets d'adresse, de faire apparaître les boîtes partagées dans les clients Outlook connectés en MAPI.

Il suffit pour cela de se connecter à son compte BlueMind, se rendre dans la gestion de son compte > Messagerie > onglet Abonnements.

Vous pouvez retrouver plus de détails sur la procédure d'abonnement et ses incidences sur les pages dédiées :
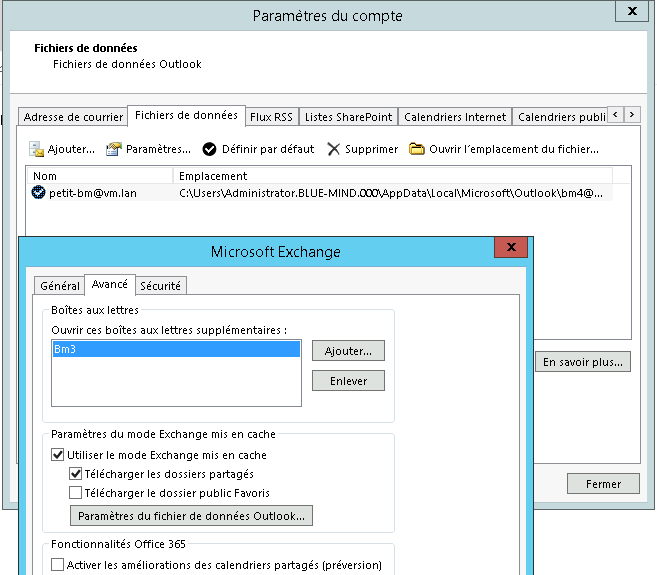
Les boîtes utilisateurs partagées

L'accès aux boîtes aux lettres d'utilisateurs n'est pas disponible de la même façon que pour les boîtes partagées.

Pour faire apparaitre une boîte d'utilisateur dans Outlook, se rendre dans les Paramètres du compte > onglet "Fichiers de données" > "Paramètres" > onglet "Avancé" :

Configuration de Windows pour une organisation

Configuration des postes Windows à l'aide des GPO

Si l'organisation dispose d'un annuaire Active Directory, les GPO suivantes peuvent être appliquées pour faciliter le déploiement de Microsoft Outlook :

Interdire l'authentification avec les serveurs Office 365:

Définir la police suivante:

  • signinoptions = 3 (None allowed)

Documentation: https://getadmx.com/?Category=Office2016&Policy=office16.Office.Microsoft.Policies.Windows::L_SignInOptions#:~:text=This%20policy%20setting%20controls%20whether,organization%20for%20accessing%20Office%20365.&text=%2D%20If%20you%20select%20%22Microsoft%20Account,by%20using%20their%20Microsoft%20Account

Forcer l'interface de configuration avancée

Définir la police suivante:

  • disableoffice365simplifiedaccountcreation = 1

Documentation: https://getadmx.com/?Category=Office2016&Policy=outlk16.Office.Microsoft.Policies.Windows::L_DisableOffice365SimplifiedAccountCreation&Language=fr-fr

Forcer la configuration manuelle des comptes

Définir la police suivante:

  • disableaccountsettingsdetectionservice = 1

Documentation: https://getadmx.com/?Category=Office2016&Policy=outlk16.Office.Microsoft.Policies.Windows::DisableAccountSettingsDetectionService&Language=fr-fr

Forcer l'utilisation d'autodiscover sur l'instance "on-premise"

Définir la police suivante:  

  • enableoffice365configservice = 1

Documentation: https://getadmx.com/?Category=Office2016&Policy=outlk16.Office.Microsoft.Policies.Windows::L_OutlookEnableOfficeConfigServiceInAutodiscover&Language=fr-fr

Paramétrer l'autodiscover adapté pour Bluemind

Définir les polices suivantes:

  • excludelastknowngoodurl = 1
  • excludescplookup = 1
  • excludehttpsrootdomain = 1
  • excludehttpsautodiscoverdomain = 0
  • excludehttpredirect = 0
  • excludesrvrecord = 0
  • excludeexplicito365endpoint = 1
  • disableautodiscoverv2service = 1

Documentation: https://getadmx.com/?Category=Office2016&Policy=outlk16.Office.Microsoft.Policies.Windows::L_OutlookDisableAutoDiscover&Language=fr-fr

Forcer l'utilisation exclusive du protocole MAPI (désactivation du fallback imap)

Définir la police suivante:

  • disablerpctcpfallback = 1

Documentation: https://getadmx.com/?Category=Office2016&Policy=outlk16.Office.Microsoft.Policies.Windows::L_DisableRpcTransportFallback&Language=fr-fr

Désactiver les comptes Microsoft personnels

Définir la police suivante:

  • disableexchangeconsumeraccounts = 1

Documentation: https://getadmx.com/?Category=Office2016&Policy=outlk16.Office.Microsoft.Policies.Windows::L_DisableExchangeConsumerAccounts&Language=fr-fr

Forcer l'utilisation d'un seul compte mapi par profil

Définir la police suivante:

  • maxnumexchange = 1

Documentation: https://getadmx.com/?Category=Office2016&Policy=outlk16.Office.Microsoft.Policies.Windows::L_SetMaximumNumberOfExchangeAccounts&Language=fr-fr

Définir la mise en cache offline

Définir la police suivante:

  • cache mode = 1

Documentation: https://getadmx.com/?Category=Office2016&Policy=outlk16.Office.Microsoft.Policies.Windows::L_ConfigureCachedExchangeMode&Language=fr-fr

Activation des logs en cas de conflits

Définir la police suivante:

  • enableconflictlogging = 3

Documentation: https://admx.help/?Category=Office2016&Policy=outlk16.Office.Microsoft.Policies.Windows::L_TurnOnLoggingForAllConflicts

Configuration des postes à l'aide de clés registres

Pour faciliter le déploiement d'Outlook avec Bluemind, enregistrer les clés registres suivantes sur les postes de travail:

Bloc de code
Windows Registry Editor Version 5.00
 
;; AUTODISCOVER 
;Outlook 2010
[HKEY_CURRENT_USER\Software\Microsoft\Office\14.0\Outlook\AutoDiscover]

"ExcludeExplicitO365Endpoint"=dword:00000001
"ExcludeHttpsAutoDiscoverDomain"=dword:00000000
"ExcludeHttpsRootDomain"=dword:00000001
"ExcludeScpLookup"=dword:00000001
"ExcludeSrvRecord"=dword:00000001
 
;Outlook 2013
[HKEY_CURRENT_USER\Software\Microsoft\Office\15.0\Outlook\AutoDiscover]

"ExcludeExplicitO365Endpoint"=dword:00000001
"ExcludeHttpsAutoDiscoverDomain"=dword:00000000
"ExcludeHttpsRootDomain"=dword:00000001
"ExcludeScpLookup"=dword:00000001
"ExcludeSrvRecord"=dword:00000001
 
;Outlook 2016 et Office365
[HKEY_CURRENT_USER\Software\Microsoft\Office\16.0\Outlook\AutoDiscover]
"ExcludeExplicitO365Endpoint"=dword:00000001
"ExcludeHttpsAutoDiscoverDomain"=dword:00000000
"ExcludeHttpsRootDomain"=dword:00000001
"ExcludeScpLookup"=dword:00000001
"ExcludeSrvRecord"=dword:00000001


;; CACHE MODE ALL, DISABLE MULTIPLE EXCHANGE ACCOUNTS
;Outlook 2016 et Office365
[HKEY_CURRENT_USER\Software\policies\microsoft\office\16.0\outlook\cached mode]
"DisableMultipleExchange"=dword:00000001
"SyncWindowSetting"=dword:00000000

;Outlook 2013
[HKEY_CURRENT_USER\Software\policies\microsoft\office\15.0\outlook\cached mode]
"DisableMultipleExchange"=dword:00000001
"SyncWindowSetting"=dword:00000000

;Outlook 2010
[HKEY_CURRENT_USER\Software\policies\microsoft\office\14.0\outlook\cached mode]
"DisableMultipleExchange"=dword:00000001
"SyncWindowSetting"=dword:00000000

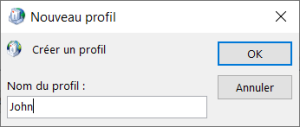
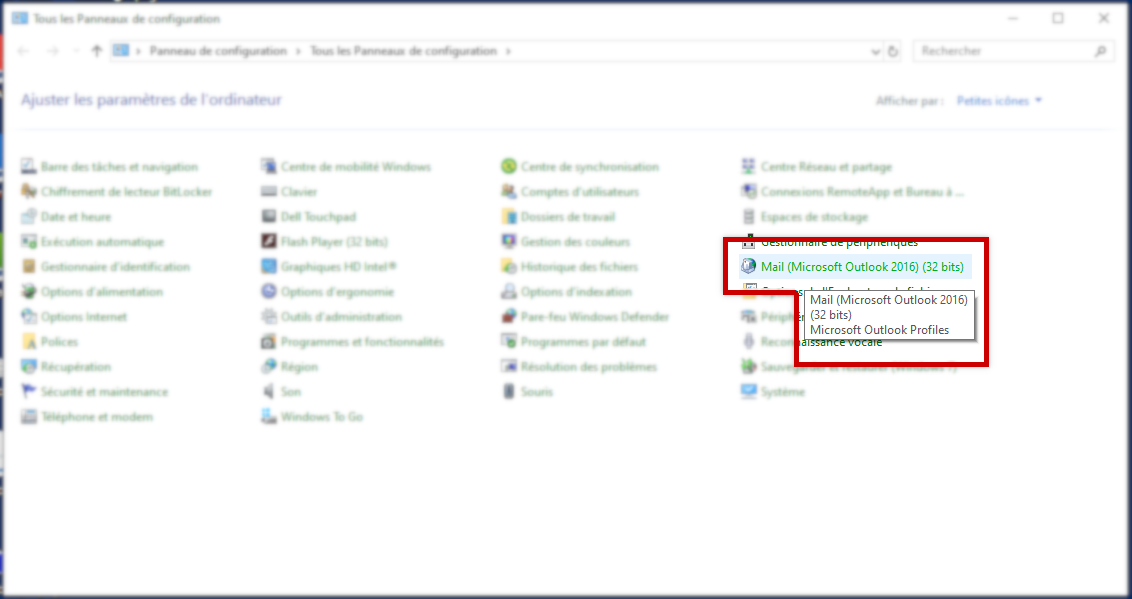
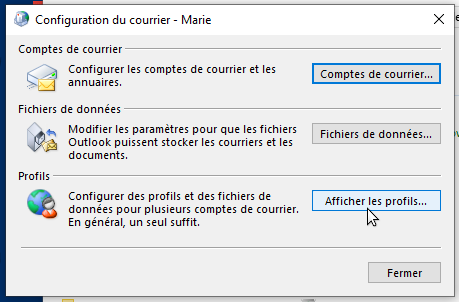
Enregistrer ce contenu dans un fichier mapi-bluemind.reg et déployer ce fichier sur les postes de travail Windows. 

Problèmes connus

Un profil est déjà présent sur le poste

Dans Outlook se rendre dans Fichier > Gérer le compte > Gérer les profils

Remarque

Selon les versions d'Outlook et/ou de Windows, il se peut que l'option "Gérer les profils" ne soit pas présente dans ce menu. Dans ce cas, se rendre dans le panneau de configuration du poste et choisir "Courrier" ("Mail" peut apparaître, même sur des système en français) :

Si le tri par catégorie est activé, l'option se trouve alors dans Panneau de configuration > Comptes utilisateurs :

Cliquer sur le bouton "Afficher les profils" :

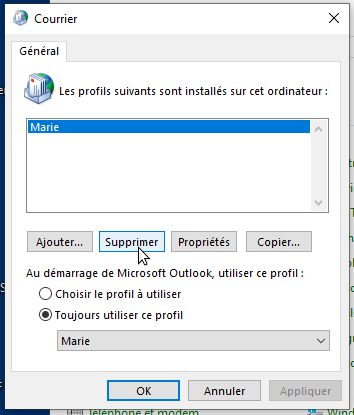
Sélectionner le profil et le supprimer :

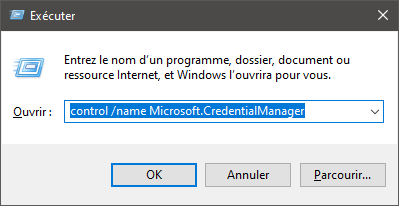
Relancer Outlook.


En cas de problème et de données persistantes, on pourra supprimer la totalité des données de la façon suivante :

Dans un navigateur, se rendre dans %localappdata%\Microsoft (copier cette chaine dans le champs de destination de l'explorateur de fichier) et supprimer totalement le répertoire Outlook (Shift+Suppr.)

Ensuite, aller dans %APPDATA%\Roaming\Microsoft et supprimer le répertoire Outlook (Shift+suppr) (ça correspond à C:\users\[username]\AppData\Roaming\Microsoft sous windows10)

Création de compte en erreur à cause d'un mauvais mot de passe enregistré

Problèmes/Symptômes : la saisie du mot de passe ne permet pas la création du compte, Outlook indique toujours que le mot de passe est erroné

Cause :   l'utilisateur a enregistré un mauvais mot de passe pour ce compte lors d'une tentative de création précédente

Vérification possible par l'administrateur : dans le fichier de logs du serveur /var/log/nginx/access.log on trouve des lignes de ce type :

Bloc de code
192.168.61.133 - - [06/May/2019:16:57:53 +0200] "POST /autodiscover/autodiscover.xml HTTP/1.1" 401 0 "-" "Microsoft Office/16.0 (Windows NT 10.0; Microsoft Outlook 16.0.11601; Pro)"

ou

Bloc de code
192.168.61.133 - tom@bm.lan [06/May/2019:16:58:31 +0200] "POST /mapi/nspi/?MailboxId=94a5c596-90a8-4985-91fd-57629ee06561@bm.lan HTTP/1.1" 200 149 "-" "Microsoft Office/16.0(Windows NT 10.0; Microsoft Outlook 16.0.11601; Pro)"

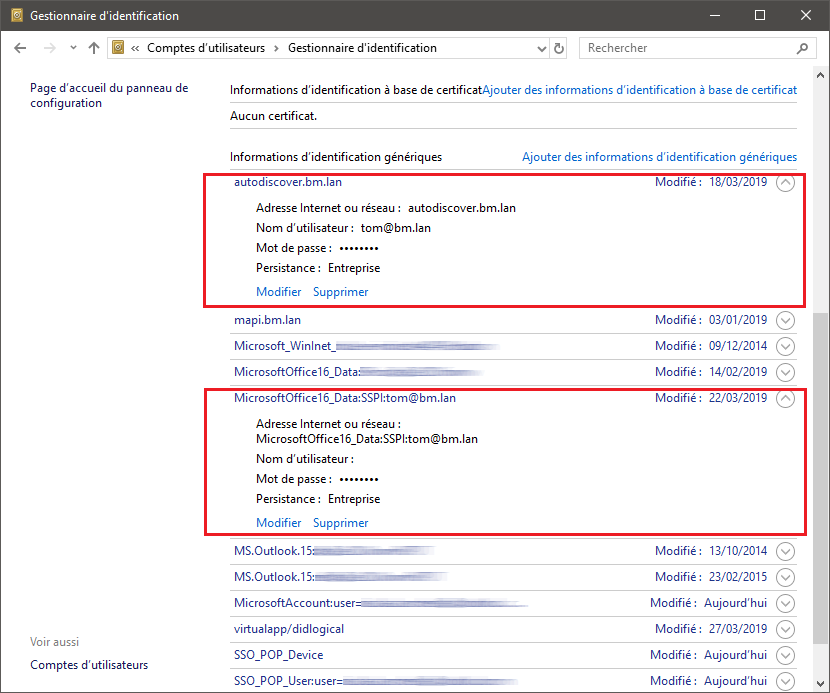
Ces lignes indiquent qu'il y a mauvais mot de passe pour tom@bm.lan soumis par la création de compte

Solution : 

Pour supprimer le mauvais mot de passe :

  • s'assurer qu'Outlook et l'écran de création de compte soient fermés
  • ouvrir le Gestionnaire d'identification en tapant Windows + R
  • saisir "control /name Microsoft.CredentialManager" :
  • cliquer sur OK (ou touche <Entrée>)
  • Supprimer les entrées de type autodiscover.domaine.tld et MicrosoftOffice16_SSPI:utilisateur@domaine.tld
    Par exemple pour supprimer le mot de passe de tom@bm.lan :

Les boîtes partagées n'apparaissent pas parmi les dossiers de l'utilisateur

Si votre BlueMind est en version 4.5 ou supérieure : vérifiez que vous êtes bien abonné à la boite dans la gestion de votre compte.

Si votre BlueMind est en version 4.4 ou antérieure : les boites aux lettres partagées se trouvent dans les dossiers publics. Ceux-ci peuvent être trouvés en cliquant sur les points de suspension en bas de l'arborescence :

Sv translation
languageen

Introduction

With BlueMind 4.0, synchronizing with Outlook no longer requires a connector for you to be able to access BlueMind features in Outlook. You can now use all Outlook features while using BlueMind mail.

Installation requires 3 steps – the first two must be performed by an administrator:

  1. Server-side installation
  2. Configuration of the Windows workstation to connect it to the server
  3. Creation of an account in Outlook
Info

Just like for earlier versions of BlueMind, using Outlook requires a subscription. Please contact our sales teams to get a trial subscription.

Volet
borderWidth3

On this page:

Sommaire
maxLevel2

Relate:
Mise oeuvre de MAPI pour Outlook

Remarque

Connector-free, MAPI-based Outlook doesn't enable the use of the linked attachments feature (it is built into BlueMind and currently requires the Outlook connector).

Compatibility

Avertissement
titleOutlook for macOS

Windows and macOS use different communication protocols, as a result, we are enable to ensure compatibility with Outlook for Windows.

BlueMind 4 isn't compatible with Outlook for macOS.

Prerequisites

  1. Versions:
    • BlueMind 4.0 with a subscription
    • Client workstation:
      • Up-to-date Windows 10 
      • Up-to-date Outlook 2013 (or above) 
  2. External and autodiscover urls must be available from the workstation via HTTPS: when entered into a browser, they must bring up the BlueMind login page.

Configuring Outlook

  • Open Outlook
  • Create a new Outlook profile: the account must not be added to an existing profile, including your default profile that appears on Outlook startup

At the current stage of the MAPI protocol implementation in BlueMind, the Outlook profile thus created cannot be used to connect to another Exchange account.

To do this:

    • Go to the Control Panel > User Accounts > Mail (Microsoft Outlook) (depending on your display configuration, this menu may be shown in the control panel's root menu)
    • In the Mail Setup - Outlook, click "Show Profiles", then "Add" to create a new profile
    • Name the profile
    • The interface then takes to to the Email account creation interface
  • Add a new Email account

    Avertissement

    Do not choose manual configuration.

  • Enter your email address and password:

    Remarque

    You must use your default user address: aliases are not taken into account properly.

  • After a few moments, Outlook announces that the account has been successfully configured:
  • Check "Change account settings" and click "Next"
  • Check "Use Cached Exchange Mode" and slide the cursor all the way to the right to "All":
  • Click "Finish".

You're all set! Your Outlook account now natively communicates with BlueMind!

Shared mailboxes

Version 4.3 of BlueMind has a mail subscription feature that works the same way as shared calendars and shared address books. This means that you can display shared mailboxes in Outlook with MAPI. 

To do this, just log into your BlueMind account and go to your account settings page  > Mail section > Subscriptions tab.

For more details about subscriptions, please go to:

Shared user mailboxes

Access to user mailboxes is not available in public folders in the same way as for shared mailboxes.

To display user box in Outlook, go to Account Settings > Data Files tab > Settings > Advanced tab:

Known Issues

A profile is already configured on the PC

  • In Outlook, File  > Account Settings > Manage profiles.

    Remarque

    Depending on your Outlook and/or Windows version, the "Manage profiles" may not be present in this menu. You may also choose not to open Outlook.

    In either case, go to the Control Panel and choose "Mail":

  • Choose "Show profiles"
  • Select the profile and delete it
  • Restart Outlook

Should the problem or data issues persist, you can delete all data:

In a browser, go to  %localappdata%\Microsoft (copy this chain in the file explorer's destination field) and delete the Outlook directory (Shift+Suppr.)

Then, go to %APPDATA%\Roaming\Microsoft and delete the Outlook directory (Shift+suppr) (C:\users\[username]\AppData\Roaming\Microsoft in windows10)

Error when creating an account because of a wrong saved password

Issue/symptoms : Outlook doesn't let you create an account when you enter a password – Outlook says that the password is wrong. 

Cause: the user has saved a wrong password for this account during a previous attempt to create an account.

Troubleshooting Checks: in the server log file /var/log/nginx/access.log, you will find lines such as:

Bloc de code
192.168.61.133 - - [06/May/2019:16:57:53 +0200] "POST /autodiscover/autodiscover.xml HTTP/1.1" 401 0 "-" "Microsoft Office/16.0 (Windows NT 10.0; Microsoft Outlook 16.0.11601; Pro)"

or

Bloc de code
192.168.61.133 - tom@bm.lan [06/May/2019:16:58:31 +0200] "POST /mapi/nspi/?MailboxId=94a5c596-90a8-4985-91fd-57629ee06561@bm.lan HTTP/1.1" 200 149 "-" "Microsoft Office/16.0(Windows NT 10.0; Microsoft Outlook 16.0.11601; Pro)"

This means that a wrong password for tom@bm.lan is being submitted during account creation.

Solution: 

To remove the wrong password:

  • make sure that Outlook and the account creation window are closed.
  • open the Credential Manager by typing Windows + R
  • then "control /name Microsoft.CredentialManager" in the run box:
  • click OK (or type <Enter>)
  • delete entries such as autodiscover.domaine.tld  and MicrosoftOffice16_SSPI:utilisateur@domaine.tld
    E.g. to delete the password for tom@bm.lan:

Shared mailboxes aren't shown in the list of user folders

Mailshares are shown in the "Public folders" section.

Public folders can be found by clicking the three dots at the bottom of the Outlook navigation pane:

Sv translation
languagede

Präsentation

Die Outlook-Synchronisation mit BlueMind 4.0 erfordert nicht mehr die Installation eines Connectors, der den Zugriff auf BlueMind-Funktionen aus Outlook ermöglicht. Von nun an können Sie alle Funktionen Ihres Outlooks in Verbindung mit Ihrer BlueMind-Mailbox voll nutzen.

Die Installation besteht aus 3 Teilen, von denen die ersten 2 von einem Administrator durchgeführt werden müssen:

  1. Serverseitige Installation
  2. Konfiguration des Windows-Arbeitsplatzes, um die Verbindung mit dem Server herzustellen
  3. Erstellen eines Kontos in Outlook
Info

Wie bei den früheren Versionen von BlueMind wird die Nutzung von Outlook durch ein Abonnement ermöglicht. Bitte kontaktieren Sie unser Vertriebsteam, um ein Testabonnement zu erhalten.

Volet
borderWidth3

Auf dieser Seite:

Sommaire
maxLevel2

Verwandt:
Mise oeuvre de MAPI pour Outlook

Remarque

Die Verwendung von Outlook in MAPI ohne Connector impliziert, dass der Connector keine großen Anlagen abtrennenkann, da dies eine BlueMind-Funktion ist, die derzeit vom Connector bereitgestellt wird.

Kompatibilität

Avertissement
titleOutlook für MacOS

Da die Kommunikationsprotokolle unterschiedlich sind, können wir nur die Kompatibilität mit Outlook für Windows garantieren.

BlueMind 4 ist daher nicht mit Outlook-Versionen für MacOS kompatibel.

Voraussetzung

  1. Versionen:
    • BlueMind 4.0 mit Abonnement
    • Client-Arbeitsplatz:
      • Windows 10 auf dem neuesten Stand
      • Outlook 2013 (oder höher) auf dem neuesten Stand
  2. Externe und Autodiscover-URLs müssen vom Computer aus in HTTPS erreichbar sein: In einem Browser eingegeben müssen sie die BlueMind-Anmeldeseite anzeigen

Outlook-Konfiguration

  • Öffnen Sie die Software
  • Erstellen Sie ein neues Outlook-Profil: Das Konto darf nicht zu einem bereits existierenden Profil hinzugefügt werden
  • Hinzufügen eines neuen E-Mail-Kontos

    Avertissement

    Wählen Sie nicht die manuelle Konfiguration

  • Geben Sie die E-Mail-Adresse und das Passwort des Benutzers ein:


    Remarque

    Es ist wichtig, die Standardadresse des Benutzers zu verwenden: Aliasnamen werden nicht korrekt berücksichtigt.

  • Nach wenigen Augenblicken meldet Outlook, dass das Konto erfolgreich hinzugefügt wurde:
  • Aktivieren Sie „Kontoeinstellungen ändern“ und klicken Sie auf „Weiter“
  • Aktivieren Sie „Exchange-Cache verwenden“ und bewegen Sie den Cursor so weit wie möglich nach rechts auf „Alle“:
  • Klicken Sie auf „Beenden“

Es ist soweit! Ihr Outlook kommuniziert jetzt im nativen Modus mit BlueMind!

Gemeinsam genutzte Mailboxen

BlueMind Version 4.3 ermöglicht dank einer neuen Abonnementfunktion, die mit der von Kalendern und Adressbüchern identisch ist, die Anzeige von freigegebenen Mailboxen in Outlook-Clients, die über MAPI verbunden sind.

Sie müssen sich nur mit Ihrem BlueMind-Konto verbinden und zu Ihrer Kontoverwaltung > Mailbox Registerkarte Abonnements gehen.

Weitere Details zum Anmeldeverfahren und dessen Auswirkungen finden Sie auf den entsprechenden Seiten:

Bekannte Probleme

Kompatibilität

BlueMind 4 ist nur mit Outlook für Windows kompatibel.

Outlook für MacOS-Versionen werden nicht unterstützt.

Im Computer ist bereits ein Profil vorhanden

Gehen Sie in Outlook auf Datei > Konto verwalten > Profile verwalten

Remarque

Je nach Outlook- und/oder Windows-Version kann es sein, dass es die Option „Profile verwalten“ in diesem Menü nicht gibt. Gehen Sie in diesem Fall in die Systemsteuerung des Computers und wählen Sie „Mail“ („Mail“ kann auch in französischen Systemen erscheinen):

Klicken Sie auf die Schaltfläche „Profile anzeigen“:

Wählen Sie das Profil und löschen Sie es:

Starten Sie Outlook neu.


Bei Problemen und persistenten Daten können alle Daten wie folgt gelöscht werden:

Gehen Sie in einem Browser zu %localappdata%\Microsoft (kopieren Sie diese Zeichenfolge in das Zielfeld des Datei-Explorers) und löschen Sie das Outlook-Verzeichnis vollständig (Shift+Entf)

Gehen Sie dann zu %APPDATA%%Roaming Microsoft und löschen Sie das Outlook-Verzeichnis (Shift+Entf) (dies entspricht unter Windows10 C:\users\[username]\AppData%Roaming Microsoft )

Fehlerhafte Kontoerstellung aufgrund eines falsch gespeicherten Passworts

Probleme/Symptome: Trotz Eingabe des Passworts kann das Konto nicht ertellt werden, Outlook zeigt immer an, dass das Passwort falsch ist

Ursache:   Der Benutzer hat bei einem früheren Versuch, ein Konto zu erstellen, ein falsches Passwort für dieses Konto gespeichert

Mögliche Überprüfung durch den Administrator: In der Server-Protokolldatei /var/log/nginx/access.log befinden sich Zeilen wie diese:

Bloc de code
192.168.61.133 - - [06/May/2019:16:57:53 +0200] "POST /autodiscover/autodiscover.xml HTTP/1.1" 401 0 "-" "Microsoft Office/16.0 (Windows NT 10.0; Microsoft Outlook 16.0.11601; Pro)"

oder

Bloc de code
192.168.61.133 - tom@bm.lan [06/May/2019:16:58:31 +0200] "POST /mapi/nspi/?MailboxId=94a5c596-90a8-4985-91fd-57629ee06561@bm.lan HTTP/1.1" 200 149 "-" "Microsoft Office/16.0(Windows NT 10.0; Microsoft Outlook 16.0.11601; Pro)"

Diese Zeilen zeigen an, dass ein falsches Passwort für tom@bm.lan bei der Kontoerstellung eingegeben wurde

Lösung: 

Das falsche Passwort löschen:

  • Sicherstellen, dass Outlook und der Bildschirm für Kontoerstellung geschlossen sind
  • öffnen Sie den Identifikationsverwalter durch Eingabe von Windows + R
  • "control /name Microsoft.CredentialManager" eingeben:
  • Auf OK klicken (oder Taste <Enter>)
  • Löschen von Einträgen des Typs autodiscover.domaine.tld und MicrosoftOffice16_SSPI:utilisateur@domaine.tld
    Zum Beispiel, um das Passwort aus tom@bm.lan zu löschen:

Freigegebene Mailboxen erscheinen nicht in den Ordnern des Benutzers

Geteilte Posteingänge befinden sich in den öffentlichen Ordnern. Diese finden Sie, indem Sie auf die Auslassungspunkte am unteren Ende des Baums klicken: