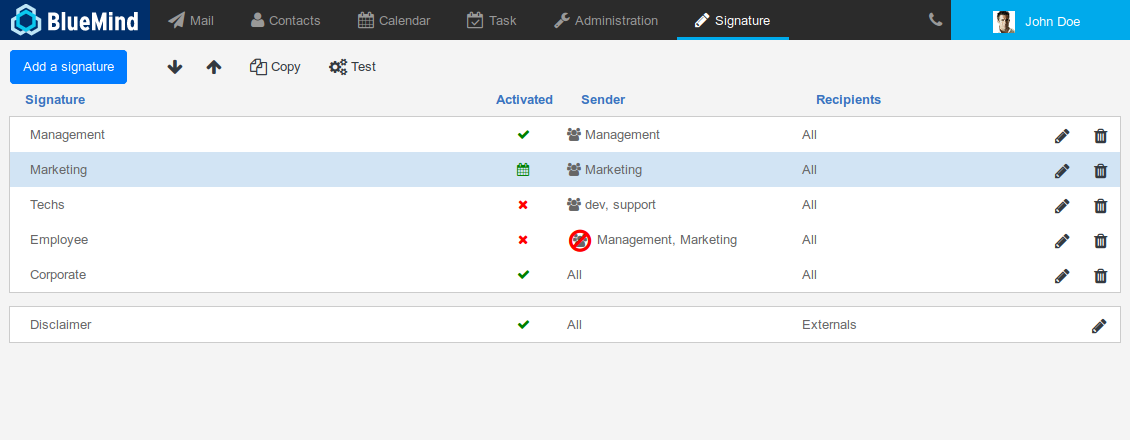
The application's homepage has three parts:
- at the top, the key action buttons allow you to create, sort and test signatures
- the list of signatures and their key characteristics:
- name
- status: activated, deactivated, scheduled
- the senders they apply to
- the recipients concerned
- edit/delete buttons
- the disclaimer: it has the same characteristics as signatures but it cannot be deleted.
The disclaimer is included in the application by default when it is installed, but it remains empty and inactive disabled until it is configured.
| Remarque |
|---|
| title | Who will see the signature? |
|---|
|
The signature is added to the message body, therefore all the message's recipients will see it. When a sender/recipient pair matches the signature's filter criteria, it will be added to the message and seen by all its recipients. For instance, a signature is set for the following criteria: - Sender: is a member of "sales"
- Recipient: external
The Sales Manager Jane (jane@bluemind.loc) writes an email message to several recipients:  the sender is a member of the "sales" group AND the client has an external address the signature is added to the message, all its recipients can see it: the client, John and Peter. the sender is a member of the "sales" group AND the client has an external address the signature is added to the message, all its recipients can see it: the client, John and Peter.
|
Installation and provisioning
Installing the application
To install the new application, install the necessary packages on the BlueMind server and restart BlueMind:
| Tabs group |
|---|
| border | all-sides |
|---|
| navcolor | navy |
|---|
|
| Debian/UbuntuRedHat |
Accessing the application
Access rights
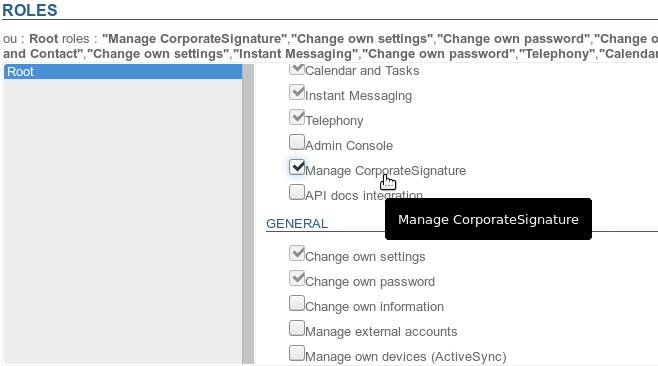
Signatures are managed through a dedicated application rather than the BlueMind admin console. As a result, the super administrator admin0 must appoint the users or administrators who can access (or delegate access to) the application to manage domain signatures.
Users or groups of users can be assigned the role "Manage corporate signature" using the same method as for any other role (see Utilisateurs - Les rôles):
Access
Once the role has been assigned -- after having logged back in if necessary – users can access the Signature application from the top ribbon along with other BlueMind applications:

Creating signatures
To add a signature, click "Add a signature".
The signature creation form opens:
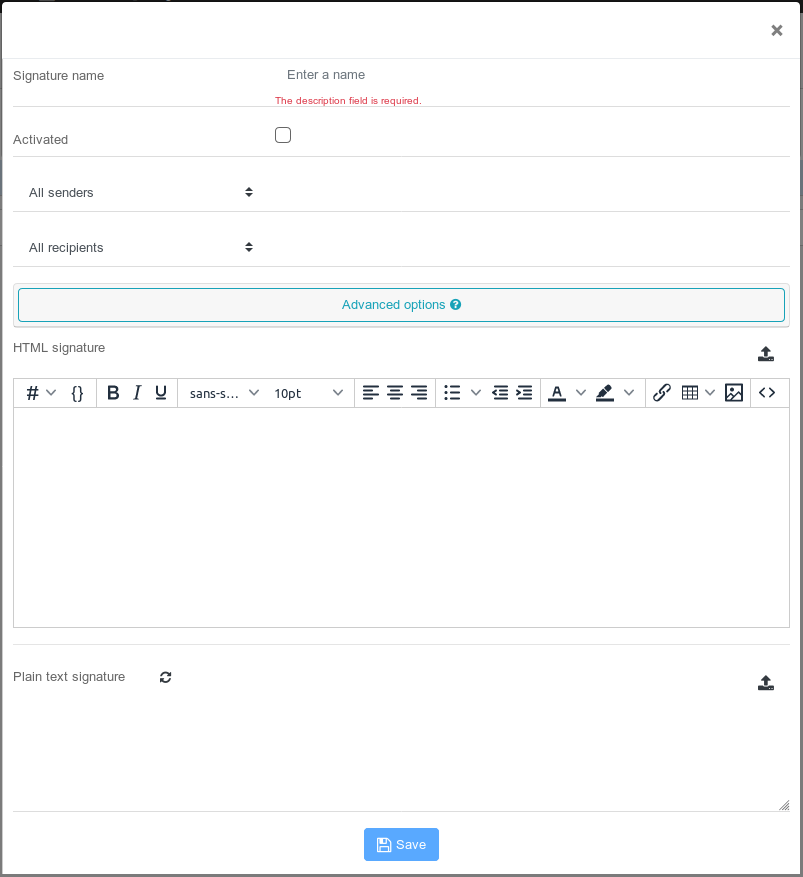
- Signature name: the signature's name to identify it in the list. This field is mandatory.
- Activated: check this box to activate or deactivate the signature.
- Senders: the signature will be applied to all outgoing messages sent by the users selected:
- All senders: all users in the BlueMind domain.
- The sender is a member of: a text box is added, enter one or several groups' name using autocomplete. The signature will be added to the messages sent by users who belong to one or more of these groups.
E.g. a specific signature for members of the "support" group who reply to technical assistance requests, a signature for members of the "sales" and "communication" groups who respond to clients' requests. - The sender is not a member of: a text box is added, enter one or several groups' name using autocomplete. The signature will be added to the messages sent by users who do not belong to these groups.
E.g. a signature for all users who are not part of the management team, a signature for all non-technical users, i.e. those that do not belong to the groups "support" and "development".
- Recipients: the signature will be applied to all the messages sent to the type of recipients:
- All recipients: will apply to all messages.
- Internal recipients only: will only be added to messages sent to domain users.
- At least one external recipient: will be added to messages sent (To or Cc) to at least one recipient outside the domain.
- Advanced options: clicking this bar opens a form with additional options:
- HTML signature: signature that will be added to the messages sent in HTML format.
- Plain text signature: simple signature that is added to messages sent in plain text format.
Placeholders
Placeholders can be used to create sender-customised signatures, e.g. the signature looks the same for all but shows the specific sender's name, telephone number and address.
Using placeholders
There are two ways of adding placeholders:
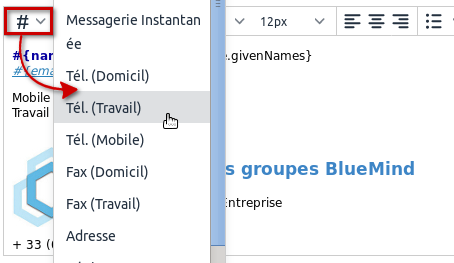
- write the corresponding code starting with "#{", autocomplete then suggests possible placeholders as you type:
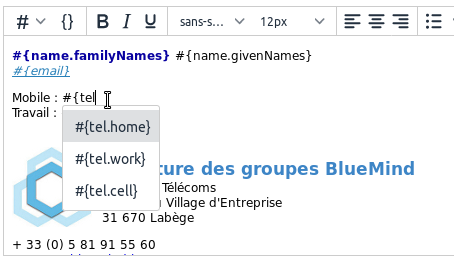
- use the drop-down list
 and select the placeholder as desired:
Conditional blocks
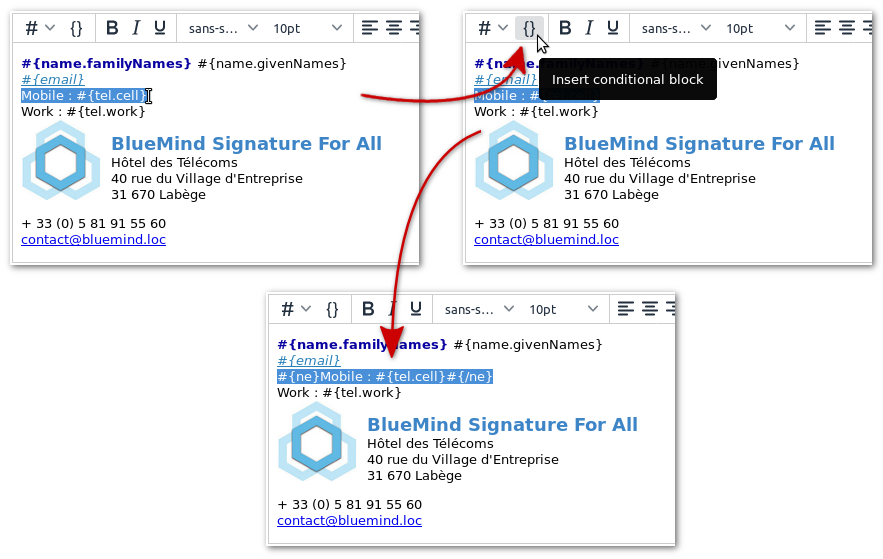
If a placeholder is missing in the user's information card, then an empty space is shown.
To avoid this, you can insert a conditional block: if a placeholder is missing in the user's information card, then the entire block will be left out of the signature.
To add a conditional block: select the appropriate text and click :
:
| Bm_legend |
|---|
| bm_legend | In this example, only the row "Work" will be shown if the user has no mobile phone number. |
|---|
|
|
| Astuce |
|---|
Conditional blocks, like placeholders, can also be used in plain text signatures. The plain text version generated from the HTML signature will show like this: 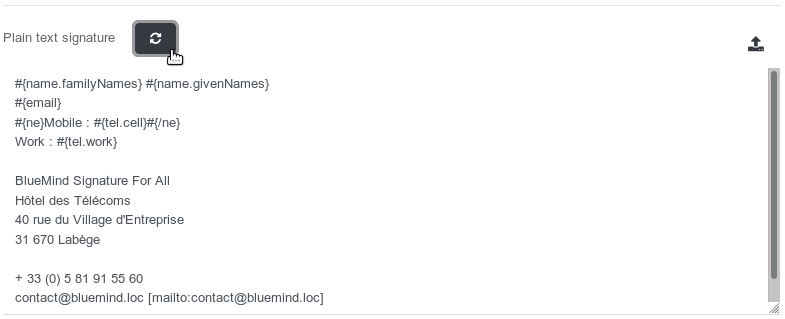
|
Available placeholders
Placeholders are the same as those in users' information cards (as entered by the administrator or through AD/LDAP synchronization). This is information you can see when you search the directory in your Contacts application:
- #{formattedName}: the full name, made up of prefix+given name+other name+family name+suffix
- #{gender}: gender
- #{name.prefixes}: prefix
- #{name.suffixes}: suffix
- #{name.givenNames}: given name
- #{name.familyNames}: family name
- #{name.additionalNames}: other name
- #{email}: email address
- #{impp}: instant messaging
- #{tel.home}: home phone
- #{tel.work}: work phone
- #{tel.cell}: mobile phone
- #{streetAddress}: street name
- #{region}: region
- #{postOfficeBox}: PO Box
- #{postalCode}: postal code
- #{locality}: town
- #{extendedAddress}: additional address information
- #{countryName}: country
- #{url}: website
- #{role}: position/job title
- #{title}: title
- #{division}: company division
- #{department}: company department
- #{company}: company name
- #{assistant}: assistant's name
- #{manager}: manager name
From BlueMind 3.5.12:
- #{fax.work}: work fax number
- #{fax.home}: home fax number
Sorting signatures
Signatures are applied by sorting order. It may therefore be important to sort them in a specific order.
Sometimes a message may match the criteria for several signatures, in that case, the first signature found will be applied.
| Info |
|---|
|
Looking at the screenshot above, the following signatures are set: - Management: activeenabled
- Marketing: active enabled (and scheduled)
- Techs: inactivedisabled
- Employees: inactivedisabled
- Corporate: activeenabled
If the Managing Director writes an email, he/she meets the filter criteria for Management (he/she belongs to that group) and Corporate (All senders): as Management comes first in the list, the Management signature will be used. Technical engineers who want to write an email meet the criteria for 3 signatures: Techs, Employees and Corporate: Techs comes first, but it is deactivated. Next comes Employees, which is also deactivated, therefore the Corporate signature will be added to messages. |
To sort the list:
- click a signature
- use the arrows
 to move it up or down
Activating signatures
Signatures are only applied when they are activated.
| Astuce |
|---|
By default, new signatures are deactivated. They will be applied only when they are expressly activated. |
To activate a signature:
- Open the editing form
- Check the "Activated" box:

- Save
The activation statuses shown in the application's home page are:
 signature inactivedisabled
 signature activeenabled
 signature active enabled within a scheduled period
 signature active, enabled and scheduled but not running (scheduled previously or in the future)
Editing signatures
In the application's home page, click the arrow at the end of the row for the signature you want to edit to open the editing form. This is the same as the signature creation form (see above).
Once the changes have been made, click "Save".
Deleting signatures
To delete a signature:
- click the
 icon at the end of the row for the signature you want to delete
 - confirm the deletion when prompted.
Copying signatures
Signatures can be copied to serve as a model for other signatures.
To do this:
- select the signature you want to copy
- click the
 button
A new signature is immediately created and named "Copy of..." followed by the name of the original signature.
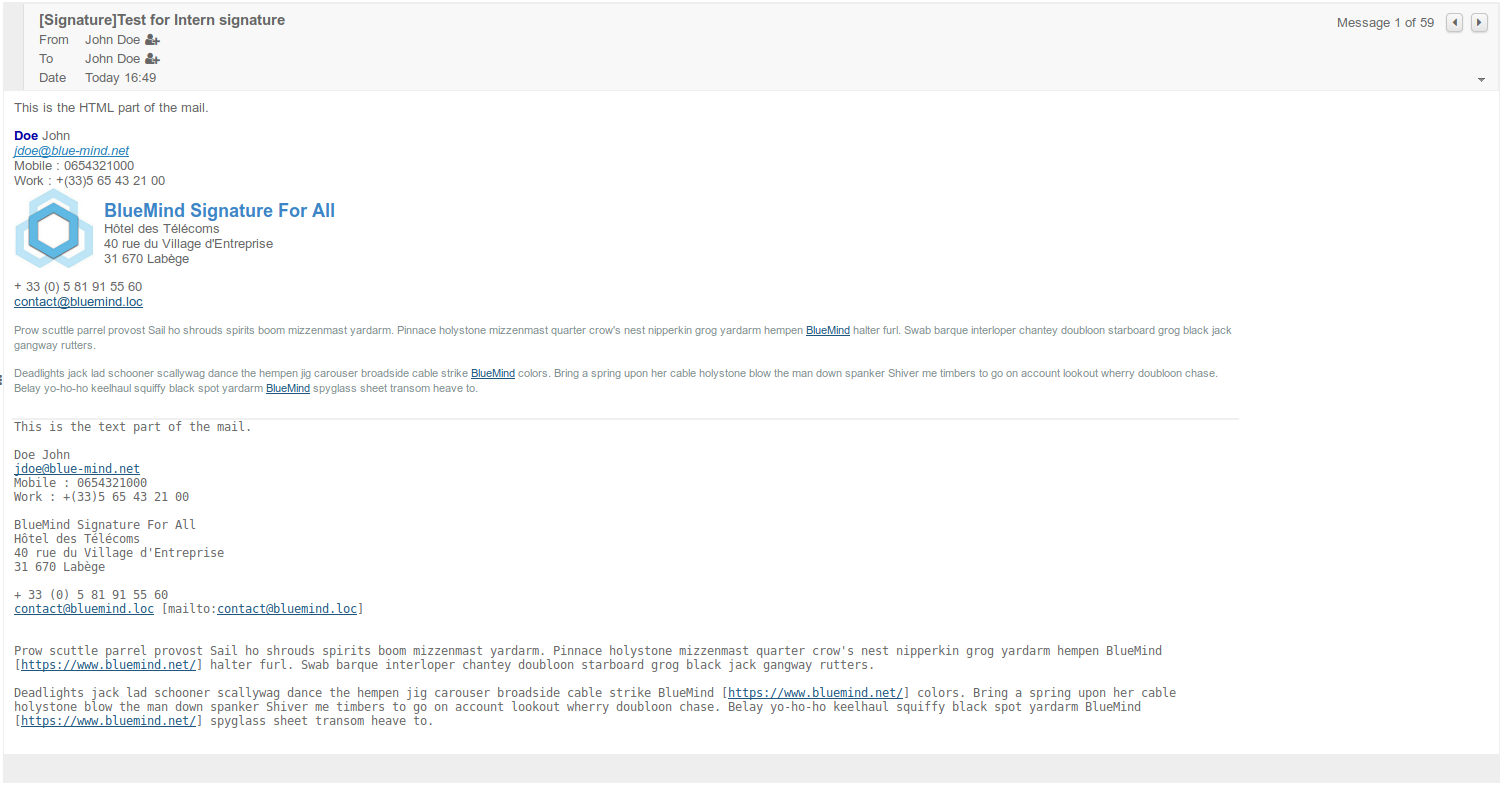
Testing the results
In addition to checking how an HTML signature will be displayed, you can test a signature to see how all its versions (HTML and text) will appear in a message.
To do this:
- Select the signature you want to test
- Click the
 button at the top of the page
an email is sent to the user, bearing the signature in both formats (HTML and plain text), followed by the disclaimer if applicable.
E.g., take the previsouly created signature, when you click the preview icon, the test email as viewed in webmail:
Disclaimers
The A disclaimer
This message, if activated, is added, no conditions applied, in addition to the signature to all the messages sent by domain users.
It may be a legal disclaimer (on confidentiality), a marketing message (company details or special offer) or an environmental warning (a message suggesting not to print the message).
The disclaimer is included in the application by default when it is installed, but it remains empty and inactive disabled until it is configured.
- To open the editing form, just like for signatures, click the corresponding icon:
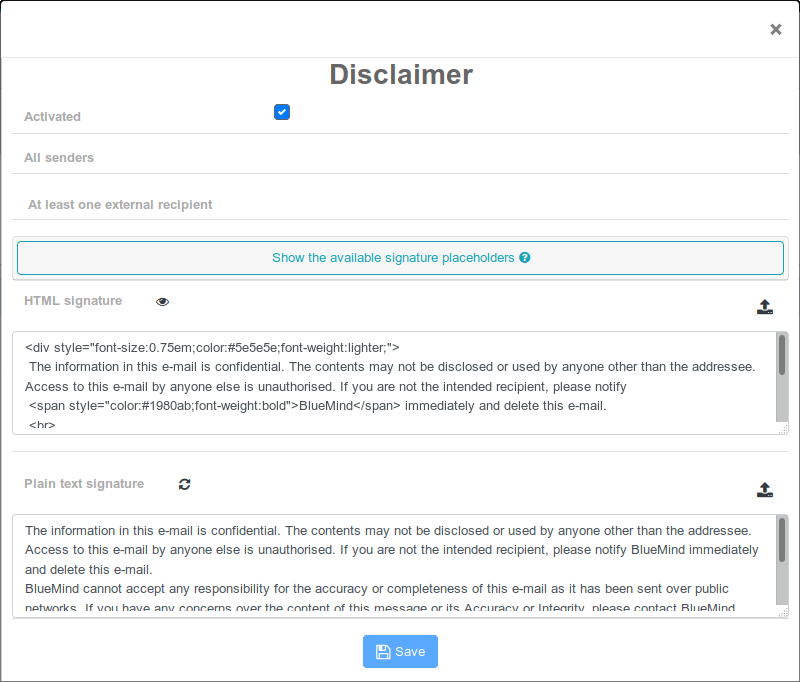 The form is almost identical to the signatures form, with two small differences:
- the name and the senders cannot be edited, it is always called "disclaimer" and applies to all senders
- there is no validity period, it is applied as long as it is activeenabled
- Recipients: unlike signatures, the disclaimer does not allow you to filter by groups, only 3 choices are available:
- All recipients
- Internal recipients only
- At least one external recipient
- HTML signature: HTML code for the signature that will be added to messages sent in HTML format.
- Plain text signature: simple signature that will be added to messages sent in plain text format
Utilisation
Les utilisateurs voient apparaître la signature dans leur fenêtre de composition de message et peuvent décider de son placement :
Image Removed
Pour en savoir plus sur le fonctionnement côté utilisateur, consulter le paragraphe dédié de la documentation utilisateur :
Using corporate signatures
Users can see the signature in their message compose window and can choose where to place it:
Image Added
To find out more about how signatures work for users, please see our user's guide:


