
Historique de la page
...
| Sv translation | |||||||||||||||||||||||||||||||||||||||
|---|---|---|---|---|---|---|---|---|---|---|---|---|---|---|---|---|---|---|---|---|---|---|---|---|---|---|---|---|---|---|---|---|---|---|---|---|---|---|---|
| |||||||||||||||||||||||||||||||||||||||
Setting up a user accountWhen you first open it, Thunderbird asks if you want a new email address and account. Choose "Skip this and use my existing email".
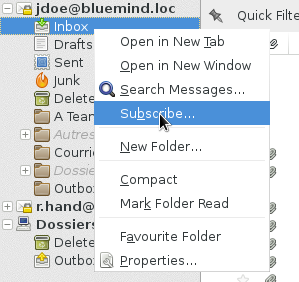
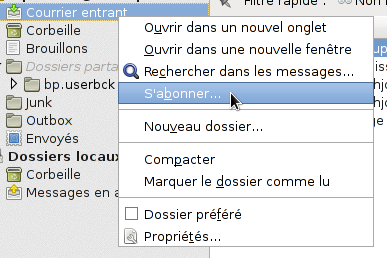
Connecting to a shared mailboxTo access a shared mailbox, you must subscribe to it in Thunderbird. To do this, right-click the left pane and choose "Subscribe" from the menu:
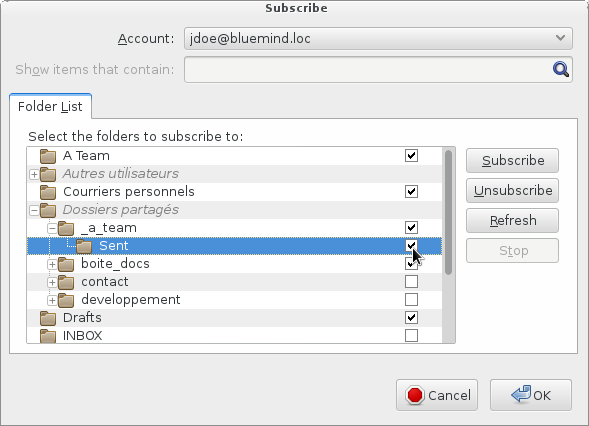
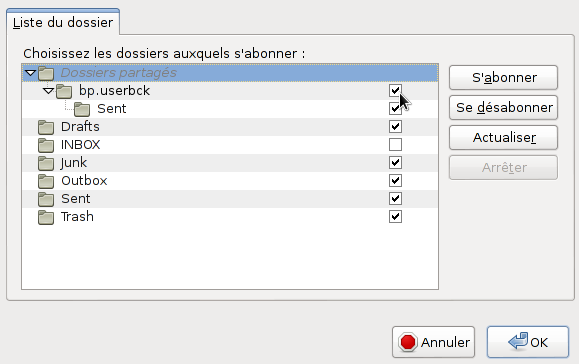
A window showing the list of files you have access to opens. Open the grayed out "Dossiers partagés" ("shared folders") menu – double-click it or click the "+" sign at the beginning of the row – and check the box(es) corresponding to the folder(s) you want to subscribe to. Click "OK" to finalize:
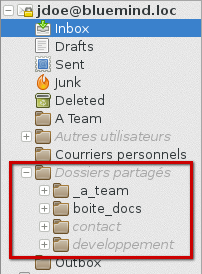
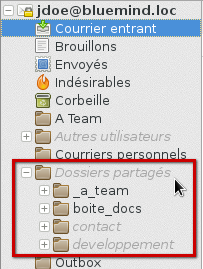
The shared mailbox is shown in the main window along with the other account folders, under a sub-menu called "Dossiers partagés".
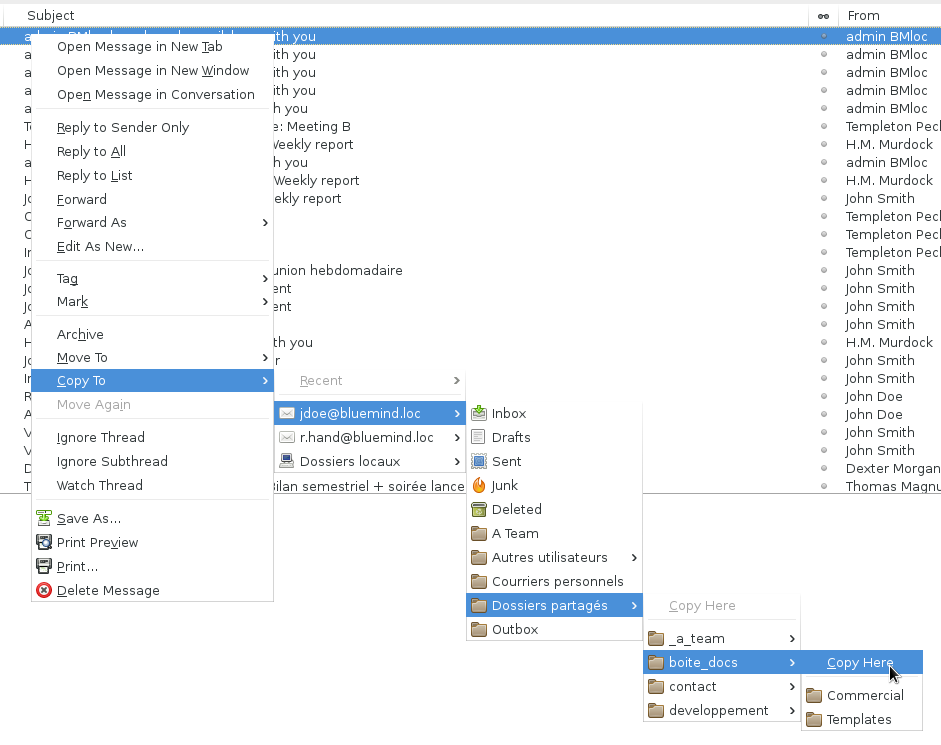
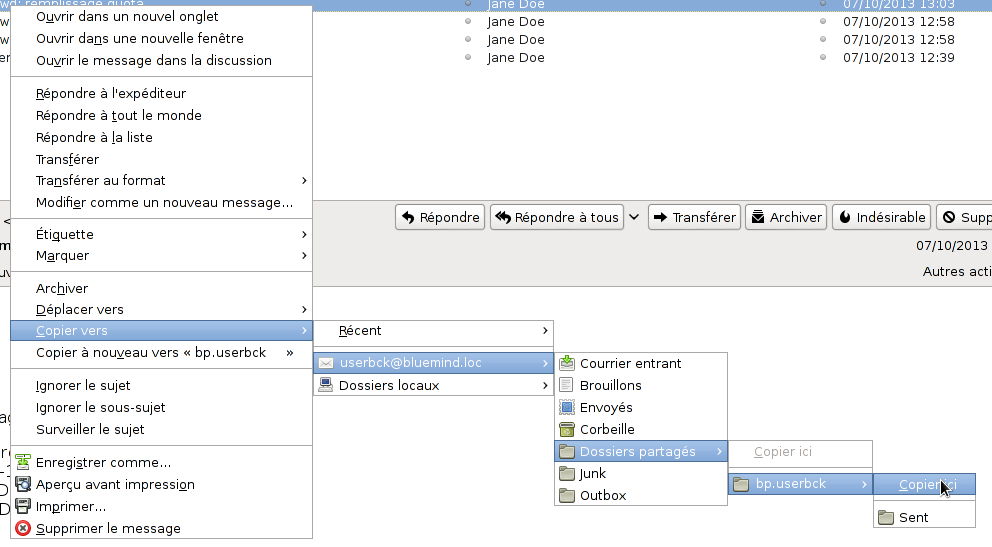
Depending on the rights you have on the shared mailbox, you can view the messages it contains or copy/move messages from your mailbox – from your "Inbox" folder, for example.
The BlueMind connectorThe BlueMind connector allows you to synchronize the BlueMind calendar and address book with Thunderbird. It also enables access to tasks and linked attachments when you write emails. Installing the connectorTo install the BlueMind connector:
BlueMind Preferences
There are several ways to access preferences in Thunderbird:
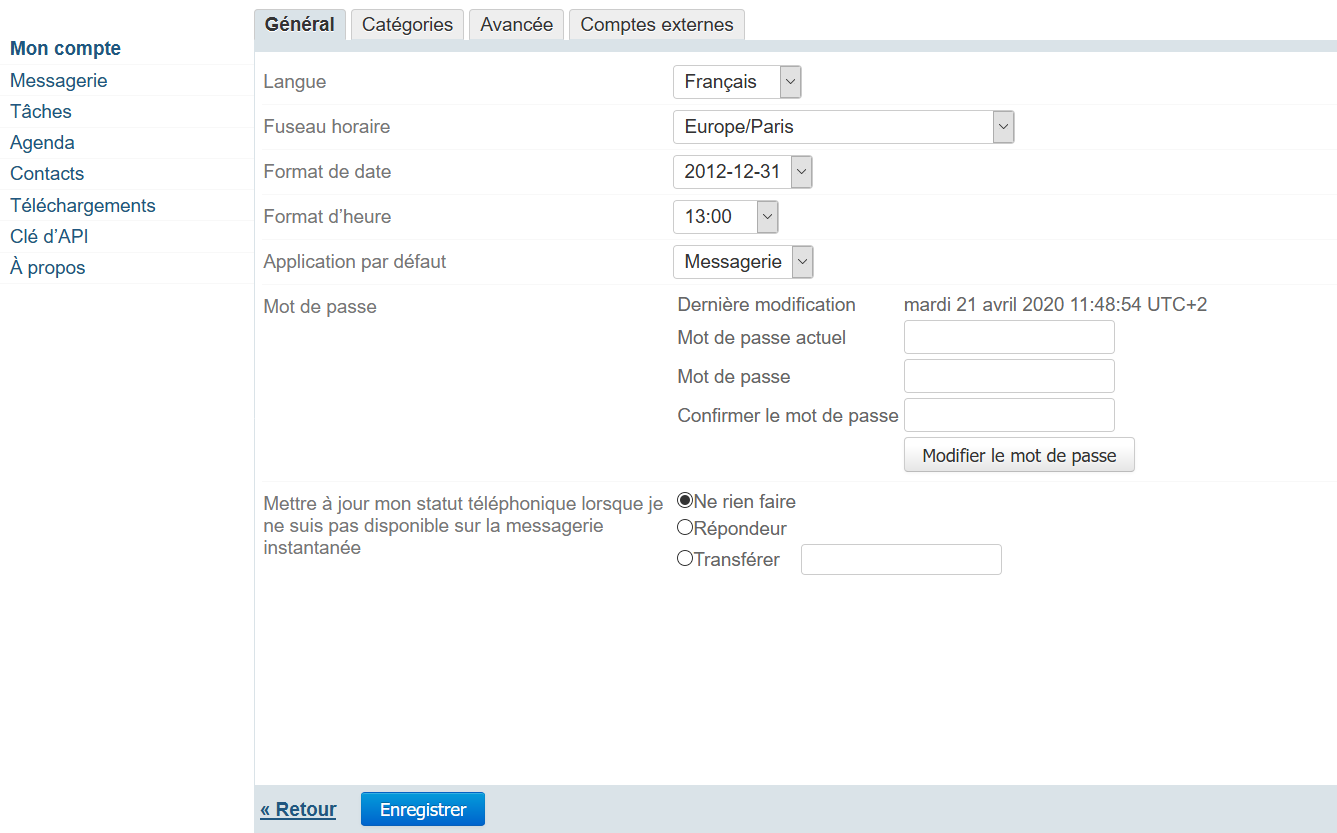
The UI looks and works exactly like the preferences page in the BlueMind web application:
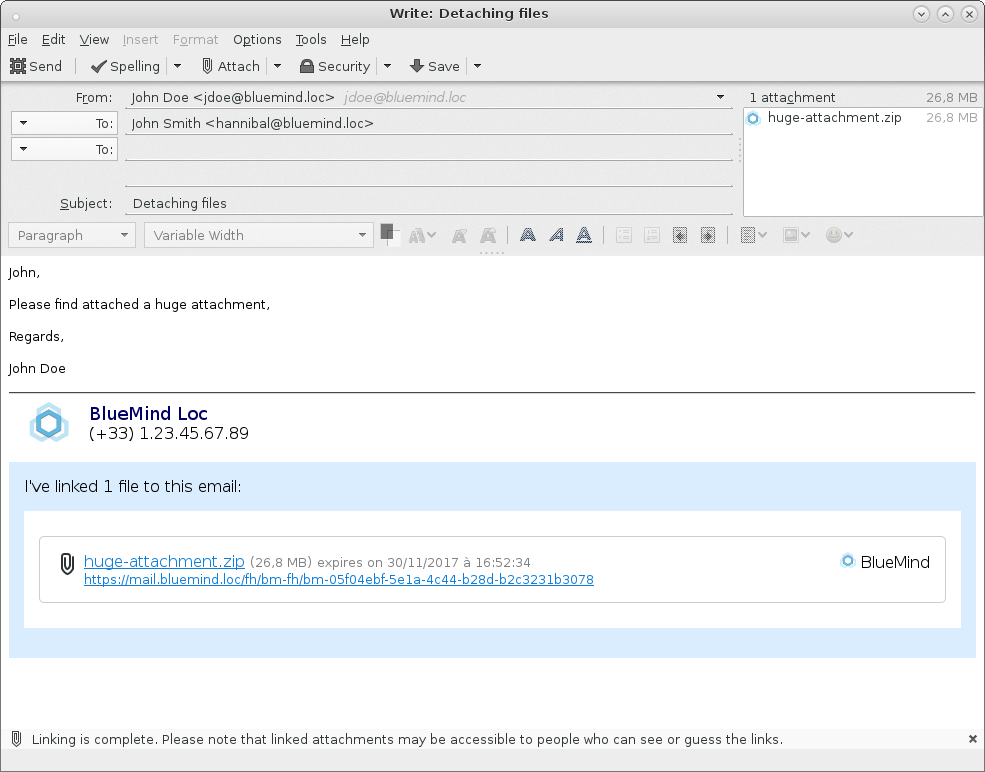
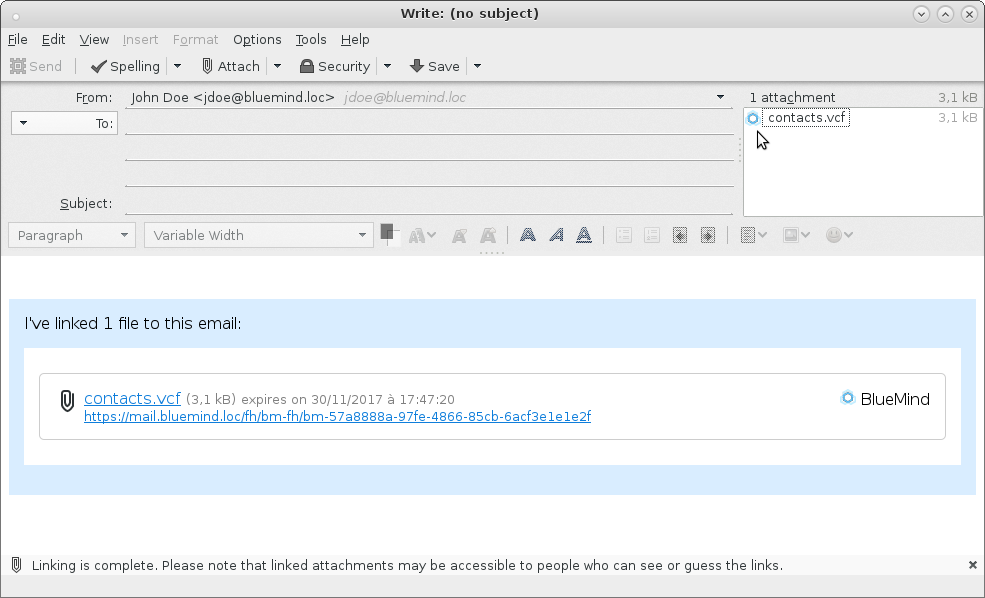
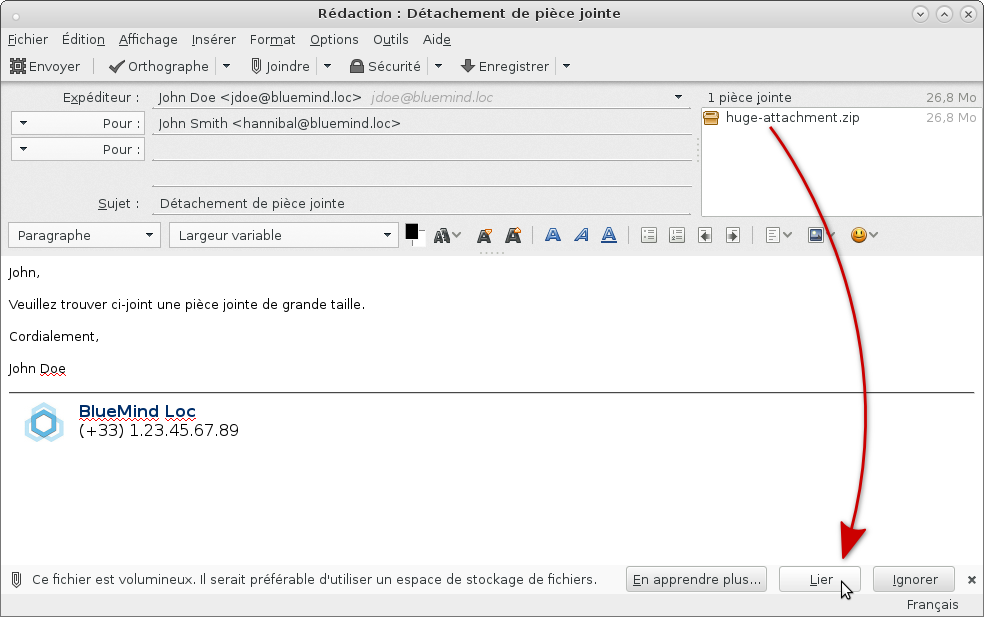
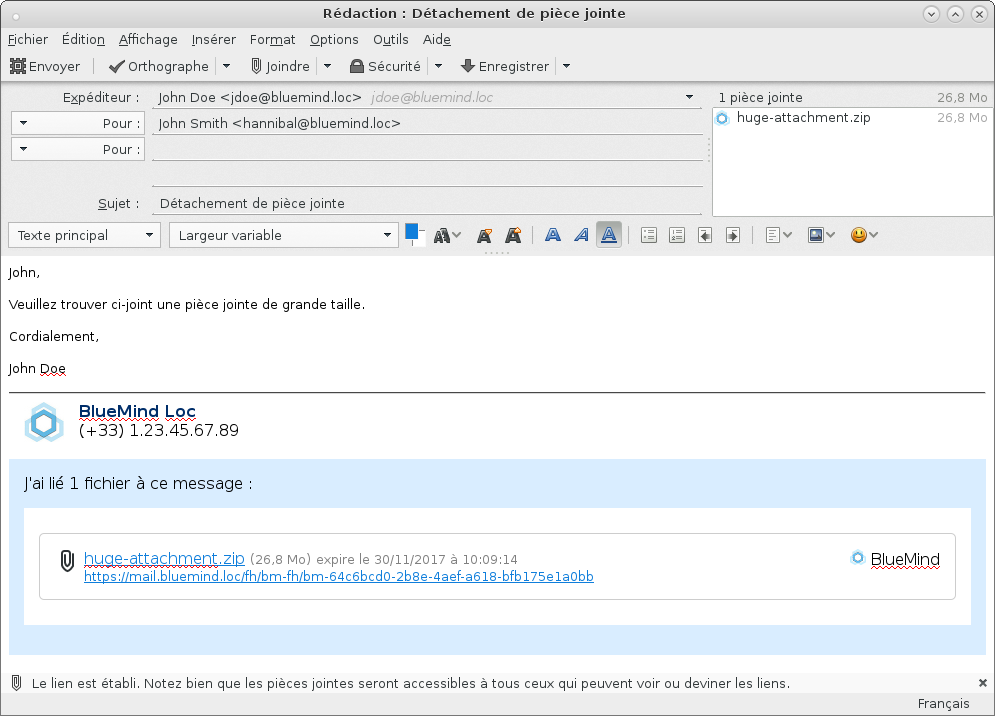
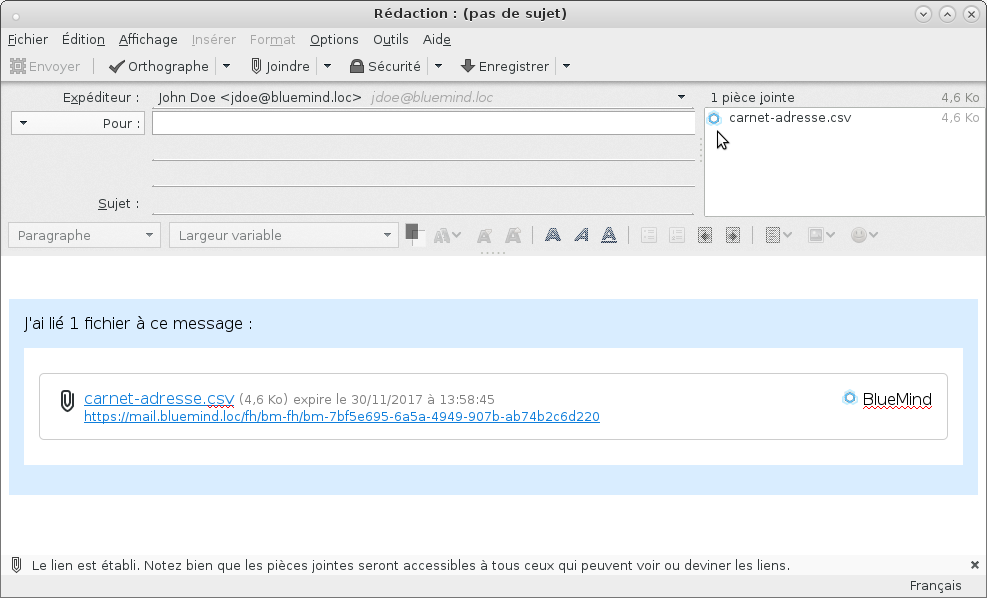
Go to the section you're specifically interested in for further details: Attaching files as linksOnce the connector is installed, you can access the link attachments feature in the compose message window. Working with linked attachmentsSimply attach your file as usual (using the attach button or drag and drop). If the file size exceeds the auto-detach size configured in BlueMind, Thunderbird gives you the option to link the file:
The file is then automatically sent to the server and linked to the message:
Just like in BlueMind webmail, the download block will be displayed in recipients' messages, whatever email client they are using.
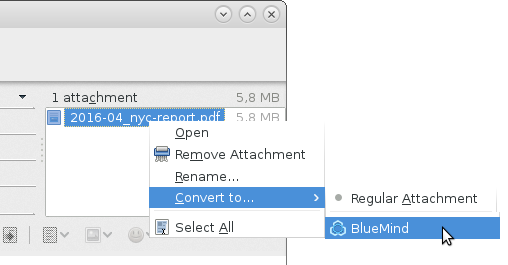
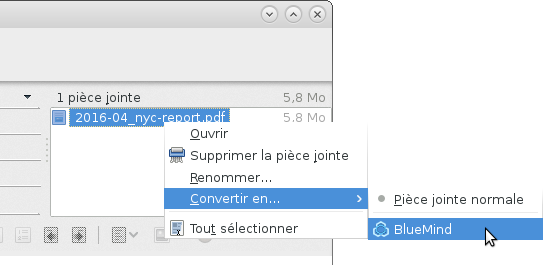
Forced detachmentTo detach an attachment from a message, right-click the file name and select Convert to > BlueMind:
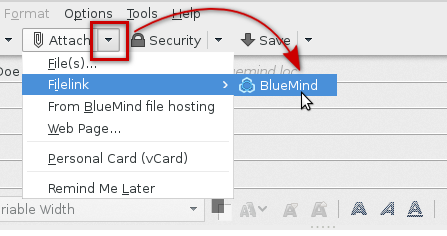
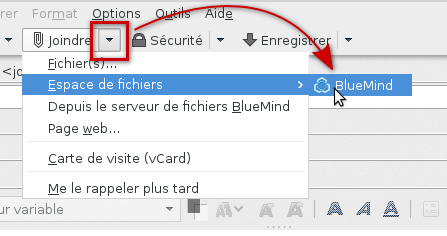
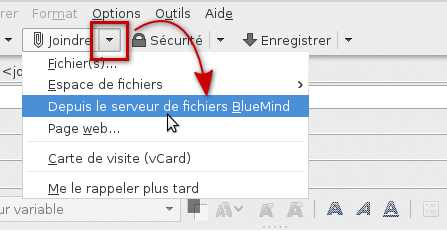
Conversely, to reattach a file that has been detached, select Convert to > Regular Attachment. The file is then added to the message and the download block is deleted. Files can also be added to messages as links rather than physically when they are first attached. To do this, click the arrow next to the "Attach" button to open the drop-down menu and select Filelink > BlueMind
Your system's file browser opens and once you've chosen a file, it is automatically and immediately sent to the server and added to the message as a link:
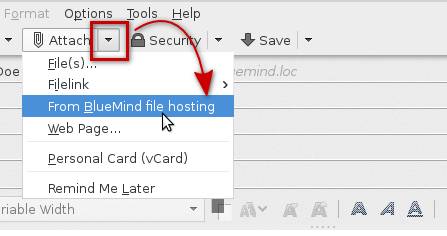
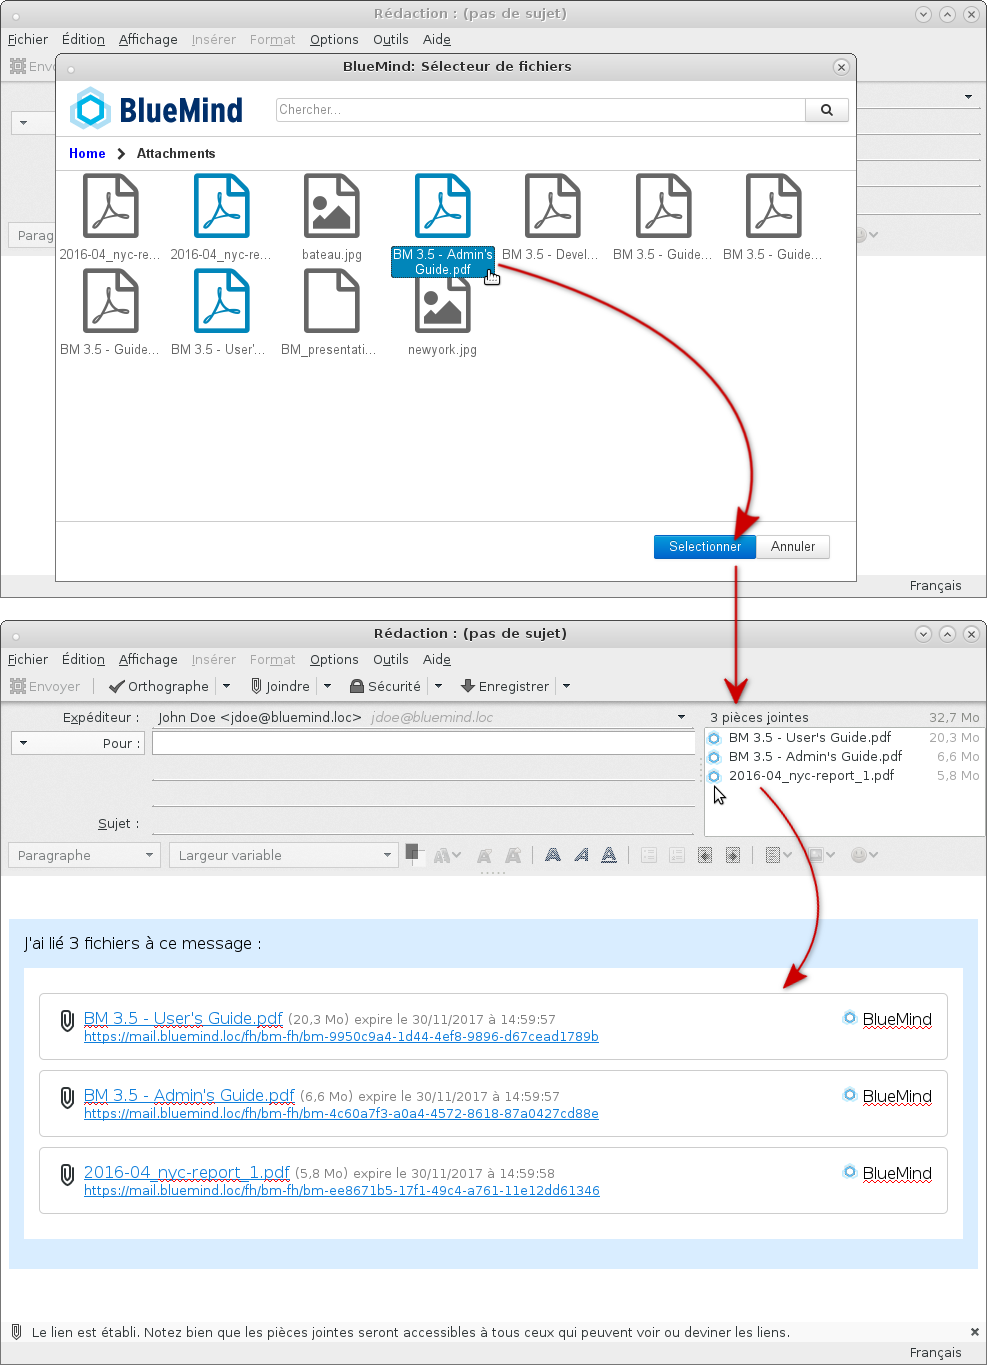
BlueMind file chooserJust like in BlueMind webmail, you can access the file chooser to send files you already have in your online space (files you've already sent as links). To access them, click the arrow next to the "Attach" button in order to open the options menu and select "From BlueMind file hosting":
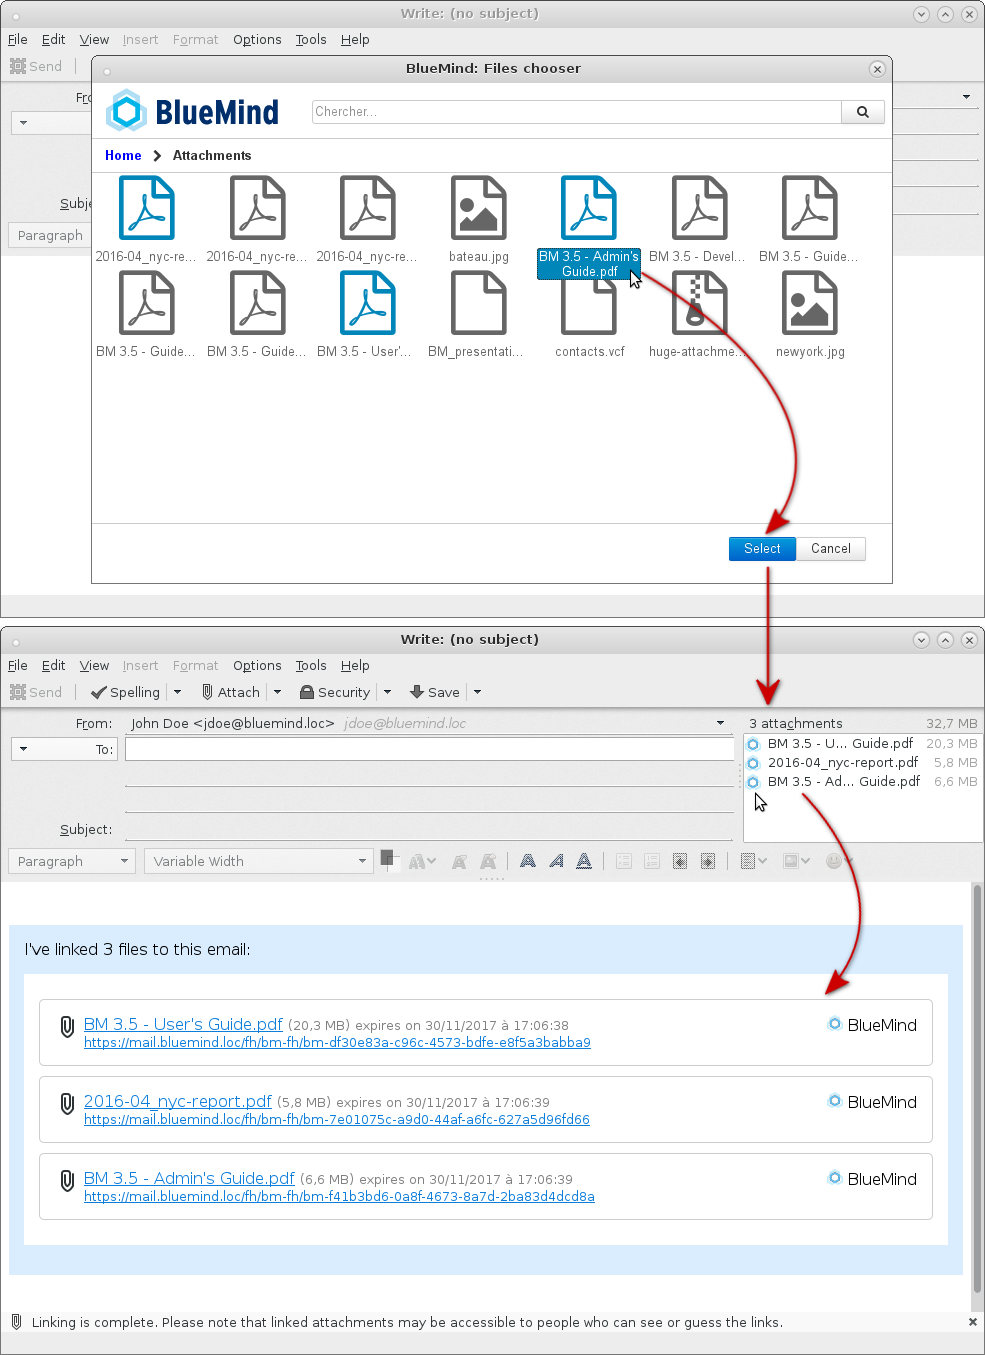
The BlueMind file chooser opens, which allows you to select available files. Click one or several files and then the "Select" button to add them to the message:
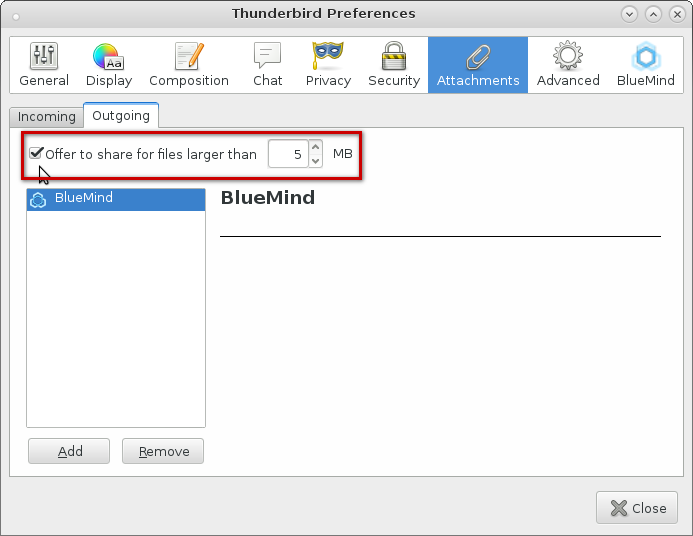
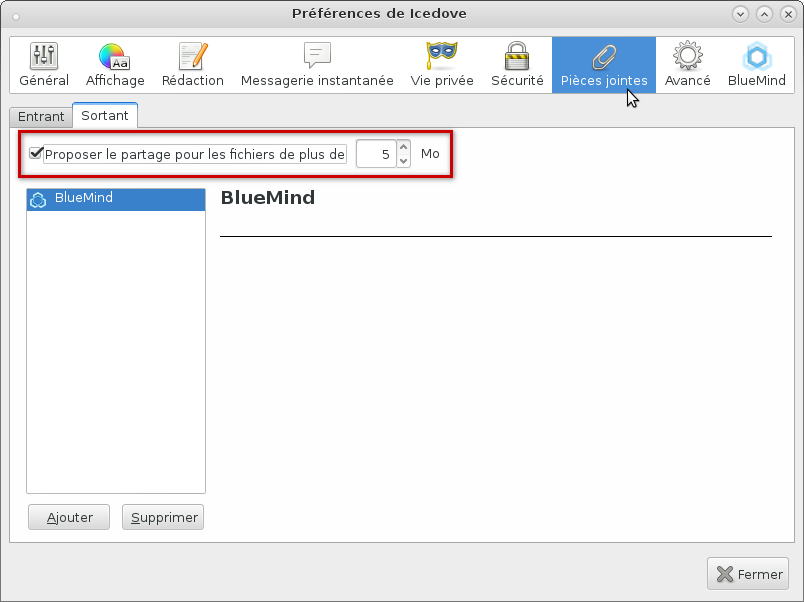
ConfigurationIn Thunderbird preferences, Attachments tab, you can choose to disable automatic file linking for files exceeding a certain size by checking or unchecking the dedicated box:
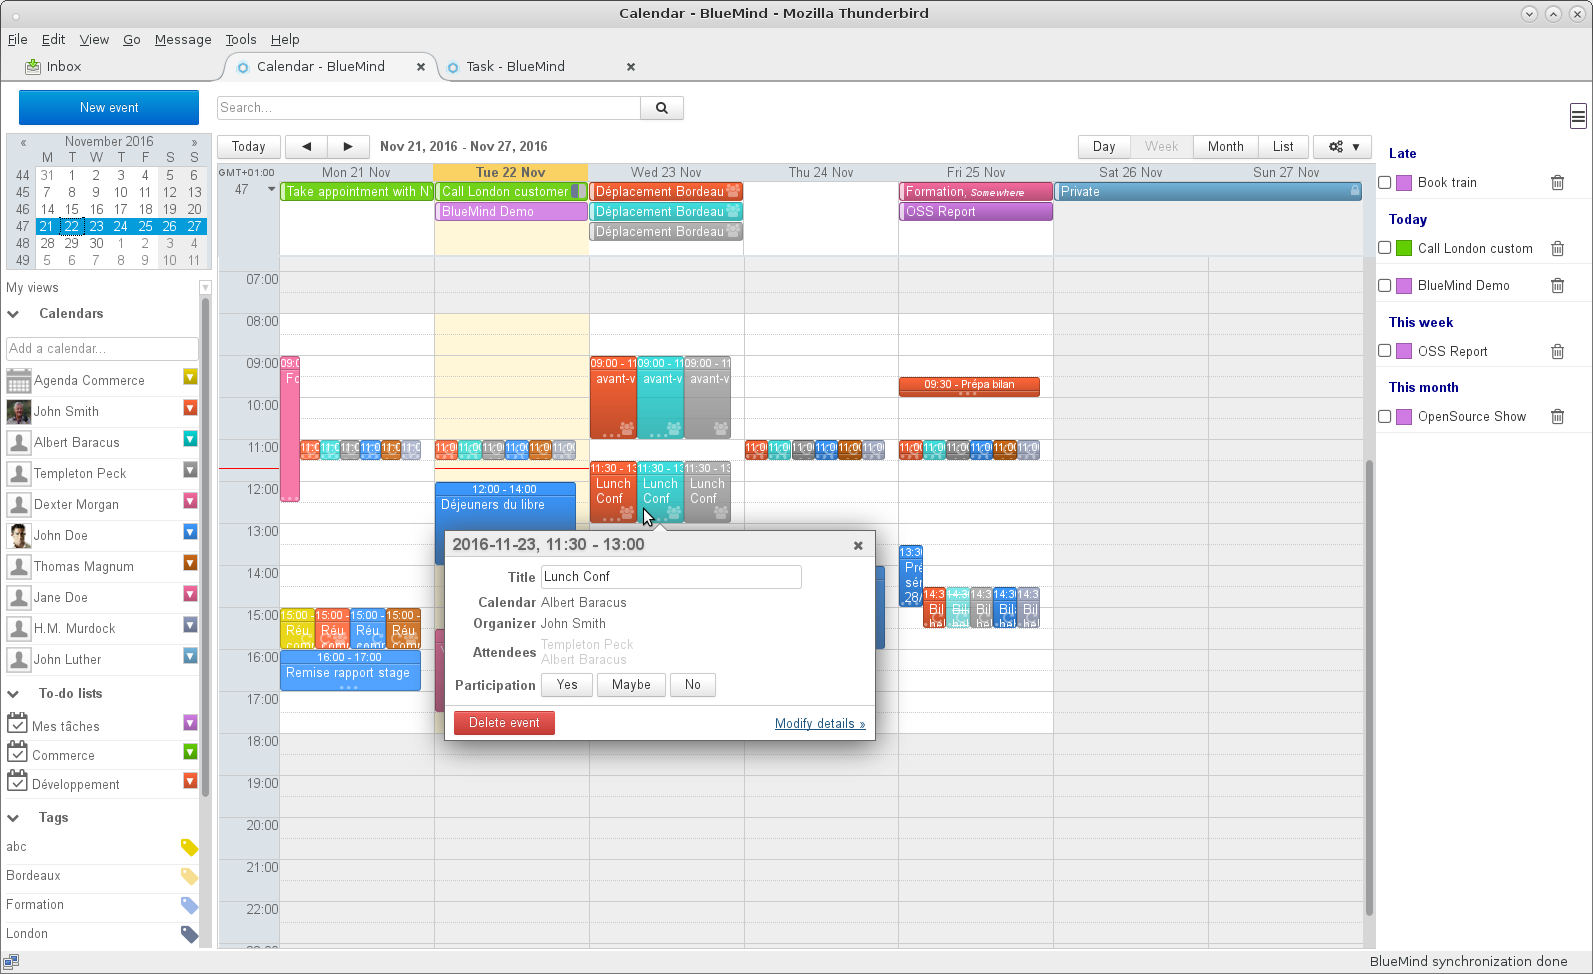
CalendarDisplayOnce the connector is installed and connected, you can access the Calendar through Tools > BlueMind > Calendar or by using the new button in the main window:
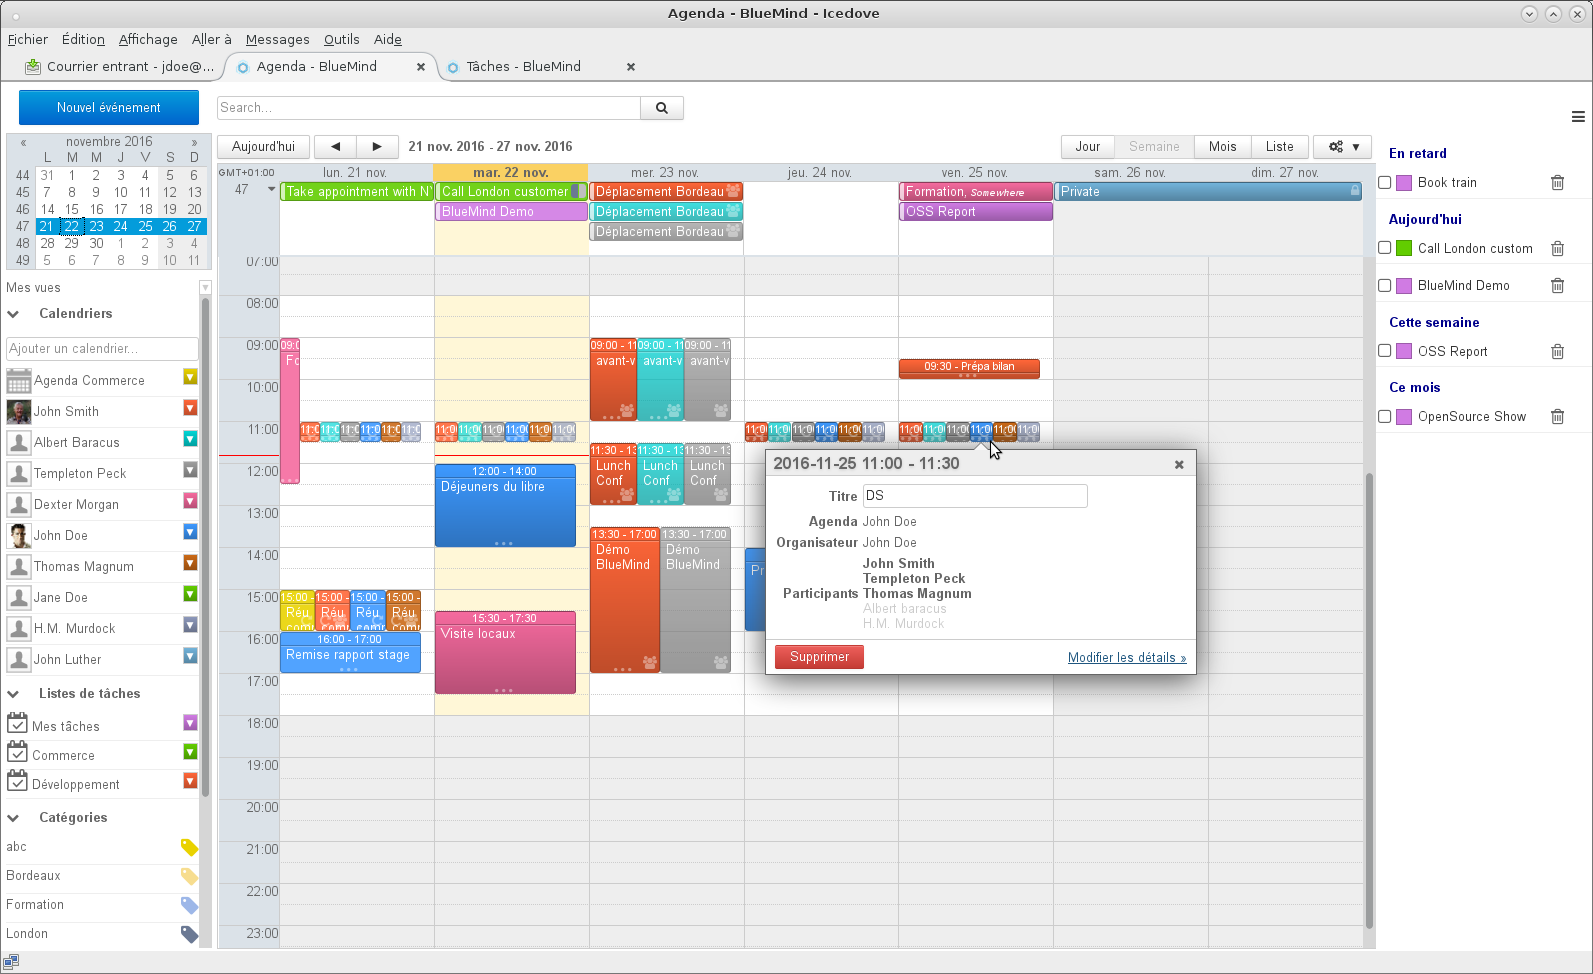
It is looks and works just like the web calendar:
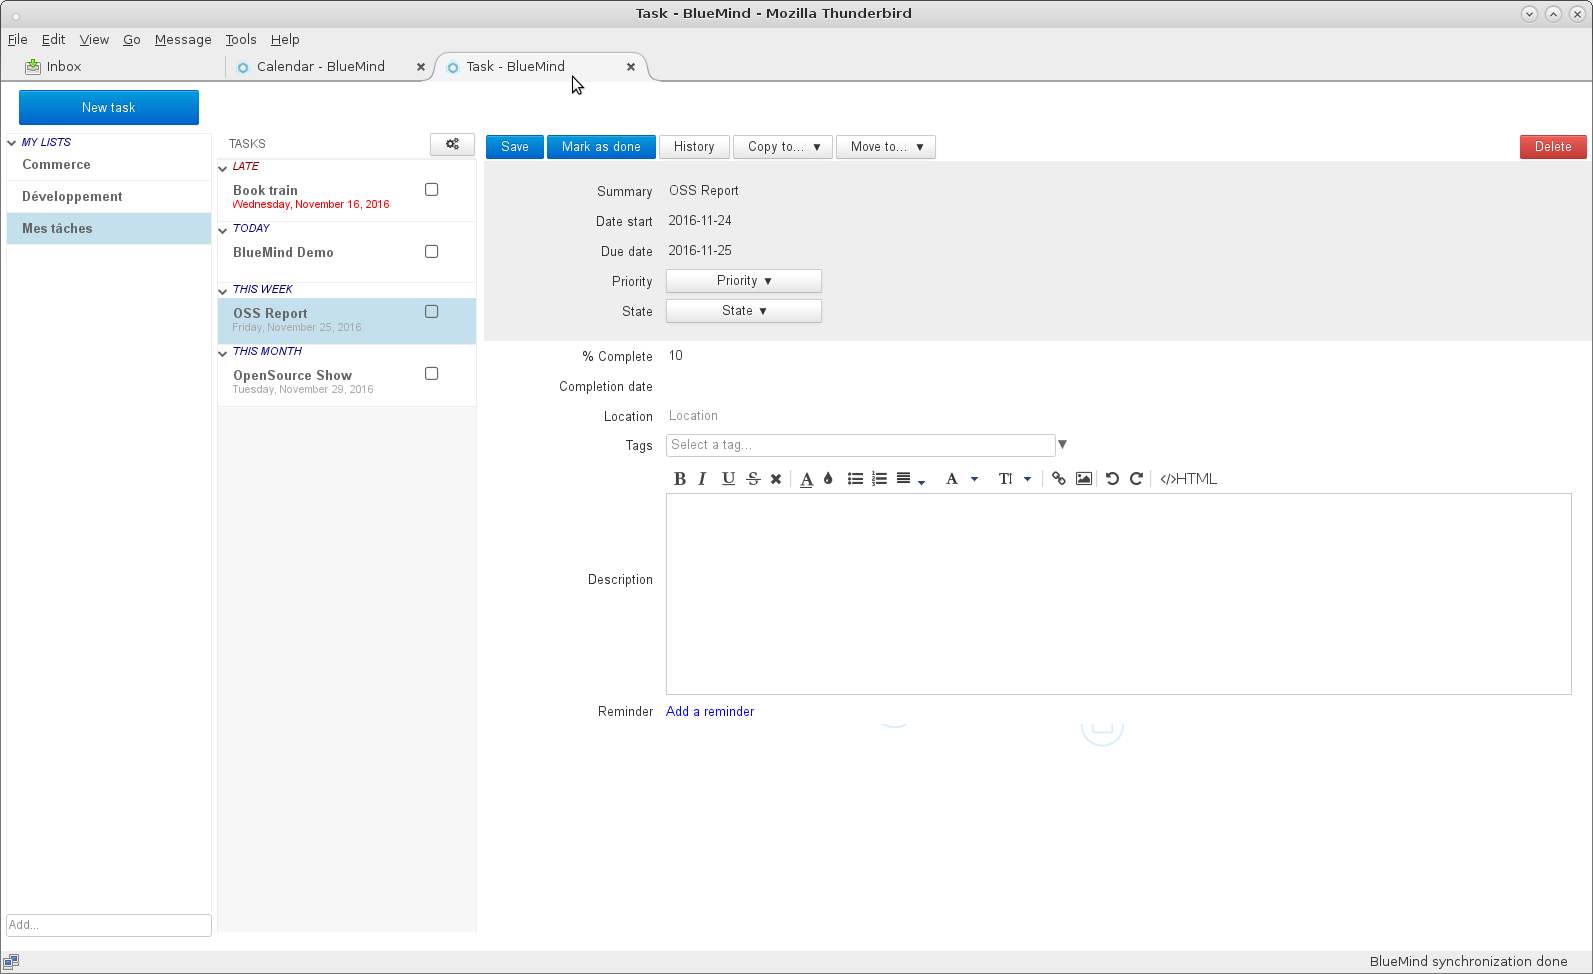
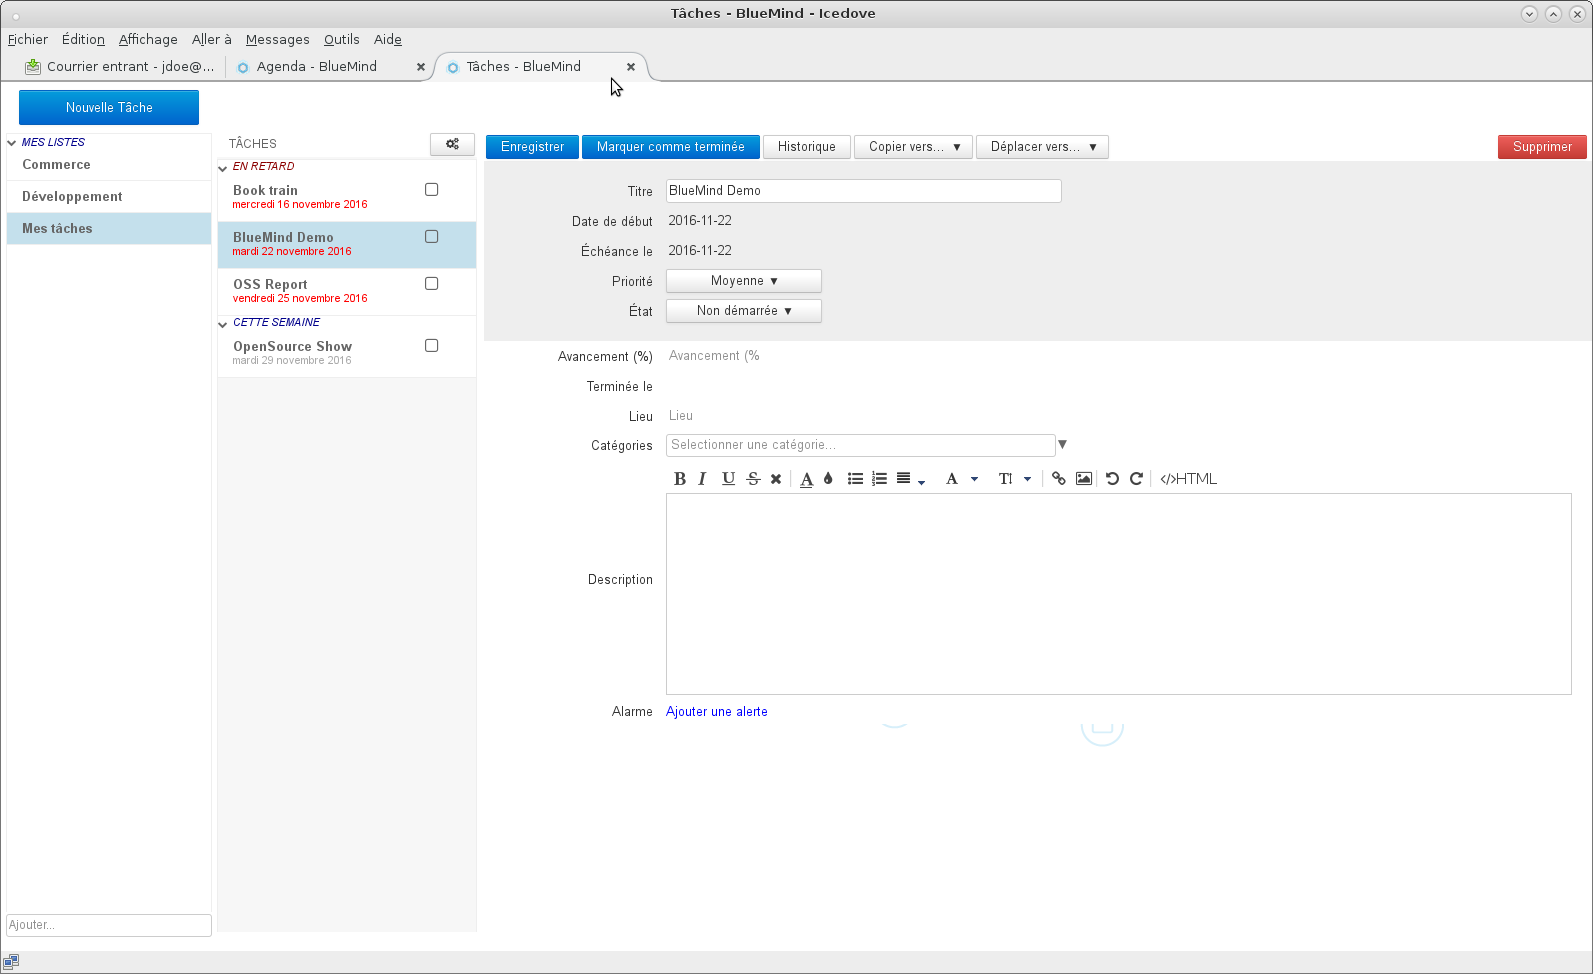
Preferences and calendarsChoosing what calendars to display, creating secondary calendars and granting share rights to other users are done in preferences (see above): Tools menu > BlueMind > BlueMind Preferences > Calendar section. For more details, go to the page on Préférences de l'agenda TasksJust like the calendar, tasks are available in a dedicated tab with the same UI as the BlueMind web application:
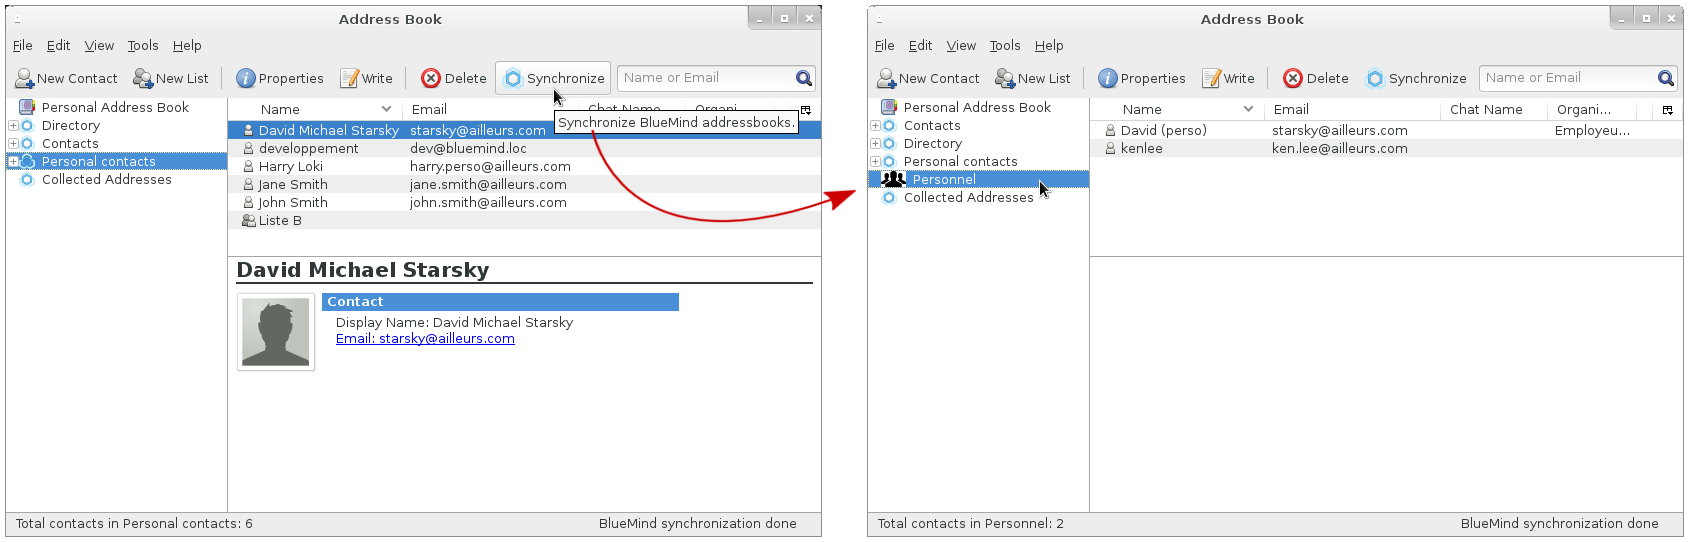
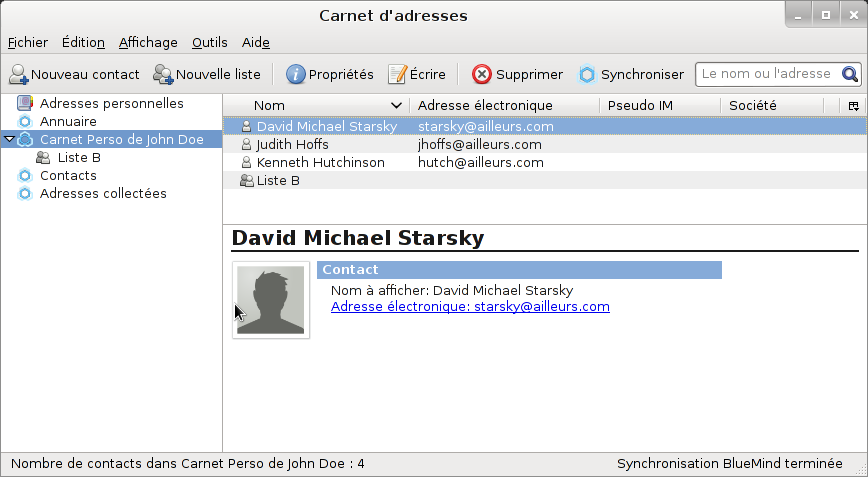
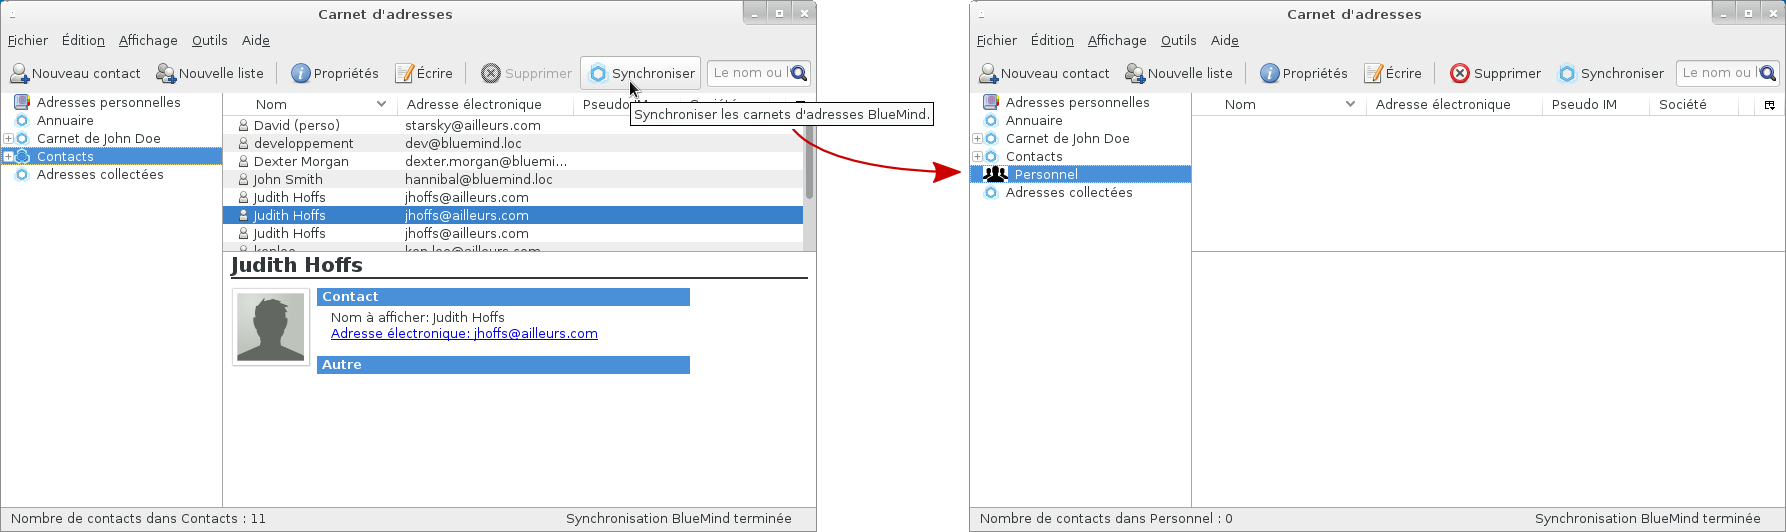
To find out more about how tasks work, go to the page: Tasks ContactsAll BlueMind user address books can be synchronized with Thunderbird and accessed in the address book window (Tools > Address Book):
To see an address book in Thunderbird, you must first subscribe to it in BlueMind, whether it is a personal address book or an address book shared by another user. To add an address book subscription:
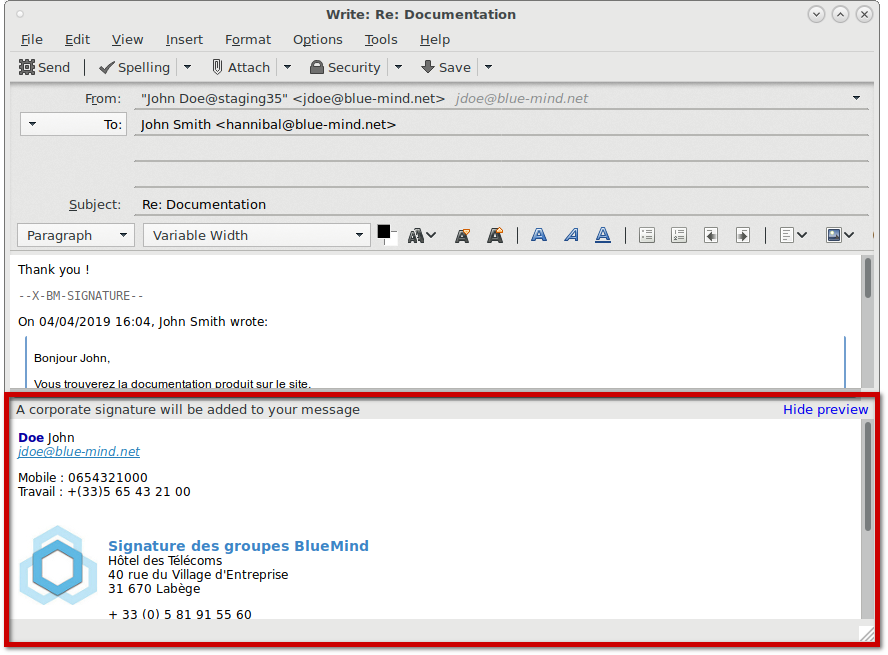
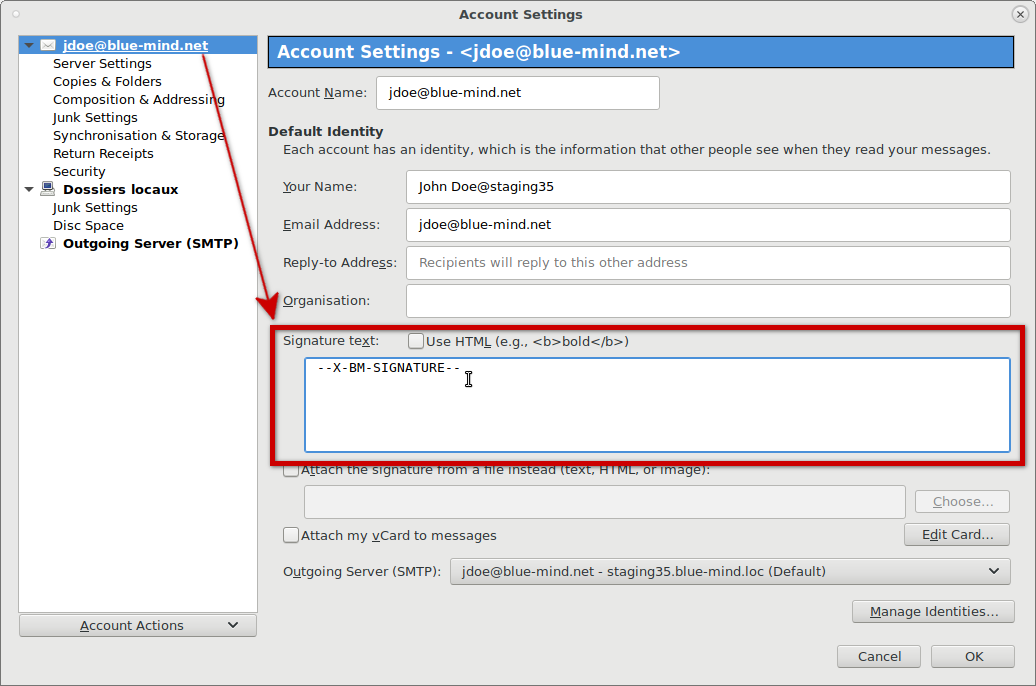
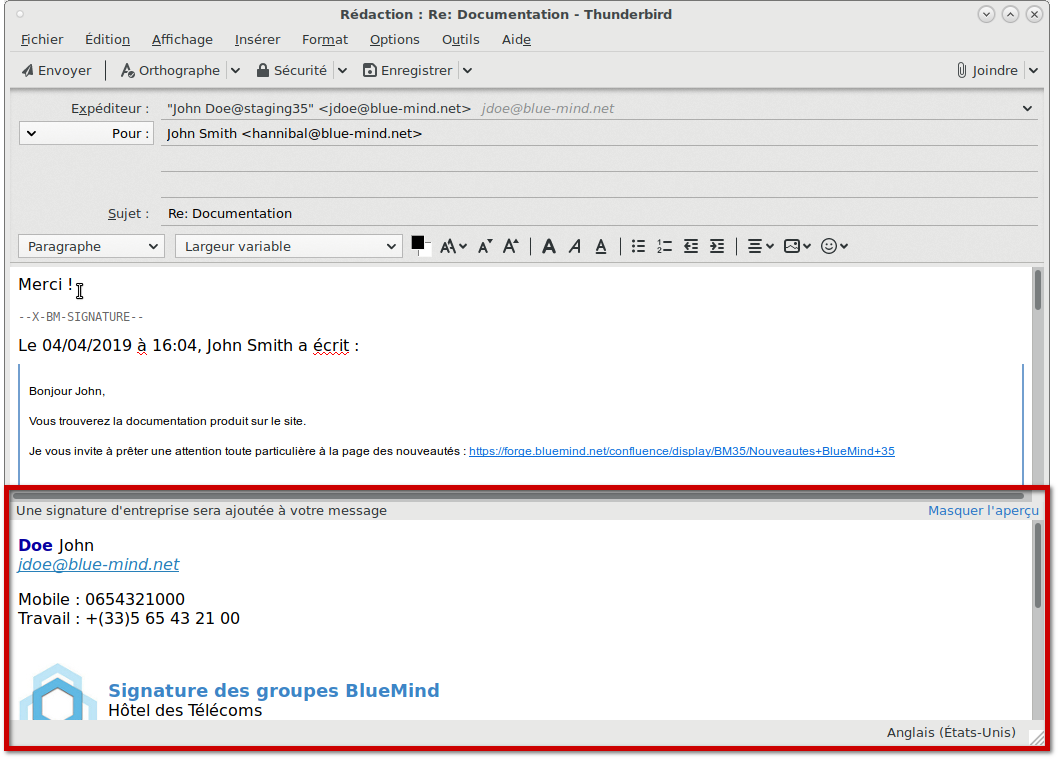
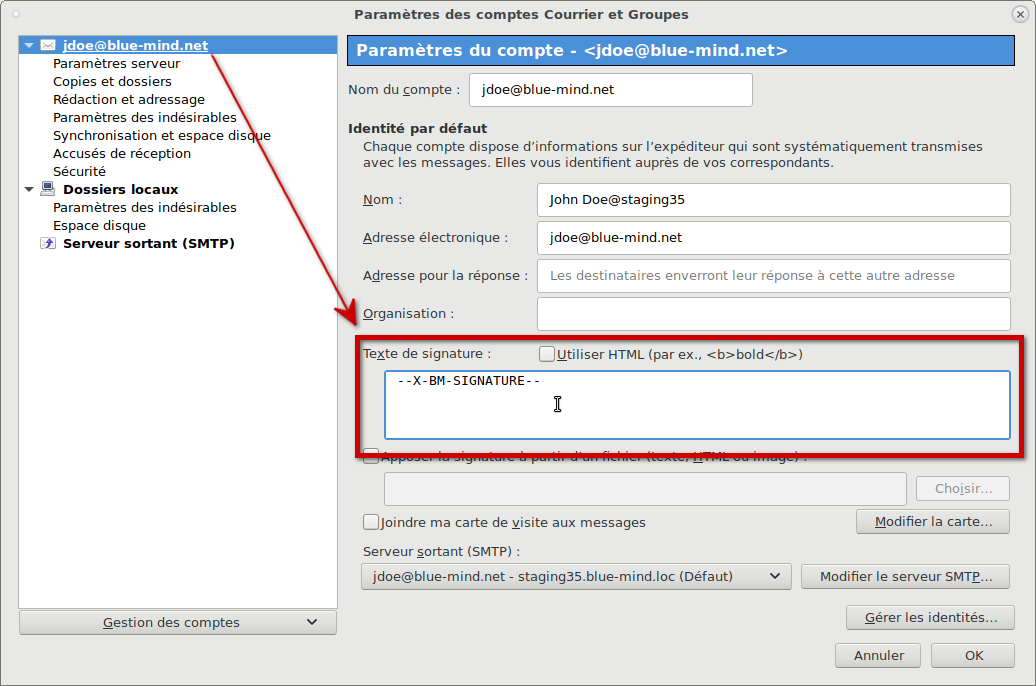
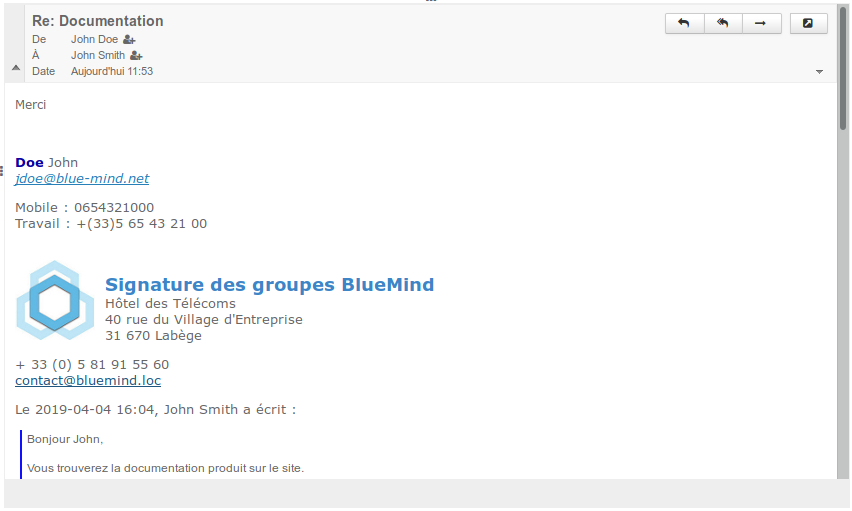
Corporate signatureIf a corporate signature has been configured, it will be automatically added at the end of the message by the server after the message is sent. A preview is shown in the compose window. This allows you to confirm that a signature will be added and which signature it is if several have been configured (internal, external or group signature, etc.): Signature placementIf the administrator has enabled this option, you can choose where to place your signature. To do this, add the string (tag) To make this easier, you can set up this string to make it your default signature in Thunderbird:
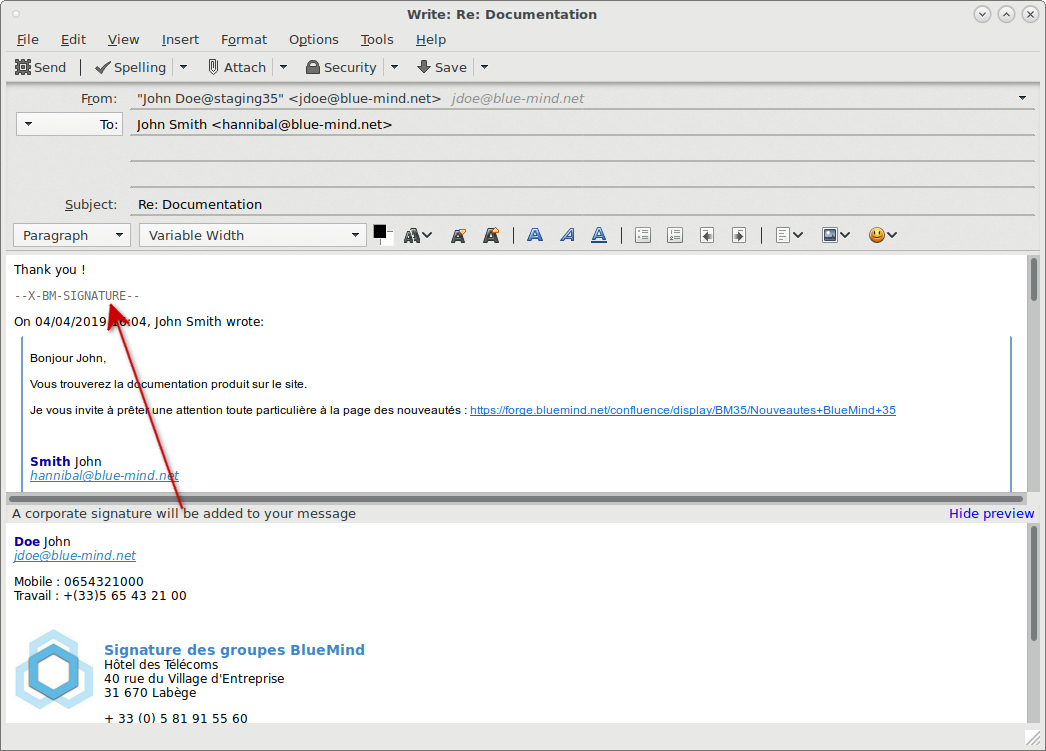
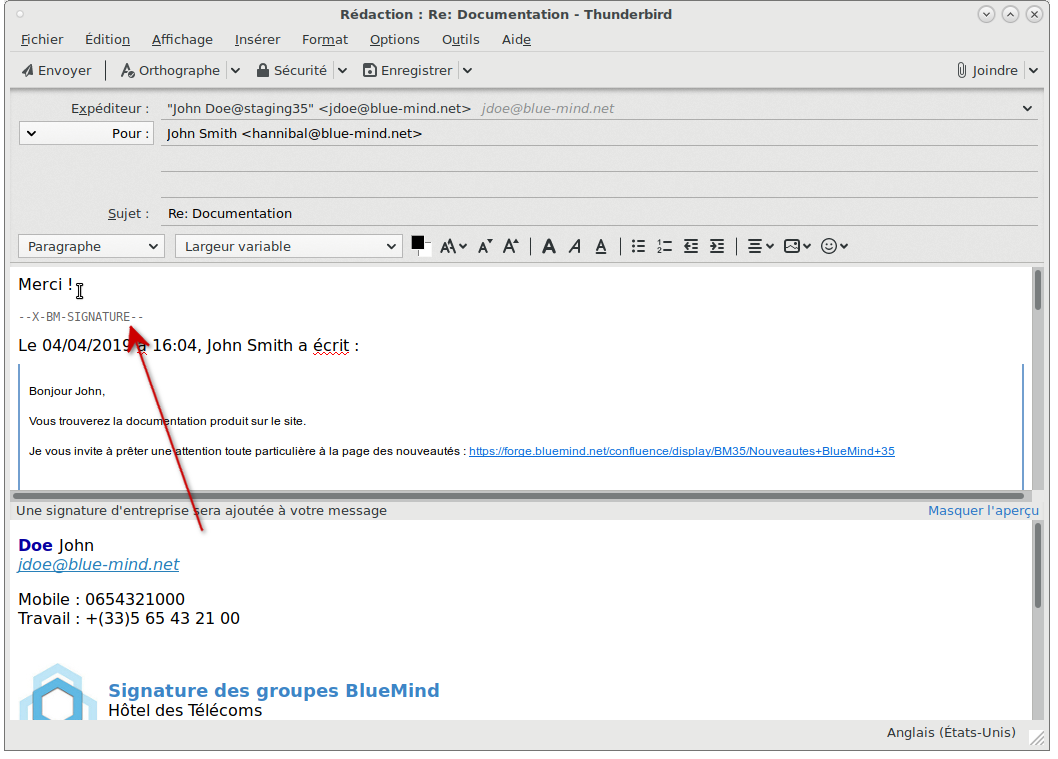
When you write or reply to an email, the tag will be added to the message automatically:
The signature is then added where the tag is placed:
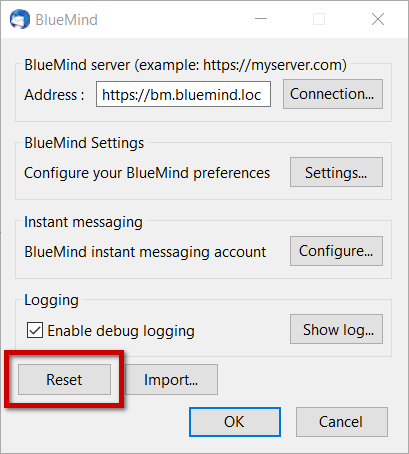
Using a personal signatureUnlike in webmail, when you use Thunderbird, BlueMind cannot detect personal signatures and replace them. If a personal signature is used in Thunderbird, the corporate signature will be added in addition to the personal signature. You should therefore not use personal signatures when a corporate signature is configured, unless it deliberately adds relevant information or it is used as a placement tag (see section above). TroubleshootingResetting the connectorWhen you're having issues with the connector that don't resolve after a simple restart, the first thing to try is to reset the connector. This resets synchronization and empties Thunderbird's browser cache. To do this:
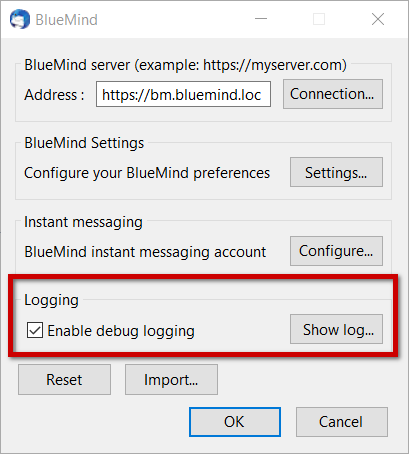
Connector logsGetting detailed logsWhen issues arise with no obvious cause, you need to enable detailed logging for the connector which will give you information about how the connector's synchronization has been running. To do this:
Viewing logsLogs can be accessed in the "Logging" section (see above) by clicking the "Show log..." button. Known issuesThe calendar tab opens a blank pageIf resetting the connector (see above) fails to resolve this issue, there are 2 solutions: Manually empty Thunderbird's browser cacheTo do this:
Force-purge the cachesIn addition to resetting and manually emptying Thunderbird's caches, you can force-purge them:
If none of these methods work to restore the calendar, then you need to enable detailed logging (see paragraph above) and send the logs to your IT service or BlueMind support. | |||||||||||||||||||||||||||||||||||||||
| Sv translation | |||||||||||||||||||||||||||||||||||||||
|


| Info |
|---|
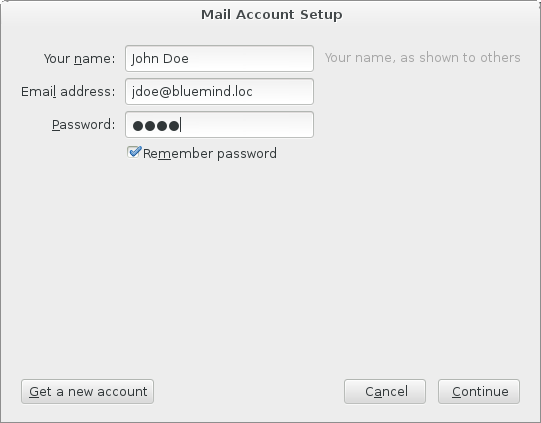
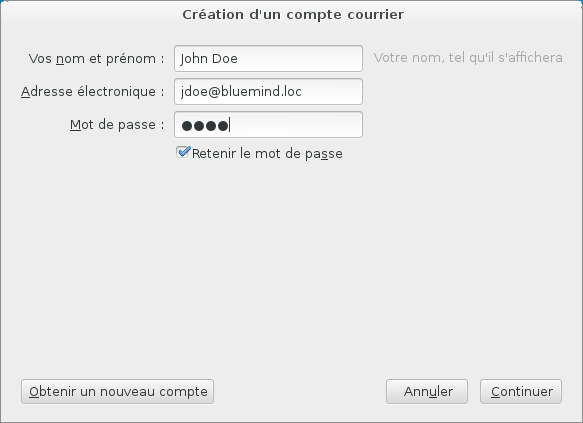
Wenn Thunderbird bereits mit einem Benutzerkonto und dessen Mailkonto installiert ist, gehen Sie in das Menü Datei > Neu > Bestehendes Mailkonto |
Die für die Verbindung mit dem BlueMind-Server erforderlichen Namen, E-Mail-Adresse und Passwort eingeben und auf „Weiter“ klicken.
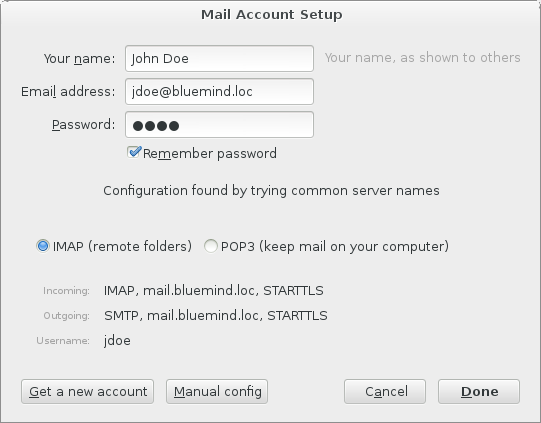
- Thunderbird versucht mit diesen Informationen eine Verbindung zu einem Server herzustellen und zeigt dann die getesteten bzw. gefundenen Informationen an:
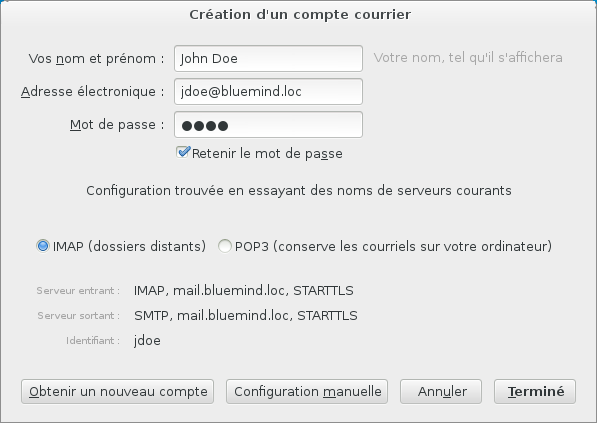
Thunderbird bietet eine abgekürzte Kennung, die auf dem ersten Teil der E-Mail-Adresse basiert. Die vom BlueMind-Server erwartete Kennung entspricht der vollständigen E-Mail-Adresse.
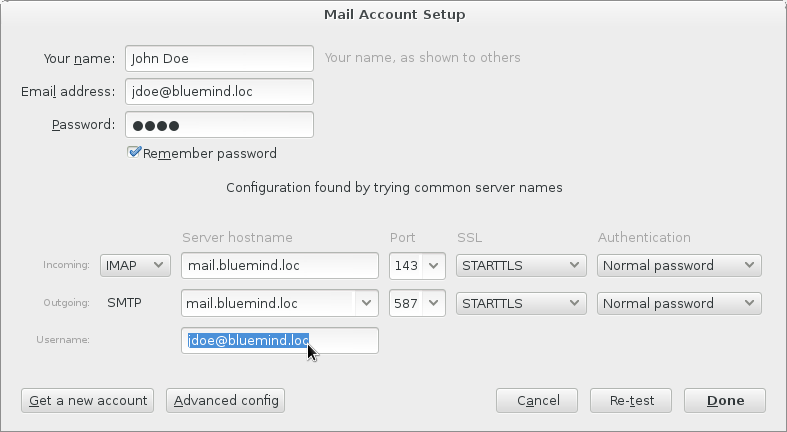
Sie müssen daher in den manuellen Konfigurationsmodus wechseln (Schaltfläche am unteren Rand des Fensters), um dies zu korrigieren: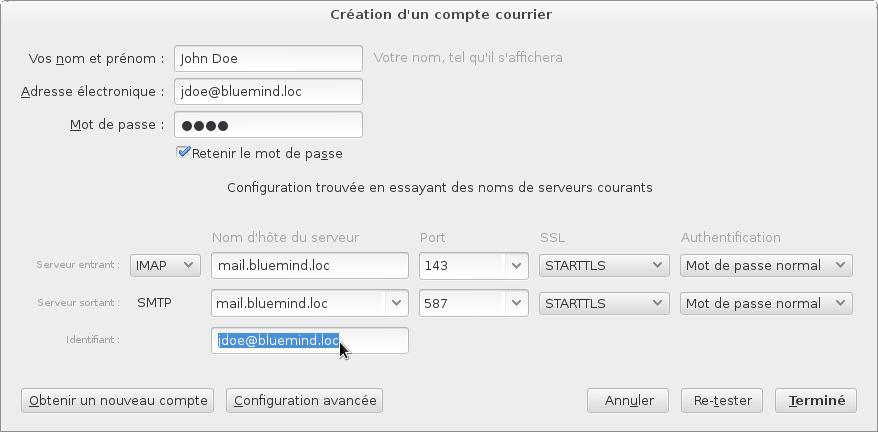
Remarque Wenn Thunderbird die Adressen der Eingangs- und Ausgangsserver nicht „erraten“ kann, schlägt es automatisch das manuelle Eingabeformular vor und die Schaltfläche „Fertig“ ist ausgegraut. Geben Sie die richtigen Adressen und Login-Daten ein und klicken Sie auf „Re-test“, um die Verbindungen zu validieren und den Vorgang abzuschließen.
Info - Der Vor- und Nachname sind frei wählbar und erscheinen in den vom Benutzer gesendeten Nachrichten.
- Die E-Mail-Adresse ist diejenige, die vom BlueMind-Administrator festgelegt wurde
- Die Posteingangs- und Postausgangsserver müssen von Ihrem Administrator angegeben werden, sie haben in der Regel das Format <Servername>.domain.com
- Der Benutzername ist der vollständige Benutzername mit der Domäne .
- Das Passwort ist das vom Administrator vergebene Passwort, mit dem Sie sich bei BlueMind anmelden.
- Klicken Sie auf die Schaltfläche „Fertig“.
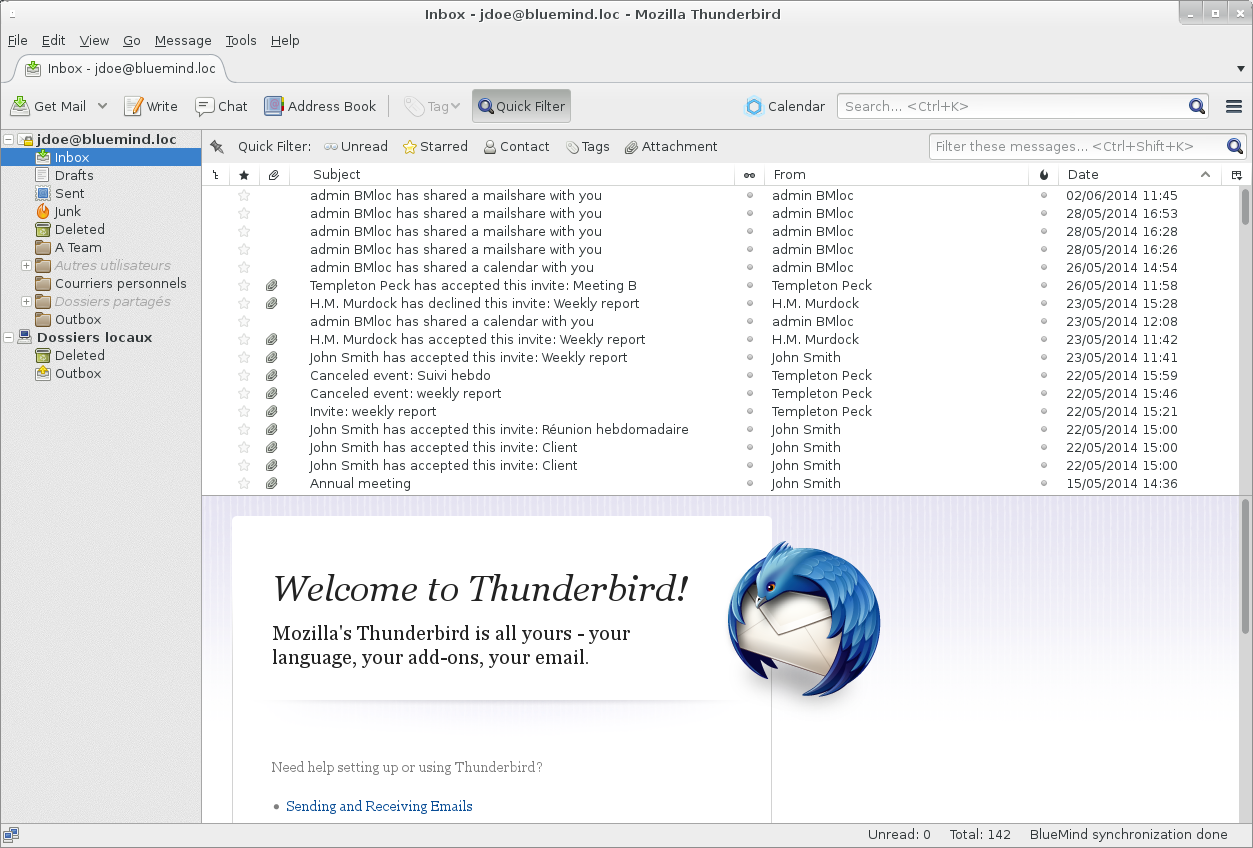
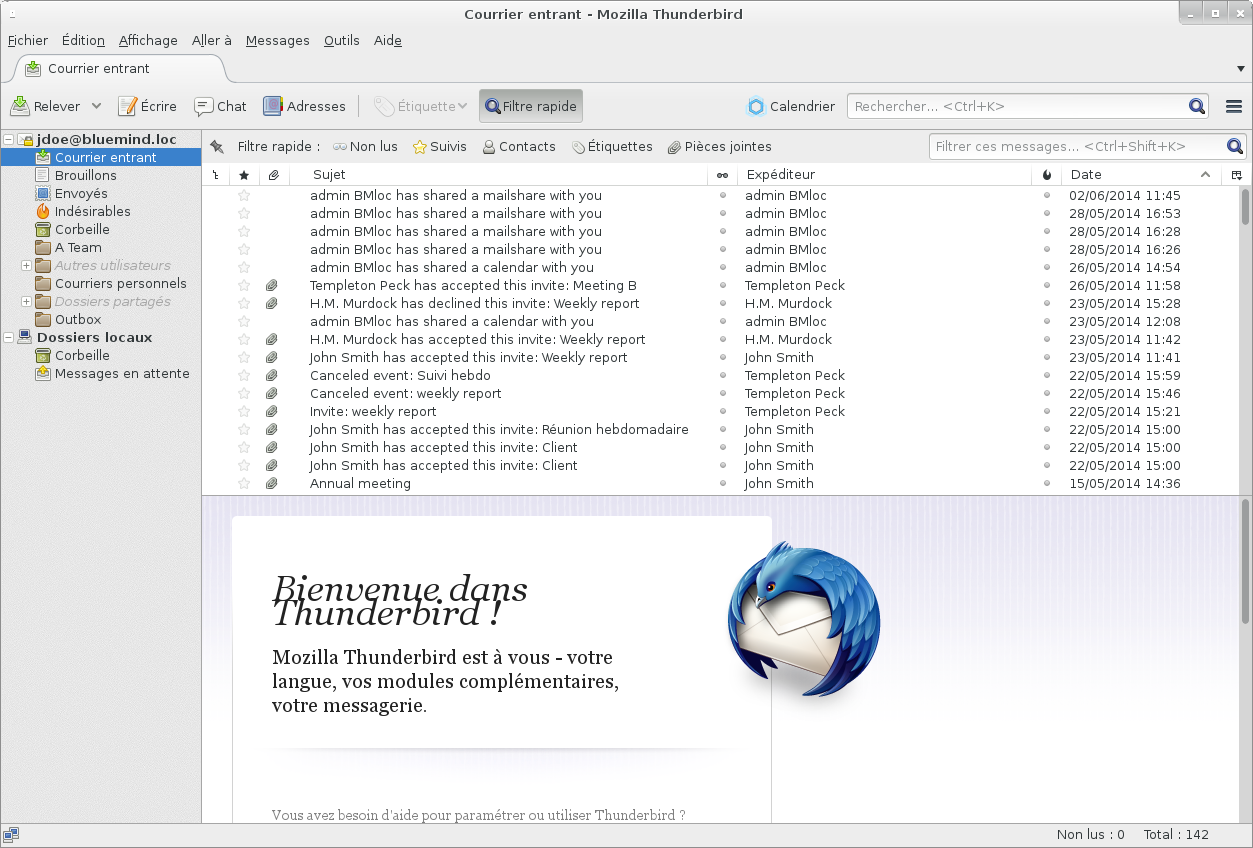
- Thunderbird zeigt das Hauptfenster an und ruft die Mails von dem eingestellten Konto ab.
Verbindung mit einer freigegebenen Mailbox
Um auf eine freigegebene Mailbox zuzugreifen, müssen Sie sie in Thunderbird „abonnieren“.
Klicken Sie dazu mit der rechten Maustaste in den linken Bereich des Fensters und wählen Sie im Menü die Option „Abonnieren“:
Ein Fenster wird geöffnet, in dem die Liste der für den Benutzer zugänglichen Ordner angezeigt wird.
Erweitern Sie das ausgegraute Menü „Gemeinsame Ordner“ (Doppelklick auf den Namen oder Einfachklick auf den Pfeil am Zeilenanfang) und aktivieren Sie das/die Kästchen für den/die gewünschten Ordner und klicken Sie dann auf „OK“:
Das freigegebene Feld erscheint im Hauptfenster mit den anderen Ordnern des Kontos in einem Unterbaum namens „Gemeinsame Ordner“:
| Astuce |
|---|
Thunderbird kann auch so konfiguriert werden, dass alle freigegebenen Ordner des Benutzers angezeigt werden, ohne dass er sie abonnieren muss:
|
Je nach Zugriffsrechten des Benutzers auf die freigegebene Mailbox kann der Benutzer die Nachrichten in ihr einsehen oder Nachrichten aus seiner Mailbox, z. B. aus seinem Ordner „Posteingang“, kopieren/verschieben.
| Remarque | ||
|---|---|---|
| ||
Wenn Sie eine E-Mail mit der Maus in diese Mailbox ziehen, wird die Mail verschoben und verschwindet aus der ursprünglichen Mailbox. Um eine Nachricht zu kopieren, klicken Sie mit der rechten Maustaste auf den Nachrichtenkopf im rechten Teil des Fensters und wählen Sie Kopieren in > Benutzer-Mailbox > Freigegebene Ordner > wählen Sie die freigegebene Mailbox und dann den Speicherort über die Option „Hierher kopieren“ im Untermenü, das dem gewünschten Ordner entspricht:
|
Der BlueMind-Connector
Der von BlueMind bereitgestellte Connector ermöglicht die Synchronisation von BlueMinds Kalender und Adressbüchern mit Thunderbird. Er bietet außerdem Zugriff auf die Aufgabenverwaltung und das Abtrennen von großen Anlagen beim Schreiben von Nachrichten.
Installation des Connectors
So installieren Sie den BlueMind-Connector:
laden Sie die Installationsdatei von der Verwaltungsschnittstelle der BlueMind-Einstellungen herunter, Rubrik Downloads
Remarque Falls der Connector nicht in den Downloads angeboten wird, wenden Sie sich bitte an Ihren Systemadministrator, um ihn zu installieren.
- gehen Sie in Thunderbird zu Tools > Zusatzmodule
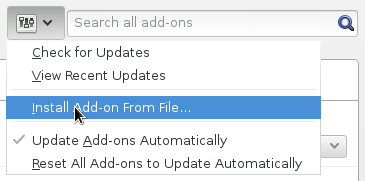
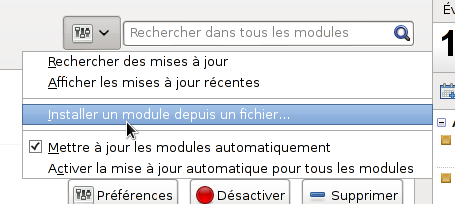
- ziehen Sie die Datei aus dem Datei-Explorer in das Thunderbird-Hauptfenster oder wählen Sie im Menü „Modultools“ die Option zur Installation eines neuen Moduls:
- folgen Sie den Installationsanweisungen für Thunderbird und starten Sie es neu
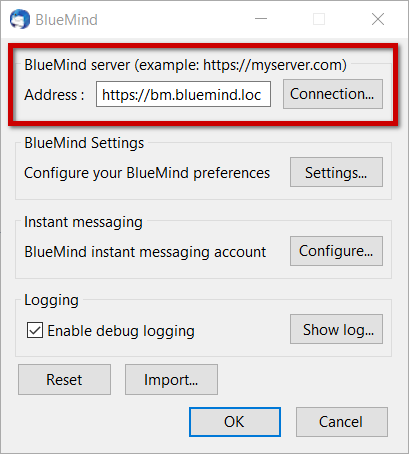
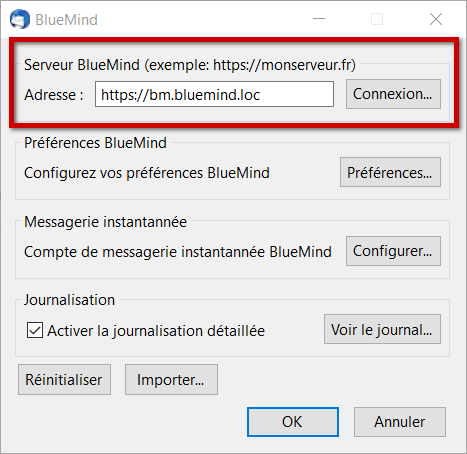
- gehen Sie zu Tools > Moduloptionen > BlueMind Connector und stellen Sie die Serveradresse ein
Hinweis: Je nach Betriebssystem und Thunderbird-Version kann der Zugriff auf verschiedene Arten erfolgen:- Tools > Zusatzmodule > Schaltfläche „Optionen“ am entsprechenden Modul
- Tools (oder Voreinstellungen) > Optionen > Registerkarte BlueMind
- Klicken Sie zum Beenden auf OK
- Der Connector stellt eine erste Verbindung her und fragt nach dem Benutzernamen und dem Passwort des Benutzers.
| Info |
|---|
Der Thunderbird-Connector synchronisiert automatisch alle Elemente alle 2 Minuten. Die Synchronisation kann jederzeit manuell über das Menü Tools > BlueMind > Synchronisieren erzwungen werden |
BlueMind-Einstellungsmanagement
BlueMind Version 4.1 bietet Thunderbird-Anwendern die Möglichkeit, all ihre BlueMind-Einstellungen direkt aus der Software heraus zu verwalten, ohne die BlueMind-Webanwendung aufrufen zu müssen.
Es gibt mehrere Möglichkeiten, auf die Einstellungsverwaltung zuzugreifen:
- Tools > BlueMind > BlueMind-Einstellungen
- im Fenster der Connector-Verwaltung:
Tools > Moduloptionen > BlueMind Connector > Schaltfläche „Voreinstellungen“
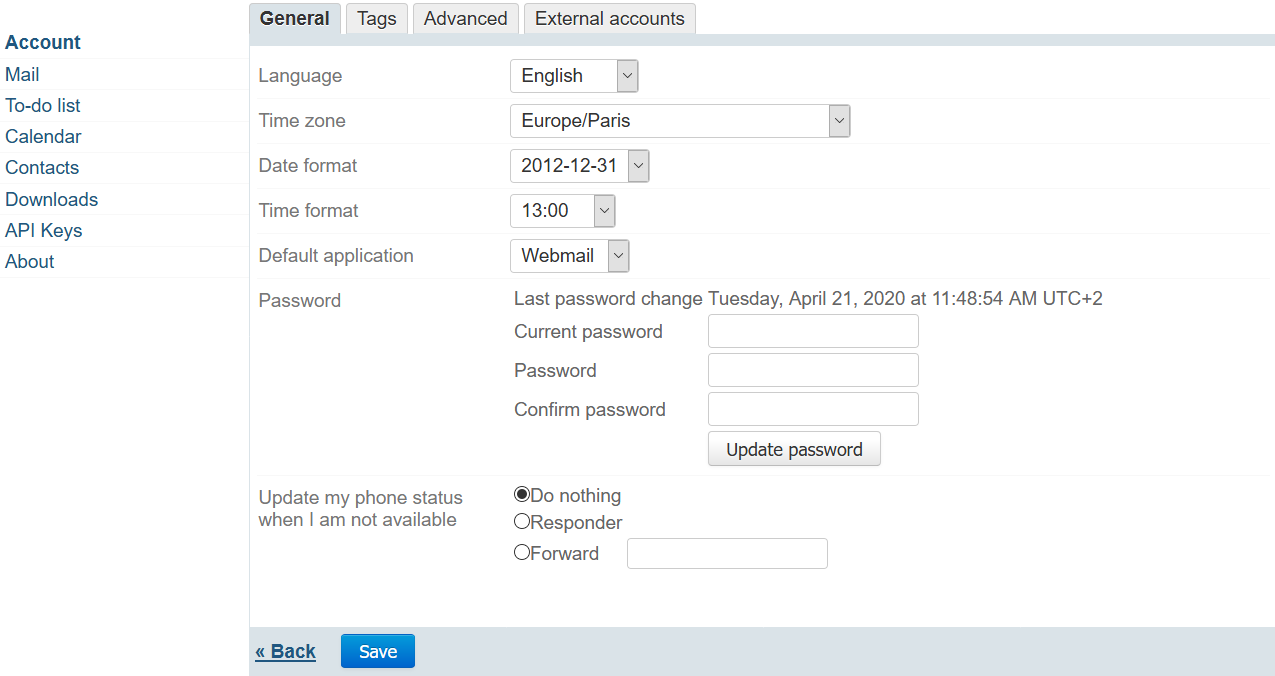
Die Schnittstelle sieht genauso aus und funktioniert genauso wie die Verwaltung der Einstellungen in der BlueMind-Webanwendung:
Weitere Erklärungen finden Sie im gewünschten Abschnitt:
Abtrennen von Anlagen
Ist der Connector installiert, ist die Funktion zum Abtrennen von Anlagen direkt im Texteingabefenster zugänglich.
Grundlegende Bedienung
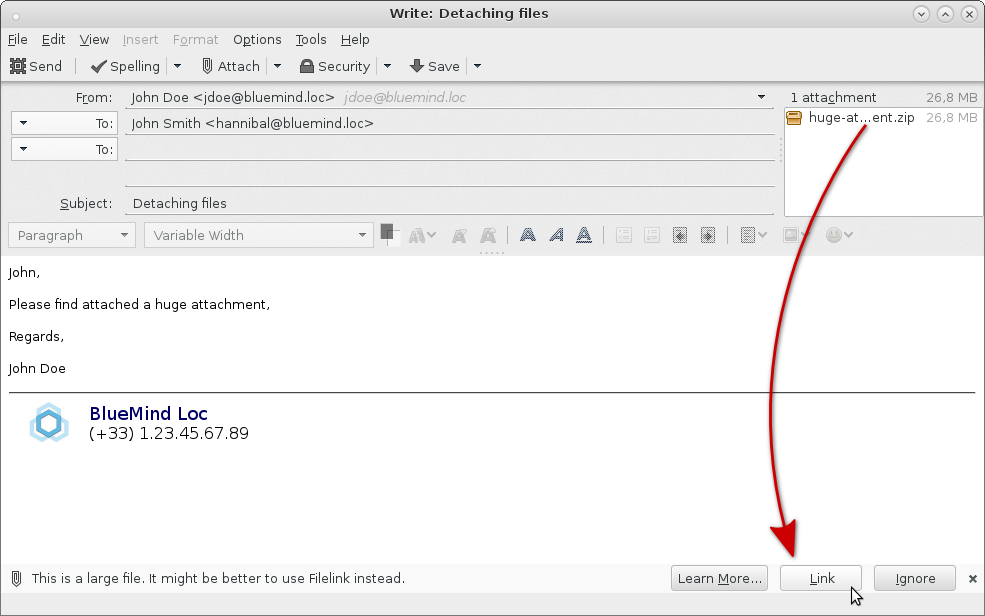
Fügen Sie Ihre Anlage auf die übliche Weise hinzu (mit der entsprechenden Schaltfläche oder über Drag & Drop). Wenn seine Größe die in BlueMind eingestellte automatische Abtrennschwelle überschreitet, bietet Thunderbird Ihnen die Abtrennung der Datei an:
Die Datei wird dann automatisch an den Server gesendet und mit der Nachricht verbunden:
Wie bei der Abtrennung vom BlueMind-Webmail wird der Download-Block unabhängig vom E-Mail-Client des Empfängers beim Empfänger angezeigt.
| Remarque |
|---|
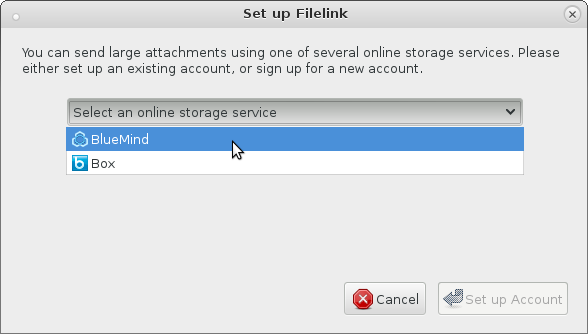
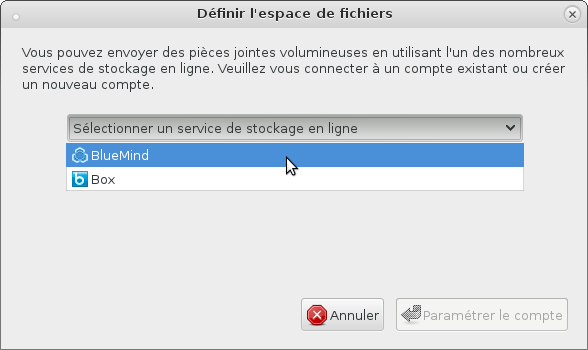
Bei der 1. Verwendung werden Sie aufgefordert, den zu verwendenden Dienst zu wählen:
|
Erzwungene Abtrennung
Um eine Datei abzutrennen, die bereits an die Nachricht angehängt ist, klicken Sie mit der rechten Maustaste auf den Namen des Anhangs und wählen Sie Umwandeln in > BlueMind:
Umgekehrt können Sie eine abgetrennte Datei wieder integrieren, indem Sie Konvertieren in > Normale Anlage wählen. Die Datei wird an die Nachricht angehängt und der Download-Block wird gelöscht.
Eine Datei kann auch direkt als Anlage an die Nachricht angehängt werden. Klicken Sie dazu auf den Pfeil der Schaltfläche „Anhängen“, um im Optionsmenü nach unten zu scrollen, und wählen Sie Dateibereich > BlueMind
Die Dateiauswahl Ihres Systems öffnet sich und sobald die Datei ausgewählt ist, wird sie automatisch und sofort an den Server gesendet und mit der Nachricht:
BlueMind Dateiauswahl
Wie von BlueMind Webmail gewohnt, können Sie auf die Dateiauswahl zugreifen, die es Ihnen ermöglicht, Dateien zu senden, die sich bereits in Ihrem Online-Speicher befinden (Dateien, die Sie bereits gesendet und abgetrennt haben).
Um darauf zuzugreifen, klicken Sie auf den Pfeil der Schaltfläche „Anhängen“, um das Optionsmenü aufzurufen und wählen Sie „Vom BlueMind-Dateiserver“:
 Die BlueMind-Dateiauswahl wird geöffnet, so dass Sie die verfügbaren Dateien auswählen können. Klicken Sie auf eine oder mehrere Dateien und dann auf die Schaltfläche „Auswählen“, um sie der Nachricht hinzuzufügen:
Parametrierung
In den Thunderbird-Einstellungen, Registerkarte Anlagen, können Sie die automatische Abtrennung von Anlagen oberhalb eines bestimmten Schwellenwertes deaktivieren, indem Sie das Kontrollkästchen aktivieren oder deaktivieren:
| Avertissement |
|---|
Der Schwellenwert kann in diesem Fenster geändert werden, er wird jedoch bei jedem Start von Thunderbird mit dem BlueMind-Server synchronisiert, so dass der geänderte Wert bei der nächsten Sitzung überschrieben wird. |
Kalender
Anzeige
Ist der Connector installiert und die Verbindung hergestellt, ist der Kalender über das Menü Tools > BlueMind > Kalender oder über eine neue Schaltfläche auf der Thunderbird-Hauptschnittstelle zugänglich:

Er hat die gleichen Anzeigefunktionen und die gleiche Bedienung wie der Online-Kalender:
Einstellungen und Kalender
Die Verwaltung der angezeigten Kalender sowie das Anlegen von Nebenkalendern oder die Vergabe von Freigaberechten an andere Benutzer erfolgt innerhalb der Einstellungsverwaltung (siehe oben): Menü Tools > BlueMind > BlueMind-Einstellungen > Bereich Kalender.
Ausführlichere Informationen finden Sie auf der Seite Kalendereinstellungen
Die Aufgaben
Wie der Kalender ist auch die Aufgabenverwaltung auf einer separaten Registerkarte zugänglich und bietet online die gleiche Schnittstelle wie in BlueMind:
Um mehr über die Funktionsweise zu erfahren, können Sie die entsprechende Seite einsehen: Les taches
Kontakte
Alle BlueMind-Adressbücher des Benutzers können mit Thunderbird synchronisiert werden und sind über den Adressbuchverwalter (Menü Tools > Adressbuch) zugänglich:
Damit ein Adressbuch in Thunderbird sichtbar ist, müssen Sie es zunächst in BlueMind abonnieren, egal ob es sich um ein persönliches Adressbuch oder ein von einem anderen Benutzer freigegebenes handelt.
So fügen Sie einem Adressbuch ein Abonnement hinzu:
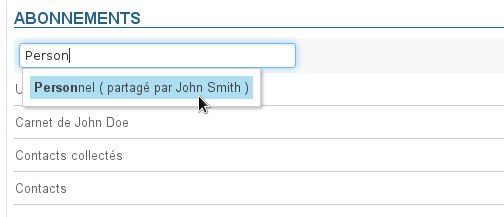
Sobald die Freigabe aktiviert ist (durch den Benutzer für ein persönliches Adressbuch oder durch den Administrator für ein Domänen-Adressbuch), gehen Sie zur Verwaltung der BlueMind-Einstellungen: Tools > BlueMind > BlueMind-Einstellungen > Abschnitt Kontakte > Registerkarte Abonnements
beginnen Sie im Eingabefeld mit der Eingabe des Namens des Adressbuchs, der dann von der Autovervollständigung vorgeschlagen wird:
Hinweis: Die persönlichen Adressbücher des Benutzers werden automatisch hinzugefügt, wenn sie erstellt werden
| Astuce | |||||
|---|---|---|---|---|---|
| |||||
Mit der Schaltfläche „Synchronisation“ können Sie für jedes Adressbuch eine differenzierte Synchronisation einrichten.
Weitere Informationen finden Sie auf der Seite Adressbuchverwaltung - §3 Abonnements |
Wenn eine Firmenunterschrift eingestellt ist, wird sie nach dem Senden vom Server automatisch am Ende der Nachricht hinzugefügt.
Im Bearbeitungsfenster wird eine Vorschau angeboten, damit der Benutzer sehen kann, dass eine Unterschrift vorhanden ist und welche, wenn mehrere Unterschriften eingestellt sind (intern, extern, für eine Gruppe, usw.):
Einfügen der Unterschrift
Wenn der Administrator die entsprechende Option aktiviert hat, können Benutzer das Einfügen ihrer Unterschrift wählen.
Dazu die Zeichenfolge (Tag) --X-BM-SIGNATURE-- an der gewünschten Stelle in der E-Mail einfügen.
Um das Einfügen zu erleichtern, kann der Benutzer diese Zeichenkette als Standardunterschrift in Thunderbird festlegen:
Beim Verfassen oder beim Beantworten einer E-Mail wird das Tag dann automatisch in der Nachricht angebracht:
| Astuce |
|---|
Auch im vorliegenden Fall einer Platzierung durch Thunderbird kann das Tag vom Benutzer manuell verschoben werden, wenn er die Unterschrift vorübergehend an einer anderen Stelle anbringen möchte. |
Die Unterschrift wird dann von dem Server eingefügt, auf dem sich das Tag befindet:
| Remarque |
|---|
Bei fehlendem oder gelöschtem Tag wird die Unterschrift ganz ans Ende der Nachricht gesetzt. |
Verwendung einer persönlichen Unterschrift
Im Gegensatz zu Webmail kann BlueMind bei der Verwendung von Thunderbird keine persönliche Unterschrift erkennen, um sie zu ersetzen. Wird beispielsweise in Thunderbird eine persönliche Unterschrift verwendet, wird die Firmenunterschrift in Nachrichten zusätzlich zu dieser hinzugefügt.
Daher sollte eine persönliche Unterschrift nicht verwendet werden, wenn eine Firmenunterschrift vorhanden ist, es sei denn, sie liefert zusätzliche relevante und gewünschte Informationen, oder das Tag zum Platzieren wird als Unterschrift benutzt (siehe voriger Abschnitt).
Fehlersuche
Zurücksetzen des Connectors
Beim Auftreten von Störungen, die nicht durch den Neustart der Software behoben werden, besteht der erste Schritt im Zurücksetzen des Connectors: Dieser Vorgang setzt die Synchronisation zurück und löscht den Browser-Cache.
Dies geschieht wie folgt:
- zu den Connectoreinstellungen gehen
- klicken Sie auf die Schaltfläche „Zurücksetzen“:
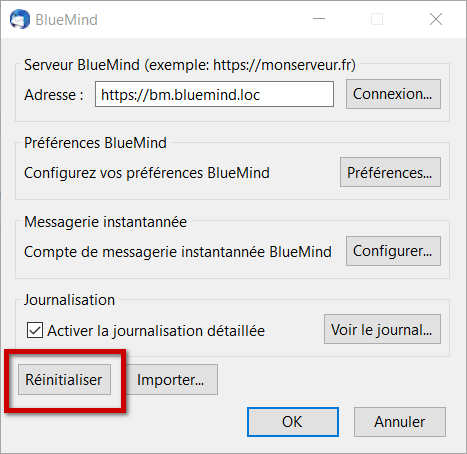
- Beenden durch Klicken auf OK
Die Protokolle des Connectors
Detaillierte Protokolle erhalten
Wenn Probleme ohne offensichtliche Ursache auftreten, muss die detaillierte Protokollierung des Connectors aktiviert werden, um vollständige Protokolle zu erhalten, die Aufschluss über den Fortschritt der Connector-Synchronisation geben.
Vorgehensweise:
- zu den Connectoreinstellungen gehen
- aktivieren Sie das Kontrollkästchen „Detaillierte Protokollierung aktivieren“:
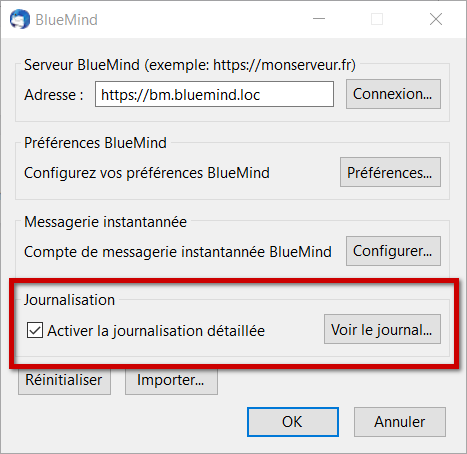
- Bestätigen Sie mit der „OK“-Taste
- Thunderbird neu starten
Die Protokolle einsehen
Im Bereich „Protokoll-Aktivierung“ (siehe oben) können Sie auf die Protokolle zugreifen, indem Sie auf die Schaltfläche“Protokoll einsehen...“ klicken
Bekannte Probleme
Die Registerkarte „Kalender“ hat eine leere Seite
Wenn das Zurücksetzen des Connectors (siehe oben) nicht ausreicht, um das Adressbuch wieder anzuzeigen, müssen 2 Lösungen umgesetzt werden:
Leeren Sie den Cache des integrierten Browsers manuell
Sie können den Cache wie folgt manuell zurücksetzen:
- öffnen Sie die Kalender-Registerkarte von Thunderbird
- gehen Sie zu Tools > Aktuellen Verlauf löschen
- wählen Sie „Alle“ im Dropdown-Menü und aktivieren Sie alle Kästchen
- klicken Sie auf „Jetzt löschen“
- schließen Sie die Kalender-Registerkarte von Thunderbird und öffnen Sie sie erneut
Erzwingen der Cache-Bereinigung
Neben dem manuellen Zurücksetzen und Leeren kann auch eine Zwangsbereinigung der Thunderbird-Caches durchgeführt werden:
- Schließen Sie die Software
verwenden Sie die Befehlszeile:
Bloc de code "C:\Program Files (x86)\Mozilla Thunderbird\thunderbird.exe" -purgecachesWeitere Informationen finden Sie unter https://developer.mozilla.org/fr/docs/Mozilla/Command_Line_Options
Löschen Sie den lokalen Speicherordner:
Bloc de code C:\Users\John\AppData\Roaming\Thunderbird\Profiles\c05tkj52.default\storage\default\https+++bm.bluemind.locHinweis: Der Programm-Pfad kann von einer OS-Version zur anderen variieren
- Thunderbird neu starten
Wenn keine dieser Methoden das Adressbuch wiederherstellen kann, müssen Sie die detaillierte Protokollierung durchführen (siehe voriger Absatz) und die erhaltenen Protokolle an Ihre IT-Abteilung oder an den BlueMind-Support übermitteln.
Vue d'ensemble
Gestion des contenus
Apps