Setting up a user account
When you first open it, Thunderbird asks if you want a new email address and account. Choose "Skip this and use my existing email".
| Info |
|---|
If Thunderbird is already installed and set up with a user account and email, just go to File > New > Existing Mail account. |
Enter your name, email address and password to connect to the BlueMind server and click "Continue".
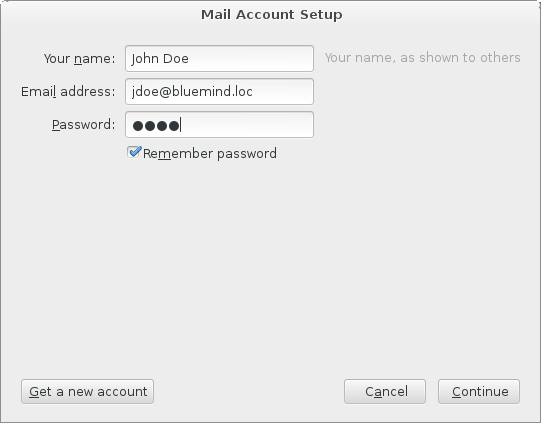
- Thunderbird tries to connect to the server based on this information and displays the information tested and/or found.
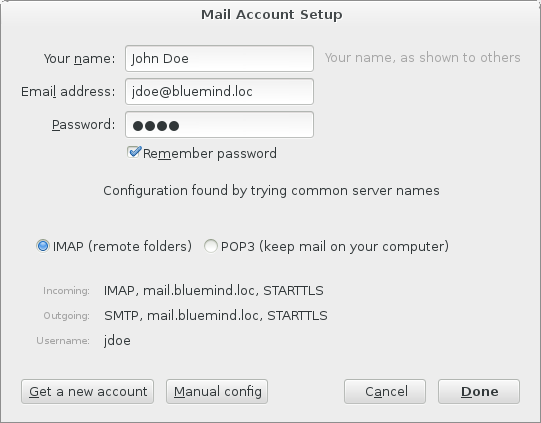
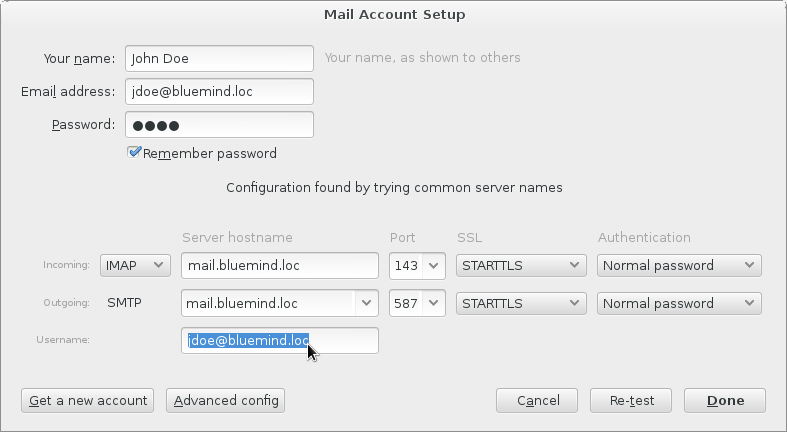
Thunderbird suggests an abbreviated username based on the first part of your email address. However, the BlueMind server expects the username to match your full email address. Go to "Manual config" (at the bottom of the dialog box) to correct this:
| Remarque |
|---|
If Thunderbird is unable to guess the incoming and outgoing server names, it automatically displays the manual configuration dialog box and the "Done" button is grayed out. Enter the correct addresses as well as the username and click "Re-test" to validate the connections and complete the process. |
| Info |
|---|
- You are free to use any name as "Your name". This is the name that will appear on your outgoing messages.
- The email address is the address configured by the BlueMind administrator.
- Incoming and outgoing server names must be given to you by your administrator. Typically, they are <servername>.domain.com.
- The username must be your full username including the domain name .
- The password is the password provided to you by the administrator to connect to BlueMind.
|
- Click "Done".
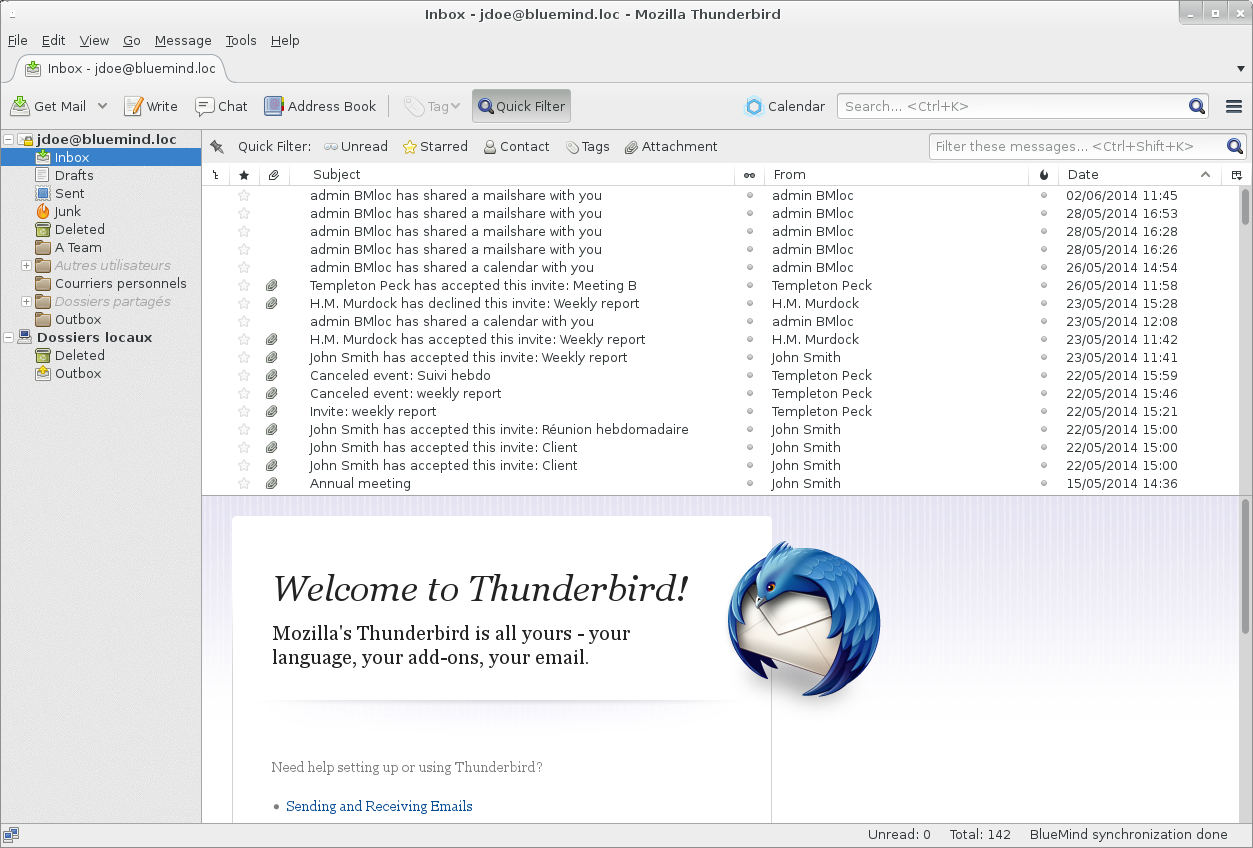
- Thunderbird then opens the main window and retrieves messages from the account you have configured.
Connecting to a shared mailbox
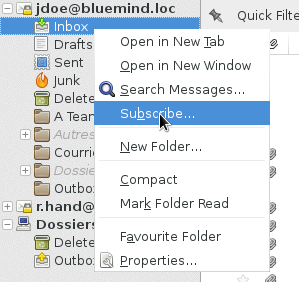
To access a shared mailbox, you must subscribe to it in Thunderbird.
To do this, right-click the left pane and choose "Subscribe" from the menu:
A window showing the list of files you have access to opens.
Open the grayed out "Dossiers partagés" menu (double-click it or click the "+" sign at the beginning of the row) and check the box(es) corresponding to the folder(s) you want to subscribe to. Click "Ok" to finalize:
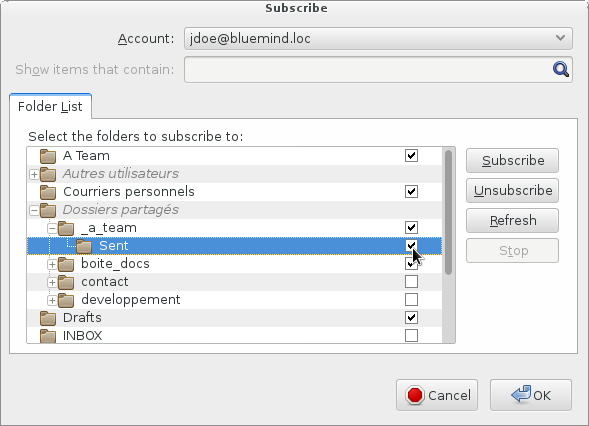
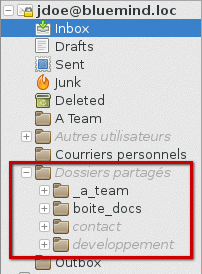
The shared mailbox is shown in the main window along with the other account folders, under a sub-menu called "Dossiers partagés".
| Astuce |
|---|
Thunderbird can be configured to display all your shared folders without you having to subscribe to them: Go to the Tools > Account settings.
Go to Server settings for the account you want to configure.
Click "Advanced...". Uncheck "Show only subscribed folders".
|
Depending on the rights you have on the shared mailbox, you can view the messages it contains or copy/move messages from your mailbox – from your "Inbox" folder, for example.
| Remarque |
|---|
|
If you use drag and drop to move an email to this mailbox, it disappears from its original mailbox. To copy a message, right-click the message header on the right hand side of the window and select Copy To > select the user's mailbox > "Dossiers partagés" > choose the shared mailbox and the location you want to move the message to by selecting "Copy Here": 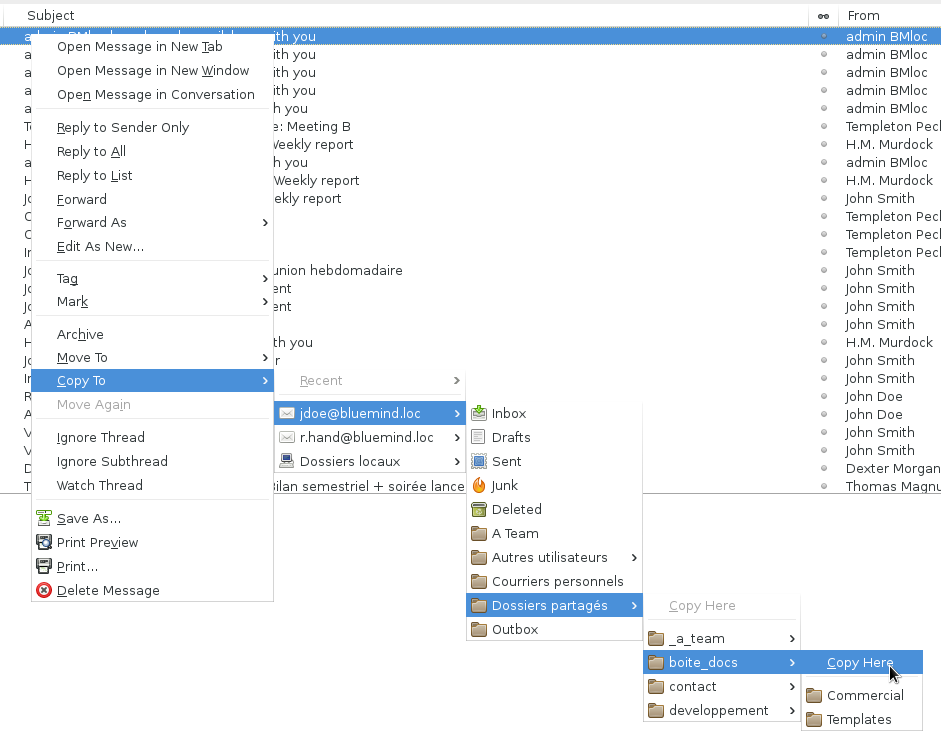
|
The BlueMind connector
The BlueMind connector allows you to synchronize the BlueMind calendar and address book with Thunderbird.
Installing the connector
To install the BlueMind connector:
| Info |
|---|
The Thunderbird connector synchronizes all items automatically every 2 minutes. To force synchronizing manually, go to Tools > BlueMind > Synchronize. |
Gestion du répondeur de messagerie
Working with the mail responder
 Image Added From Image Removed À partir de la version 3.5.8-1 (connector version 3.1.28061 du connecteur), le connecteur BlueMind permet de gérer son répondeur de messagerie directement depuis Thunderbird, il n'est plus nécessaire de se rendre dans les paramètres de BlueMind pour créer, activer ou désactiver un message d'absence.
| Astuce |
|---|
Le répondeur étant toujours géré par le serveur BlueMind, les règles d'application sont exactement les mêmes que pour le répondeur activé depuis BlueMind. |
Pour accéder à la configuration du répondeur :
- se rendre dans les préférences de Thunderbird, rubrique BlueMind : Outils > Options (ou « Édition > Préférences » selon l'environnemen) > BlueMind
- une nouvelle Rubrique "Messagerie" est désormais présente. Cliquer sur le bouton « Réponse » pour paramétrer la réponse automatique:
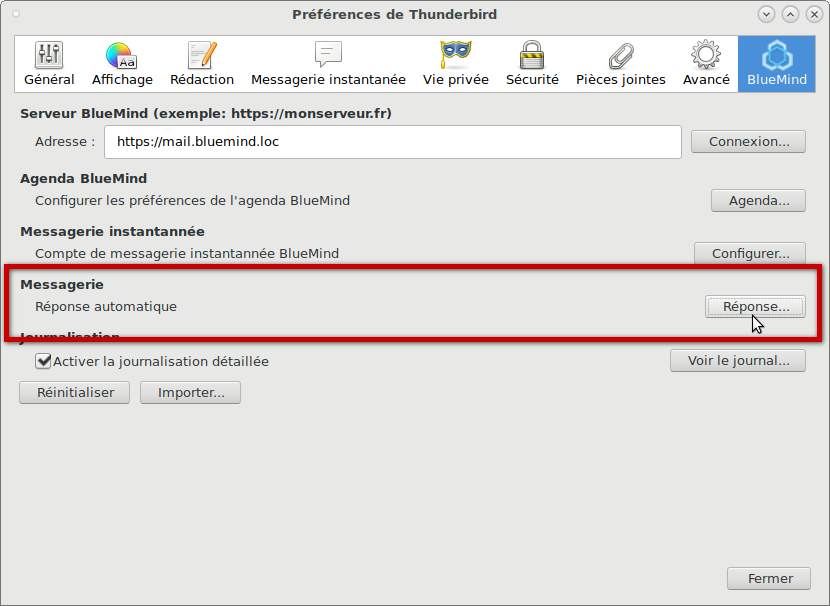 Image Removed
Les données affichées sont celles actuellement paramétrées dans BlueMind :
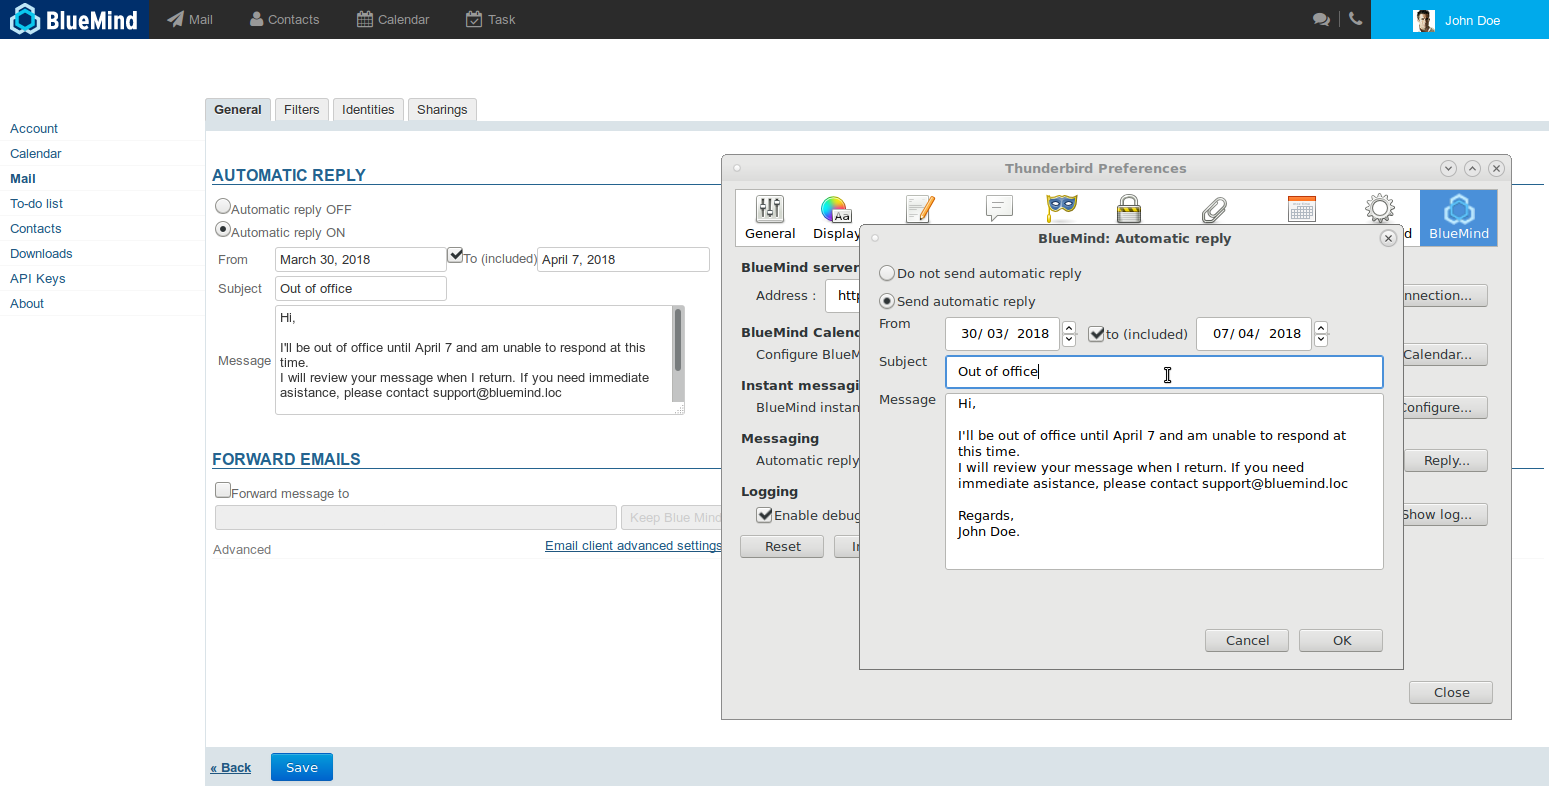 Image Removed
Une fois le répondeur paramétré comme souhaité, cliquer sur « OK » pour sauvegarder les modifications. Les nouvelles valeurs sont immédiatement synchronisées avec BlueMind et entrent en vigueur.
the BlueMind connector enables you to manage the mail responder from Thunderbird, you no longer need to go into BlueMind settings to create, activate or deactivate an out-of-office message.
| Astuce |
|---|
The responder continues to be managed by the BlueMind server which means that application rules are exactly the same as when activated from BlueMind. |
To access responder settings:
- go to Thunderbird preferences, BlueMind section: Tools > Options (or "Edit > Preferences" depending on the environment) > BlueMind
- a new "Mail" section is now shown. Click "Reply" to set up an automatic reply:
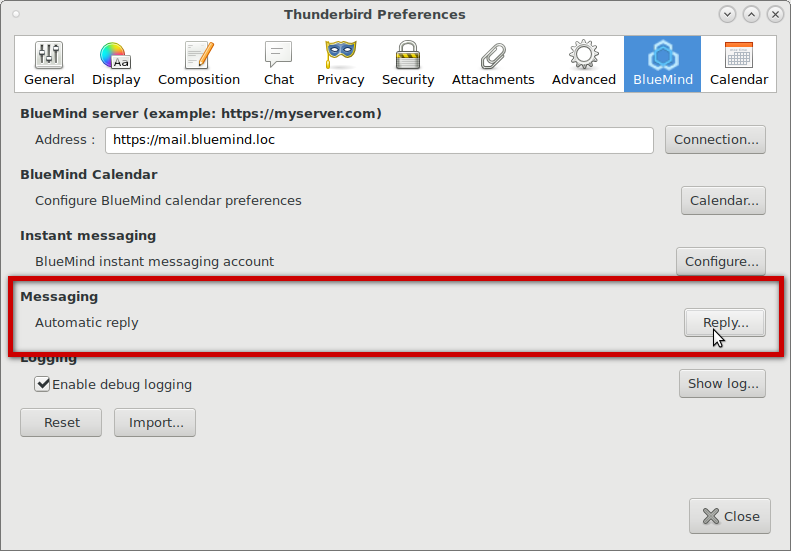 Image Added
The data displayed is that currently set up in BlueMind:
Image Added
Once the responder has been set up as desired, click "OK" to save the changes. The new values are synchronized with BlueMind immediately and applied.
For more detailed information on managing the responder, view the page on Mail preferences.Pour plus d'informations détaillées sur la gestion du répondeur, voir la page dédiée aux Préférences de messagerie
Attaching files as links
Once the connector is installed, you can access the link attachments feature in the compose message window.
Working with linked attachments
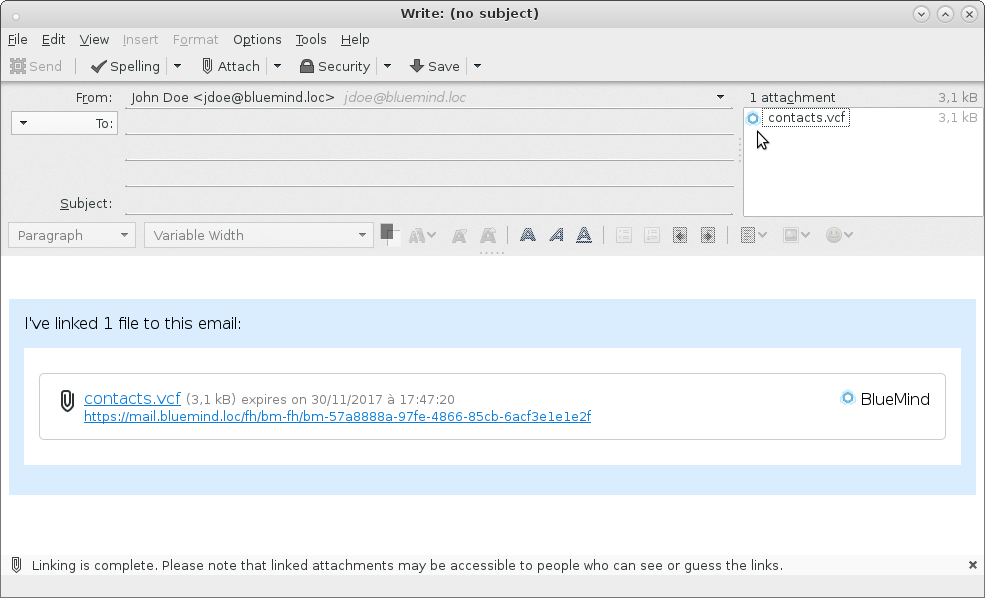
Simply attach your file as usual (using the attach button or drag and drop). If the file size exceeds the auto-detach size configured in BlueMind, Thunderbird gives you the option of linking the file:
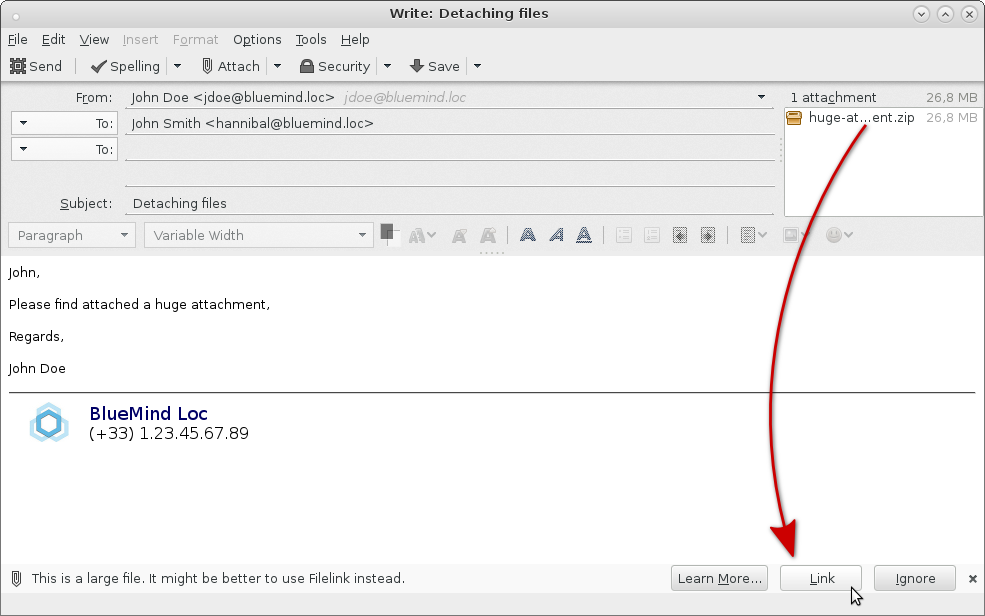
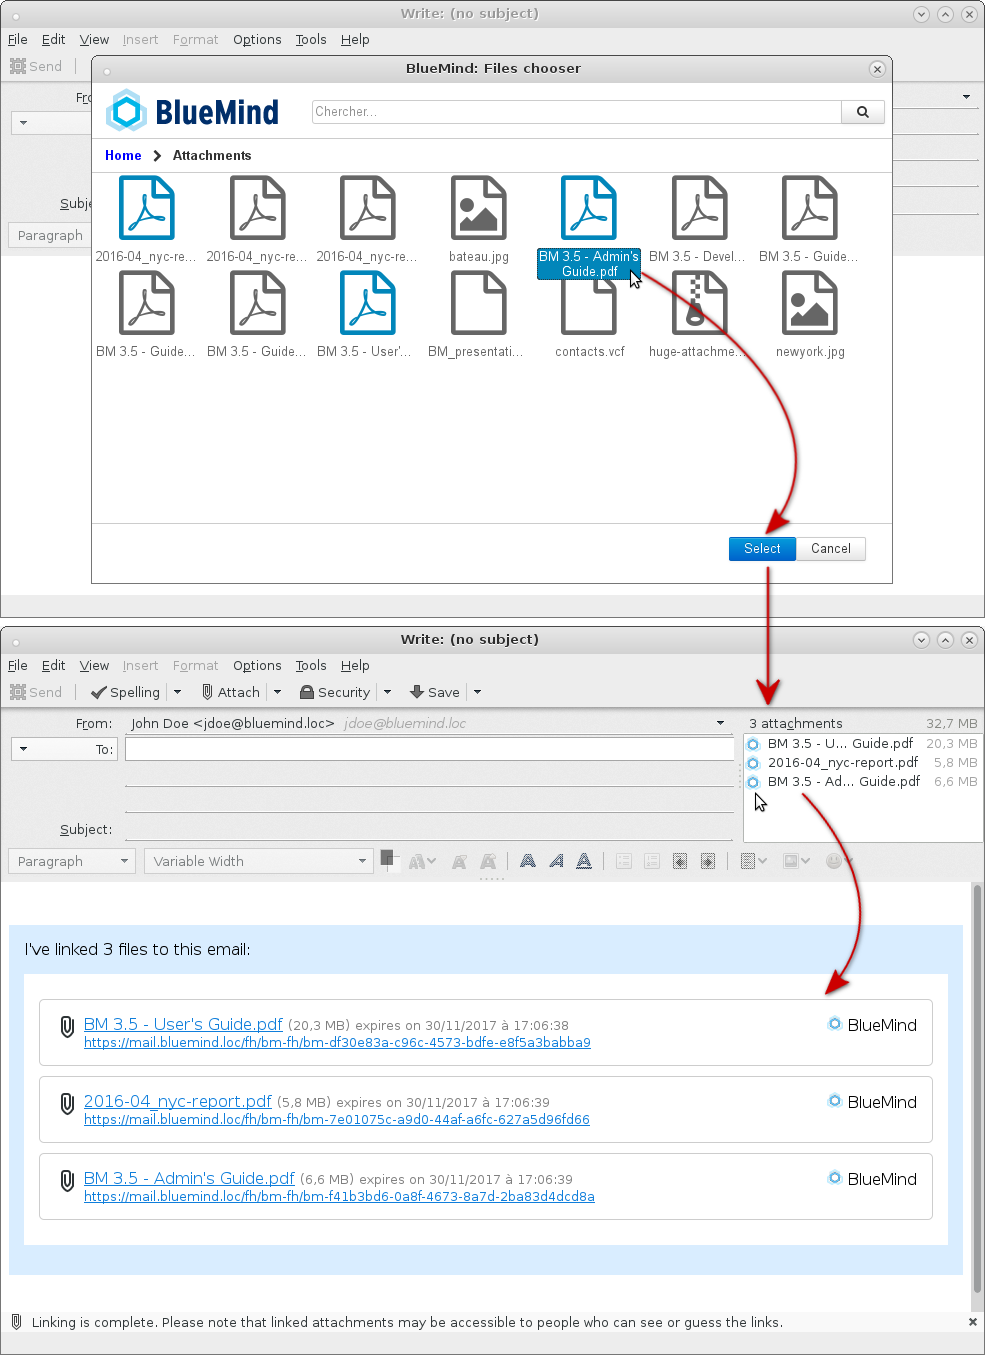
The file is then automatically sent to the server and linked to the message:

Just like in BlueMind webmail, the download block will be displayed in the recipient's message, whatever email client they are using.
| Remarque |
|---|
When you use this for the first time, you will be asked to choose which service to use: 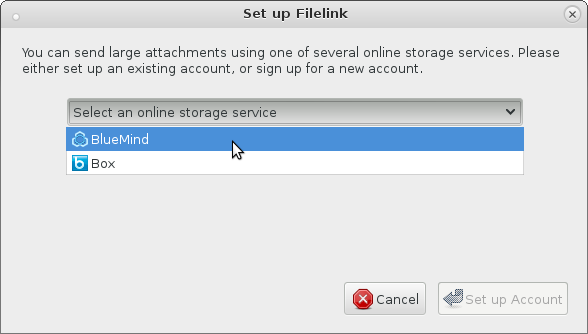
- Select BlueMind
- Click "Set up Account"
- A warning may pop up. Confirm that you accept the exception required for the certificate and click "Set up Account" again
- The pop-up closes and the file is attached to the message
|
Forced detachment
To detach an attachment from a message, right-click the file name and select Convert to > BlueMind:
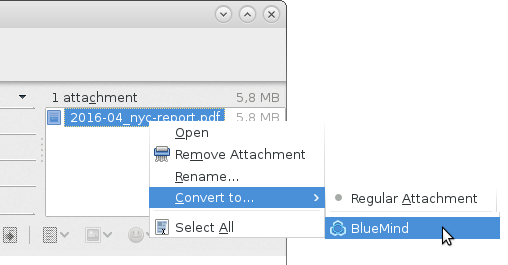
Conversely, to reattach a file that has been detached, select Convert to > Regular Attachment. The file is then added to the message and the download block is deleted.
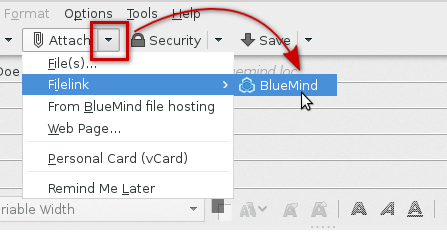
Files can also be added to messages as links rather than physically when they are first attached. To do this, click the arrow next to the "Attach" button to open the drop-down menu and select Filelink > BlueMind
Your system's file browser opens and once you've chosen a file, it is automatically and immediately sent to the server and added to the message as a link:
BlueMind file chooser
Just like in BlueMind webmail, you can access the file browser to send files you already have in your online space (files you've already sent as links).
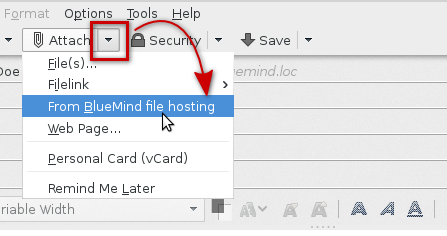
To access them, click the arrow next to the "Attach" button in order to open the options menu and select "From BlueMind file hosting":
The BlueMind file browser opens, which allows you to select available files. Click one or several files and then the "Select" button to add them to the message:
Configuration
In Thunderbird preferences, Attachments tab, you can choose to disable automatic file linking for files exceeding a certain size by checking or unchecking the dedicated box:
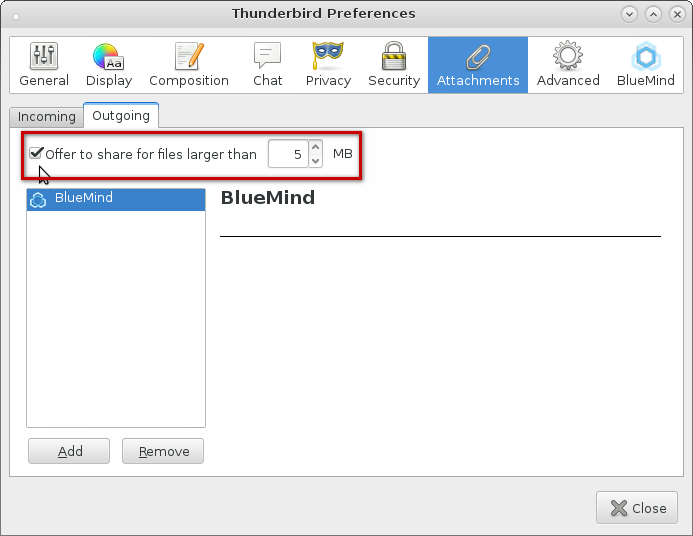
| Avertissement |
|---|
Although file size can be modified in this window, it is synchronized with the BlueMind server every time Thunderbird starts. As a result, the modified value will be overwritten next time you open Thunderbird. |
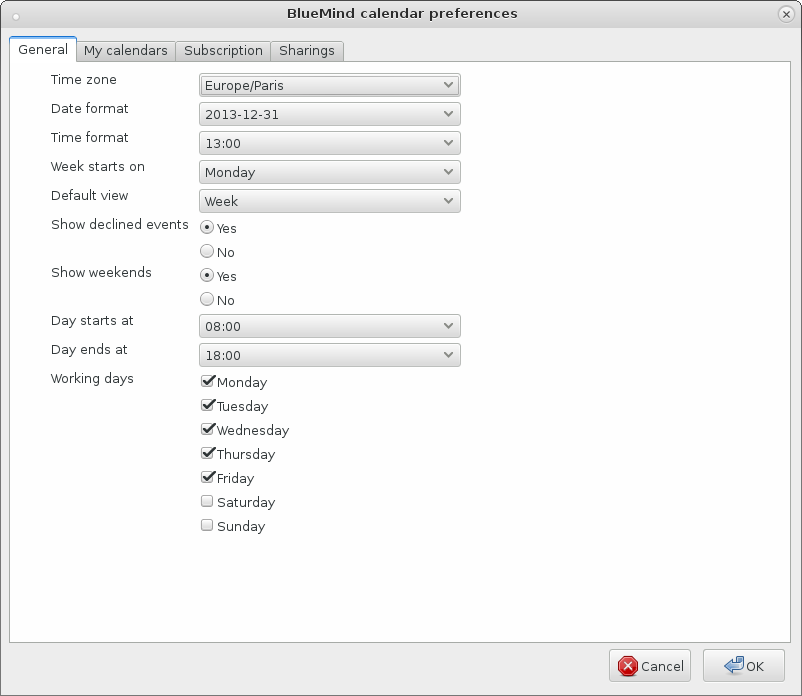
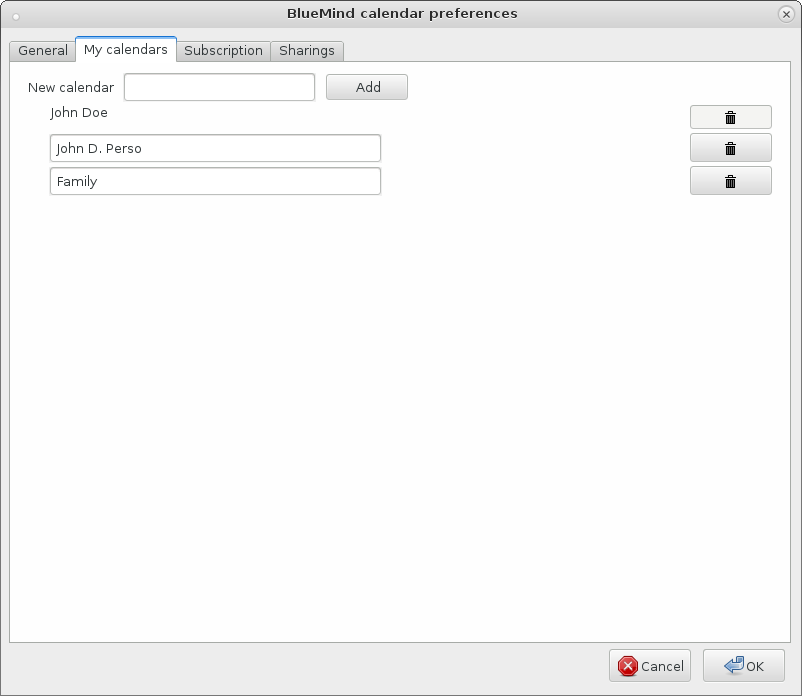
Calendar
Preferences
Calendar preferences are synchronized with BlueMind's online preferences. To access preferences in Thunderbird go to Tools (or "Edit" depending on your operating system) > Preferences (or "Options", depending on your OS) > BlueMind.
The preferences dialog box allows you to:
- Manage display preferences:
- Manage your personal calendars:
Manage subscriptions to shared calendars:
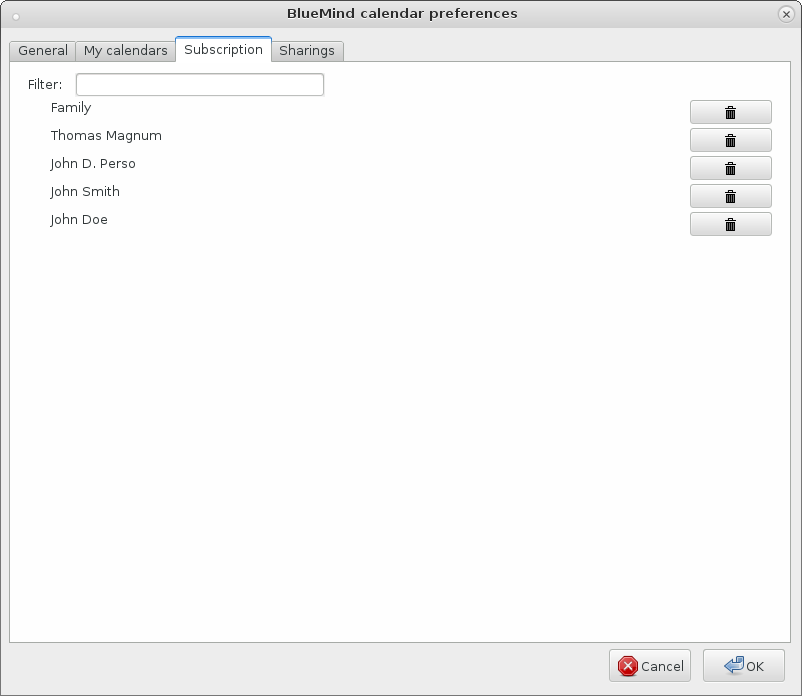
Subscriptions are synchronized with BlueMind
- To add a subscription, start to type the name in the "Filter" text field : corresponding personal and shared calendars will be proposed
- To remove a subscription, clic the trash icon
| Info |
|---|
Subscribed calendars are not automatically added to the users view in the calendar tab. As in BlueMind, you have to add them in you calendar with "Add a calendar" :
|
- Manage how you share your calendar with other users:
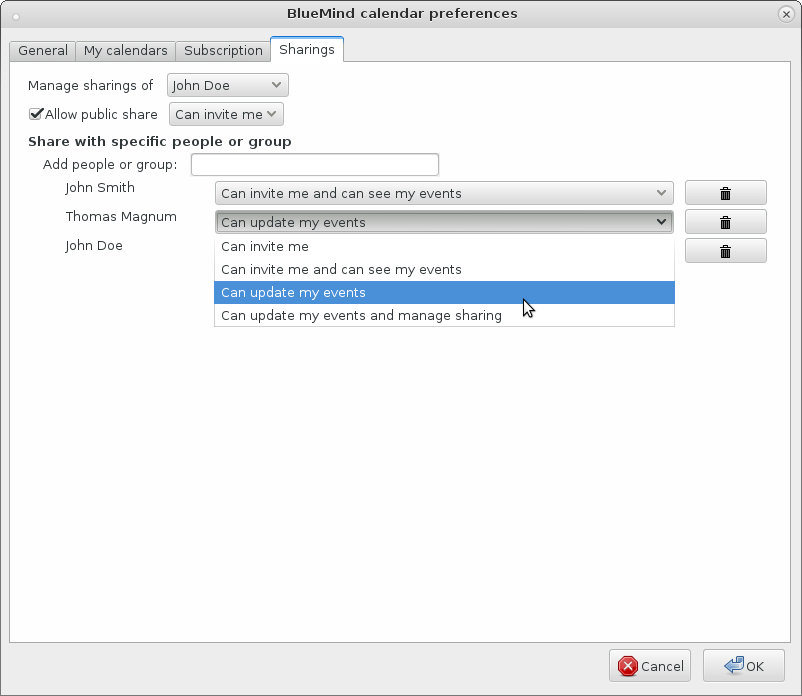
Note: autocomplete searches among all users or groups available in the domain, just like it does in the online version.
Display
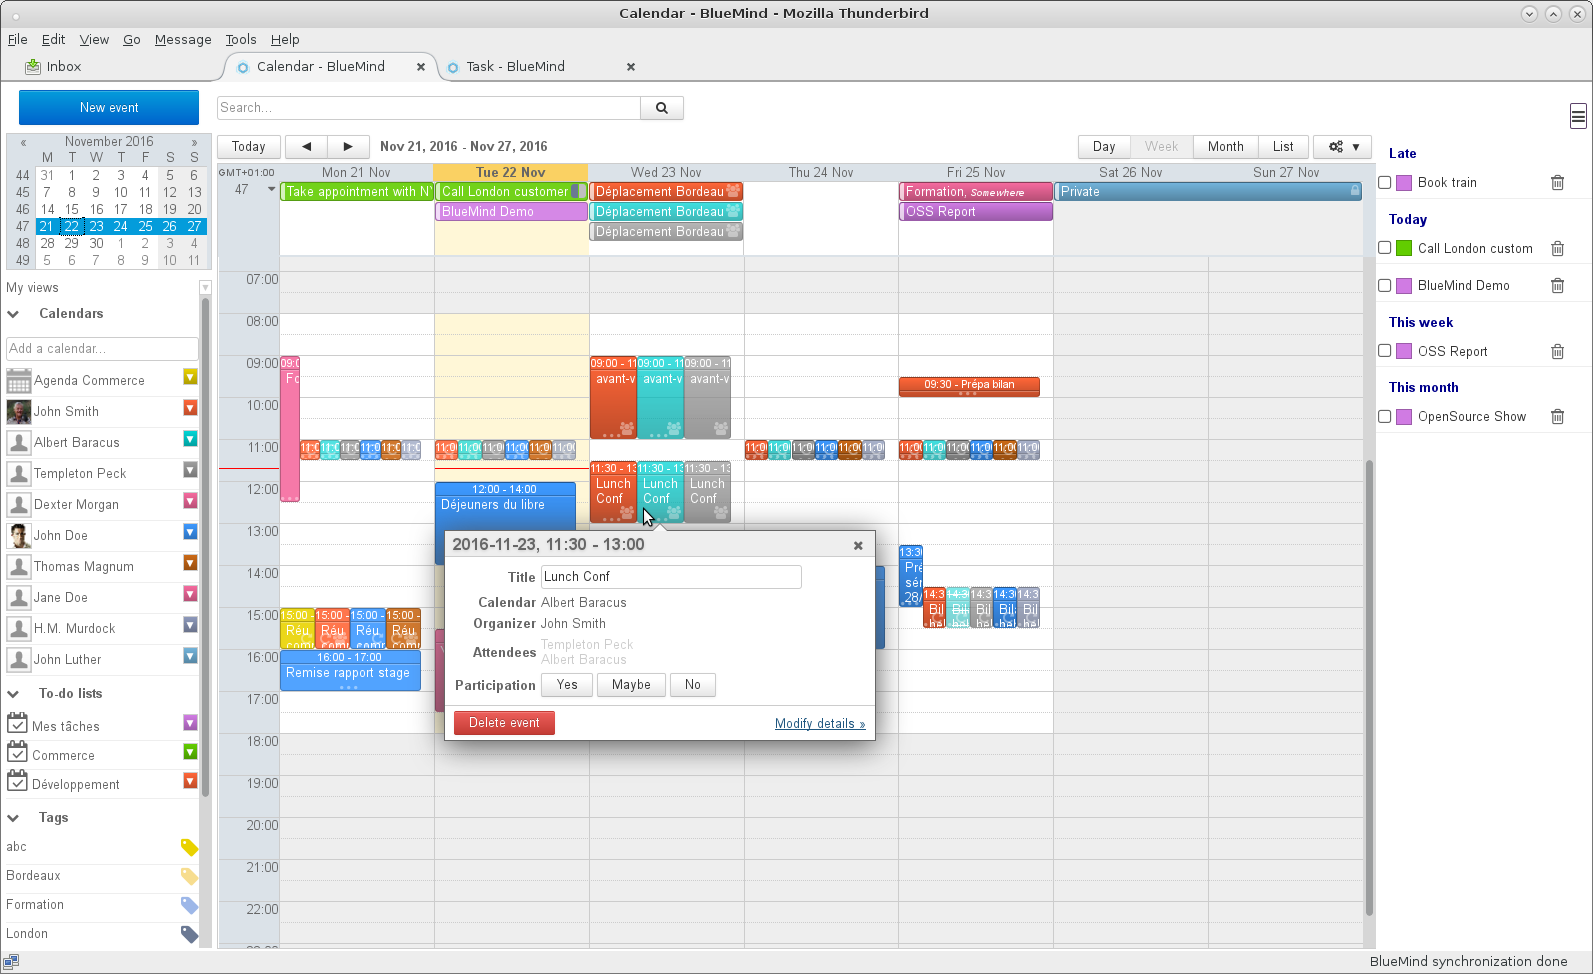
Once the connector is installed and connected, you can access the Calendar through Tools > BlueMind > Calendar or by using the new button in the main window:

It is displayed and works the same way as the online calendar:
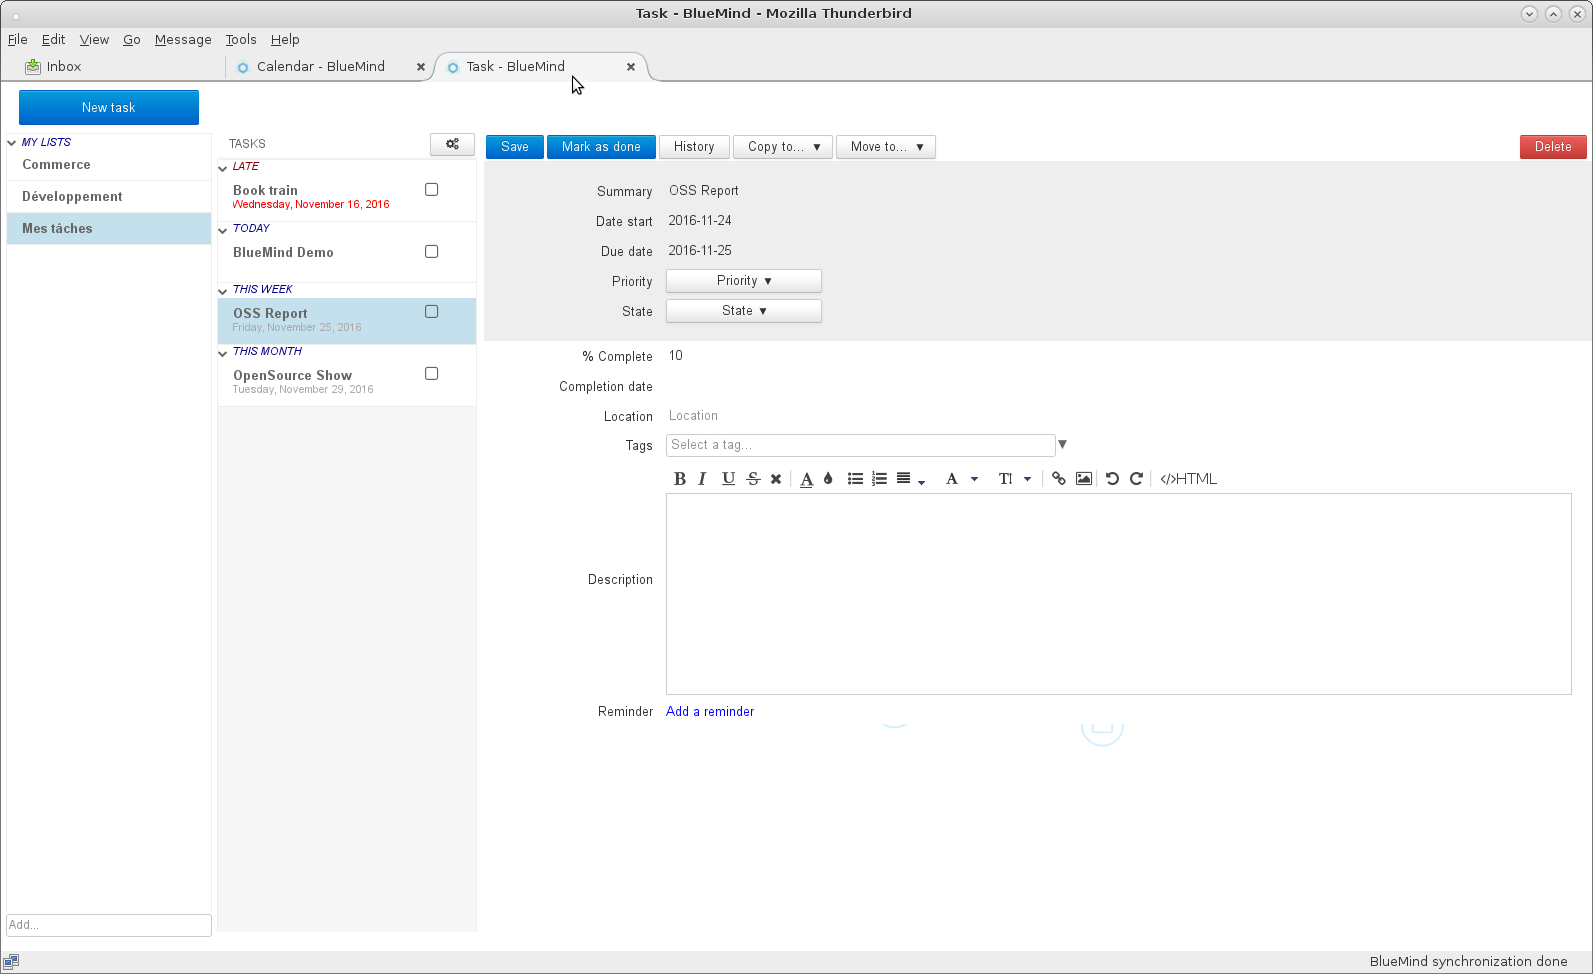
Tasks
Just like the calendar, tasks are available in a dedicated tab with the same UI as web-based BlueMind:
To find out more about how tasks work, go to the page: Tasks
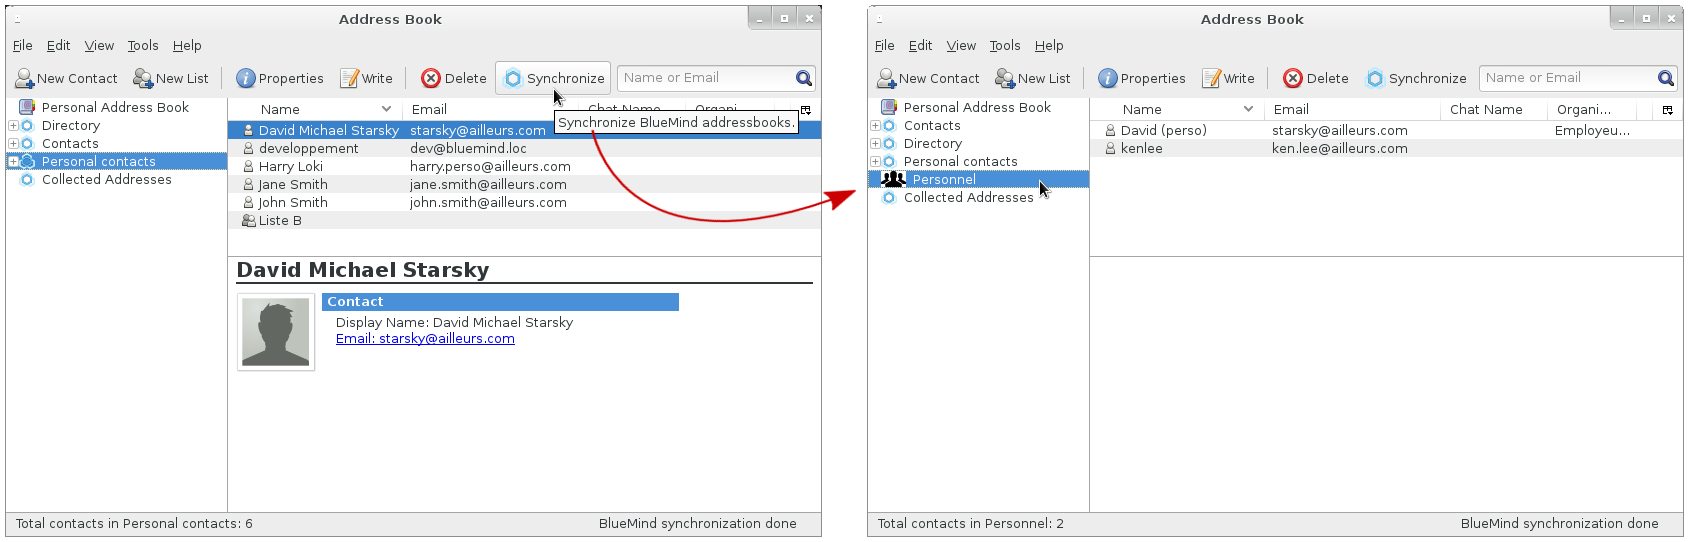
All BlueMind user address books can be synchronized with Thunderbird and accessed via the address book window (Tools > Address Book):
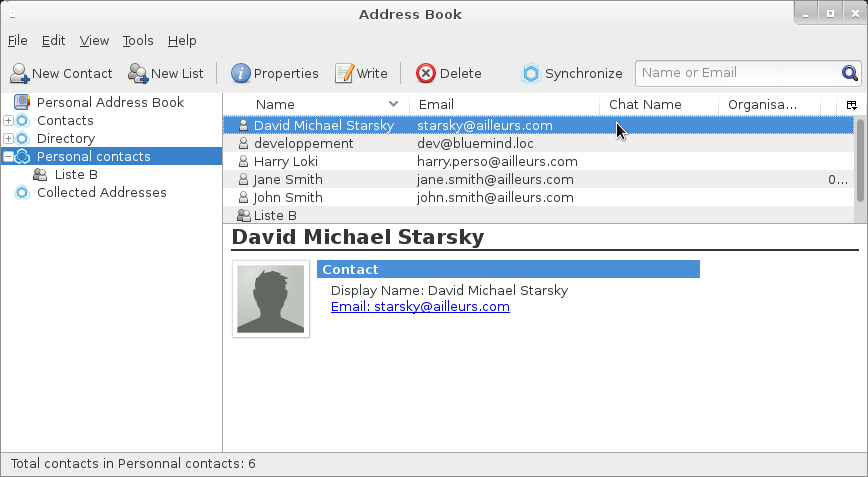
The BlueMind Thunderbird UI does not support address book subscriptions yet. To see an address book in Thunderbird, you must first subscribe to it in BlueMind, whether it is a personal address book or an address book shared by another user.
To add an address book subscription:
Once the address book is shared (by a user for a personal address book or by the administrator for a domain address book), you can subscribe to it by following the instructions described in chapters "2.3 Subscribing to an address book" or "3. Subscriptions" in the Managing adress books article:
Note: personal address books are automatically added when they are created
| Astuce |
|---|
| title | Subscriptions and Synchronization |
|---|
|
The "Synchronize" button is used to configure address book-specific synchronization. - If synchronization is enabled: the address book you can see the address book and contact cards can be viewed and are available offline
- If synchronization is disabled: the address book is identified with a different icon from other address books and contact cards can be accessed via search (address book) and autocomplete (compose messages) only
| Avertissement |
|---|
| title | Directory synchronization |
|---|
| To avoid issues with large numbers of domain users, the Directory address book for new users created from version 3.5.8 will no longer be synchronized by default. Directory synchronization will have to be enabled. |
For more information, please go to the page Gestion des carnets d'adresses - §3 Abonnements |
- Go back to Thunderbird and open the address book.
- Click "Synchronize" or go to Tools > BlueMind > Synchronize to open the address book: